Adjusting Filters
After you apply a filter to an object, the filter is represented in the following places in the Motion project window, allowing you to make adjustments:
In the Layers list, underneath the object it was applied to, where you can select the filter, turn its effect on or off, or lock it to prevent modification
In the Timeline layers list, underneath the object it was applied to, where you can select the filter, turn its effect on or off, or lock it to prevent modification
In the Timeline track area, as a purple bar underneath the blue bar of the object it was applied to, where you can select the filter and modify its timing by slipping or trimming the bar
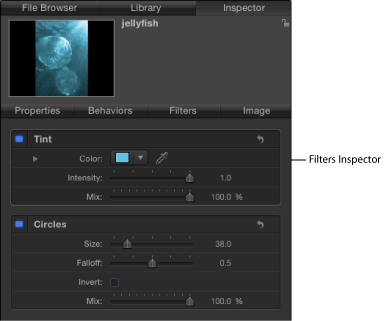
At the top of the Filters Inspector, where you can turn the filter’s effect on or off and adjust all its parameters using sliders and other controls
In the HUD, where you can adjust many filter parameters using sliders and other controls
In the Canvas, where you can manipulate the filter’s onscreen controls
The controls in the Filters Inspector give you the most precise control over the parameters of a filter. A subset of those parameter controls is available in the HUD.
Select a filter in the Layers list, Timeline, or Filters Inspector.
Adjust parameters in the Filters Inspector or HUD.
For more information about filter controls in the Layers list and Timeline layers list, see Enabling, Renaming, and Locking Filters. For more information about filter onscreen controls, see Adjusting Filter Onscreen Controls. For more information about modifying filters in the Timeline track area, see Changing Filter Timing.
You can also modify filters by adding keyframes or applying Parameter behaviors. For more information, see Keyframing Filter Parameters and Applying Behaviors to Filter Parameters.
Enabling, Renaming, and Locking Filters
Although the Filters Inspector contains editable parameters for any filter applied to an object, the Layers list and Timeline have three primary controls for each filter.
Note: When a filter is selected, it appears in the mini-Timeline. For more information on using the mini-Timeline, see Mini-Timeline.
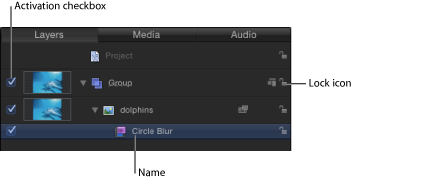
The following filter controls appear in the Layers list and Timeline layers list:
- Activation checkbox: Turns the filter on or off. Deselected filters are not rendered.
- Name: Displays the name of the filter. Customize the name by double-clicking it and entering a name.
- Lock: Locks or unlocks the filter. Locked filters cannot be adjusted.
Adjusting Filter Onscreen Controls
Many filters have onscreen controls that let you manipulate parameters visually. As you modify these controls by dragging them in the Canvas, the parameters are updated in the Inspector.
Select the filter in the Layers list or Timeline.
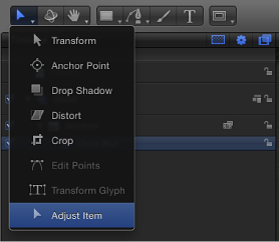
If it isn’t enabled, choose the Adjust Item tool from the pop-up menu in the toolbar.
If the Adjust Item tool is not enabled, no onscreen controls are available for the selected filter.
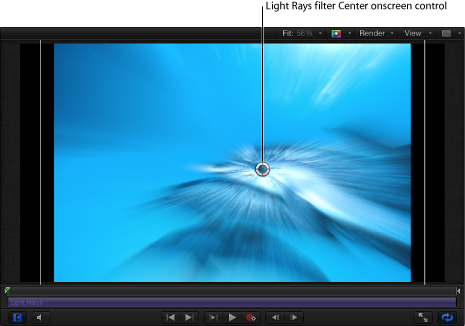
The onscreen controls appear in the Canvas.
Note: Many filter onscreen controls adjust multiple parameters. To modify one parameter at a time, use the Filters Inspector or HUD.
Types of Onscreen Controls
Several onscreen controls, such as Center, are common to many filters. However, some filters have unique onscreen controls. The following list provides examples of the types of controls available. If you’re unsure of an onscreen control’s function, drag it in the Canvas while viewing the Filters Inspector to see which parameter changes.
- Center: This is the most common filter onscreen control. Drag in the center of the circle to reposition the filter’s Center parameter.
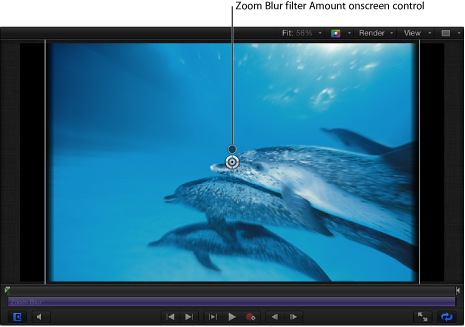
- Amount: This onscreen control has different representations, depending on the filter. In the Zoom Blur filter, drag the small circular handle (above the Center onscreen control) to adjust the Amount parameter.
In the Prism filter, drag the arrow handle inward or outward to adjust the Amount parameter. (Dragging the arrow in an arc adjusts the Angle parameter.)
- Angle: This onscreen control also has different representations, depending on the filter. In the Page Curl Filter, drag the circular middle handle to adjust the Angle parameter.
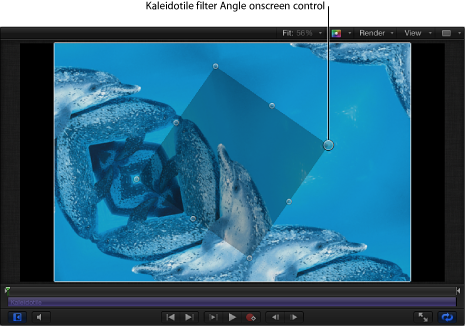
In the Kaleidotile filter, drag a corner handle to adjust the Angle parameter.
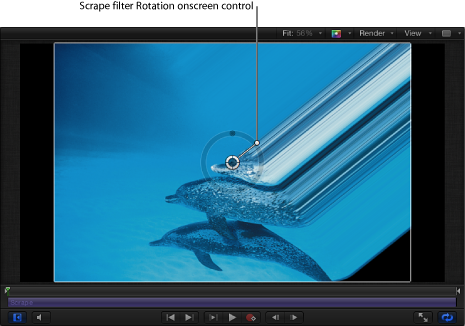
- Rotate/Rotation/Twirl: This onscreen control has different representations. In the Page Curl Filter, drag the outer arrow handle to adjust the Rotation parameter. In the Scrape, Stripes, and Target filters, drag the small outer handle to adjust the Rotation parameter.
In the Twirl filter, the small outer handle adjusts the Twirl parameter.
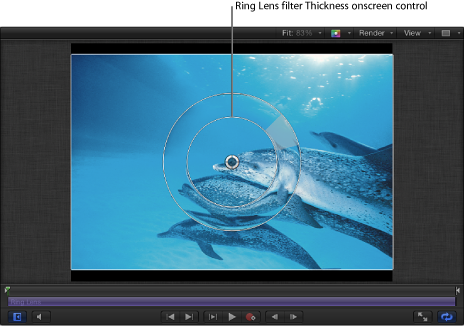
- Radius/Thickness/Size/Falloff: This onscreen control has different representations. In the Disc Warp and Circle Blur filters, drag the large ring inward and outward to adjust the Radius parameter. In the Droplet and Ring Lens filters, drag the inner ring to adjust the Radius and Thickness parameters simultaneously. Drag in the area between the inner and outer rings to adjust the Radius parameter. Drag the outer ring to adjust the Thickness parameter.
In the Vignette filter, drag the inner ring to adjust the Size parameter. Drag the outer ring to adjust the Falloff parameter. Drag in the area between the inner and outer ring to adjust both parameters simultaneously.
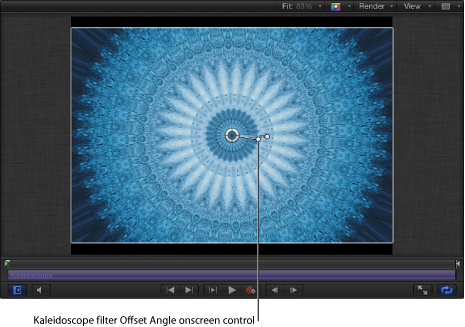
- Segment Angle/Offset Angle: This onscreen control has multiple representations. In the Kaleidoscope filter, drag the outer handle to adjust the Segment Angle parameter. Drag the middle handle (between the center and outer handle) to adjust the Offset Angle parameter.
Copying, Pasting, Moving, and Duplicating Filters
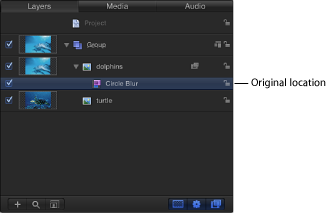
Because filters modify image layers (still images, video clips, shapes, and so on), an applied filter is attached to its target layer (or folder), nested underneath it in the Layer’s list. You can copy, paste, and move filters like any other object in Motion, but a filter must be applied to an image layer or folder containing image layers. When you cut or copy a filter in the Layers list or Timeline, the copy preserves the current state of the filter’s parameters.
Select the filter in the Layers list, Timeline, or Inspector, then choose Edit > Copy (or press Command-C).
In the Layers list or Timeline, Control-click the filter, then choose Copy from the shortcut menu.
Select the image layer or folder to apply the filter to, then choose Edit > Paste (or press Command-V).
Control-click the image layer or folder to apply the filter to, then choose Paste from the shortcut menu.
The filter is applied to the image layer or folder with its parameter settings intact.
Note: Pasting a filter does not paste it at the playhead location. To move the filter to the playhead location, press the Shift key while dragging the pasted object in the Timeline or mini-Timeline. As you approach the playhead location, the filter snaps into place.
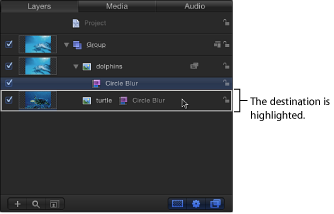
Drag the filter from its location onto another image layer or group.
When the destination layer or group is highlighted, release the mouse button.
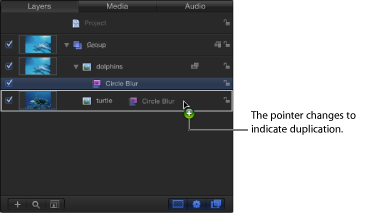
Option-drag the filter from its location onto another image layer or group.
Choose Edit > Duplicate (or press Command-D).
The duplicate appears with “copy” appended to its name. When you use the Duplicate command (or keyboard shortcut), the duplicate appears above the original filter. Drag the duplicate to another layer or group. If you leave the duplicate where it is, the filter will be applied twice to the current image layer.
Reordering Filters
Multiple filters applied to a single image layer (or folder) appear nested underneath it in the Timeline and Layers list, in the order the filters were selected in the Library. You can change the order of filter application to change how they interact.
Some filters yield better results depending on the order they are applied. For instance, never apply a color correction filter after applying a blur filter. A color correction is most effective when it acts on the original image, rather than a filtered distortion of the original image. The same holds true for chroma keying operations and any other effects process requiring unmediated color information.
Drag the filter name or icon up or down in the list.
A position indicator shows the new location for the filter.

Drag the filter name up or down in the Filters Inspector.
The filters are reordered.
Changing Filter Timing
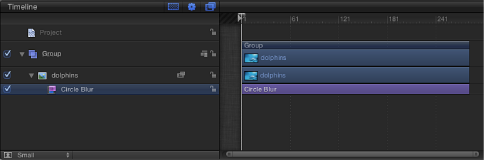
In Motion, the timing component of a filter is represented as purple a bar in the Timeline and mini-Timeline. Like other duration bars, filter timebars can be trimmed or moved (slipped) in their Timeline tracks to adjust the timing of an applied effect.
When you apply a filter to an object, the duration of the filter defaults to the length of the object it is applied to. In the following image, the purple bar represents the filter.
After you apply a filter, its duration can be modified to affect the target image for a specific amount of time. For example, applying the Circle Blur filter to an object blurs the object for the object’s entire duration. However, changing In and Out points of the Circle Blur filter bar changes how long the blur is applied to the object.
In the Timeline track area, position the pointer over the In or Out point (the left or right edge) of the filter bar to trim.
When the pointer becomes a trim pointer, drag the In or Out point to change the duration of the filter.
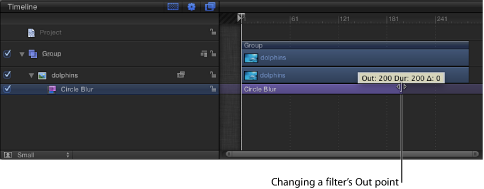
As you drag, the new In or Out point is displayed in a tooltip. Also displayed is the delta value, representing the amount of change.
In addition to changing a filter’s duration, you can also slip a filter bar’s position in the Timeline track area relative to the layer under which its nested. This allows you to set the frame where a filter begins to take effect.
Drag the filter bar left or right to move its In point (and Out point) to a new frame.
The filter is moved but its duration is unaffected. While you drag, the new In and Out points are indicated, along with the amount of change (the delta).
In the Layers list or Timeline, select the filter to trim.
Do one of the following:
To trim the filter, position the pointer over the In or Out point (the left or right edge) of the filter bar in the mini-Timeline, then drag when the pointer changes to a trim pointer.
To slip the filter, drag the filter bar in the mini-Timeline left or right to change its position in the Timeline.