Generator Parameters
The following sections describe common parameters and details of each generator.
Parameters Common to All Generators
All generators have a reset button and Width, Height, and Pixel Aspect Ratio controls, located in the Generator Inspector. The controls specific to each type of generator are discussed later in this chapter.
- Reset: A button you can click to reset the generator to its default settings.
- Width: A slider that sets the width of the generator, in pixels. Values range from 1 to the width of your project.
- Height: A slider that sets the height of the generator, in pixels. Values range from 1 to the height of your project.
- Pixel Aspect Ratio: A pop-up menu that sets the aspect ratio of the pixels drawn by the generator. Values can be selected from the following menu options: Square, NTSC D1/DV, NTSC D1/DV Anamorphic, PAL D1/DV, PAL D1/DV Anamorphic, Anamorphic 2:1, D4/D16, D4/D16 Anamorphic, HD (960 x 720, 1440 x 1080), HD (1280 x 1080), or Custom. When a value other than Custom is selected, the Pixel Aspect Ratio of that selection appears in a value field next to the pop-up menu. Enter values from 0 to 10000 in the value field. If the value does not correspond to a preset value (for example, 2 for Anamorphic 2:1), Custom appears in the pop-up menu.
HUD Controls
In general, Generator HUDs contain a subset of the larger group of controls located in the Generator Inspector. Additionally, the HUDs contain the Opacity and Blend Mode parameters.
Important: The Opacity parameter in the HUD is identical to the Opacity control located in the Properties Inspector. This slider sets the transparency of the generator as a whole. Several generators contain a separate opacity control in the Generator Inspector, which is independent of the like-named control in the Properties Inspector.
Caustics
The Caustics generator creates an animated, simulated water surface. The size, speed, refraction, brightness, and color of the Caustics pattern can be modified and animated. You can use the Caustics generator to add light patterns to a project, or as the source object for an image map.
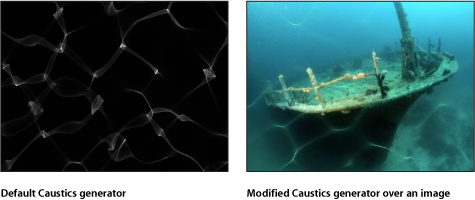
The HUD contains the following controls: Size, Speed, Refraction, Brightness, and Color.
Cellular
The Cellular generator creates an animated pattern that looks like cells moving under a microscope. You can change the color, size, and speed of the cells.
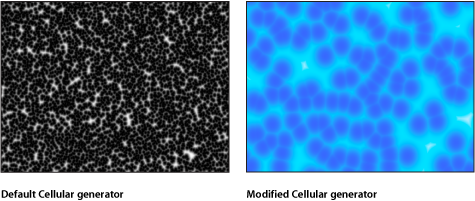
- Gradient: Sets the color gradient used for cells. For information on using gradients, see Gradient Controls.
The HUD contains the following controls: Size, Speed, and Gradient.
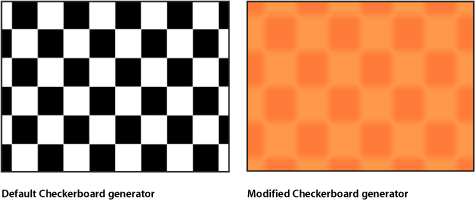
Checkerboard
The Checkerboard generator creates a static checkerboard pattern. The contrast, color, size, and position of checkerboard squares can be edited and keyframed.
- Center: Sets the center of the generator.
You can also use the Adjust Item tool to adjust this parameter using onscreen controls. For more information, see Editing Generators Using Onscreen Controls.
- Publish OSC: Selecting this checkbox ensures that if this generator is sent to Final Cut Pro X as part of a template, the onscreen controls are accessible in Final Cut Pro. For more about publishing onscreen controls and other parameters see Creating Templates for Final Cut Pro X.
The HUD contains the following controls: Color 1, Color 2, Size, and Contrast.
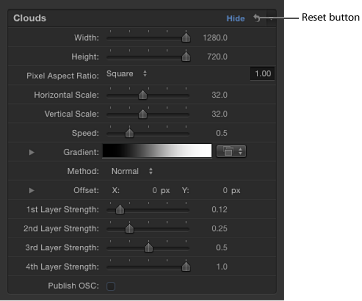
Clouds
The Clouds generator creates an animated cloud pattern. You can modify or animate the color, scale, speed, and strength of the cloud layers.

- Gradient: Sets the color gradient used for the clouds. For information on using gradients, see Gradient Controls.
- Offset: Sets the coordinates of the center of the clouds. Coordinates are calculated from the center of your object, which is the coordinate origin.
You can also use the Adjust Item tool to adjust this parameter using onscreen controls. For more information, see Editing Generators Using Onscreen Controls.
The HUD contains the following controls: Horizontal Scale, Vertical Scale, Speed, Gradient, Method, 1st Layer Strength, 2nd Layer Strength, 3rd Layer Strength, and 4th Layer Strength.
Color Solid
The Color Solid generator creates a single-colored object. You can adjust the color of the solid, as well as keyframe the color to create an animated texture of changing colors.

Note: To create and animate a small, color-filled box or shape, use the Shape tools to draw a vector-based shape rather than creating and masking a Color Solid generator. This is more efficient in terms of processor performance and workflow.
The HUD contains the following control: Color.
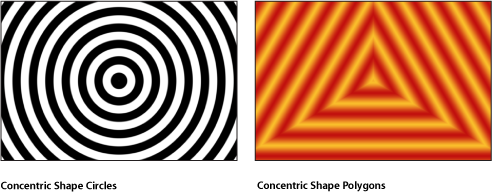
Concentric Shapes
The Concentric Shapes generator creates a repeating pattern of shapes.
- Color Type: Specifies color type. There are two choices:
- 2 Color: Creates two-color concentric shapes. When 2 Color is chosen from the Color Type pop-up menu, the Color 1, Color 2, and Contrast parameters become available.
- Gradient: Adds additional gradient parameters to the Inspector: the Gradient editor and Gradient Handling pop-up menu.
For more information on gradient editors, see Using the Gradient Editor.
- Publish OSC: Selecting this checkbox ensures that if this generator is sent to Final Cut Pro X as part of a template, the onscreen controls are accessible in Final Cut Pro. For more about publishing onscreen controls and other parameters see Creating Templates for Final Cut Pro X.
The HUD contains the following controls: Shape, Number of Sides, Rotation, Inner Cutoff, Outer Cutoff, Color Type, Color 1, Color 2, Width, Contrast, and Phase.
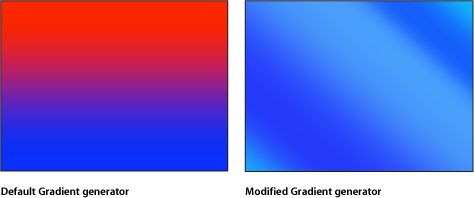
Gradient
The Gradient generator initially creates a linear gradient. You can change the gradient type from linear to radial, add and remove colors in the gradient, and change the gradient start and end points. You can save a modified gradient to the Gradient category in the Library and apply it to shapes, text objects, or particle cells. Additionally, gradient controls can be keyframed to create a moving, color-changing gradient.
- Gradient: Sets the color gradient. For information on using gradients, see Gradient Controls.
- Type: Sets the gradient to Linear or Radial. For more information on the Type pop-up menu, see Using the Gradient Editor.
- End Condition: Specifies the end condition. When Radial is chosen from the Type pop-up menu in the Gradient editor, the End Condition pop-up menu becomes available. (For more information on the Type pop-up menu, see Using the Gradient Editor.) The End Condition pop-up menu has two choices:
- Hold Last Tag: Extends the last color defined in the gradient editor beyond the gradient (defined by the Start and End parameters) to the edge of the Canvas.
- Transparent Tag: Ends the gradient at the location defined by the Start and End parameters. Because transparency is created, objects below the gradient in the project appear beyond the end of the gradient.
The HUD contains the following controls: Gradient, Type, Start, End, and End Condition.
Grid
The Grid generator creates a grid pattern made of two colored lines. By default they are white lines on a black background. Using the controls in the Inspector, you can customize the colors and line widths of the grid, and add graph paper lines.

- Offset: Sets the coordinates of the center of the grid. Coordinates are calculated from the center of your object, which is the coordinate origin.
You can also use the Adjust Item tool to modify this parameter with onscreen controls. For more information, see Editing Generators Using Onscreen Controls.
The HUD contains the following controls: Line Color, BG Color, BG Opacity, Feather, Line Width, Autofit, BG Width, BG Height, Graph Paper Lines, Graph Line Color, and Graph Line Frequency.
Lens Flare
Lens flares result from a bright light source pointed right at a lens, refracting off multiple elements in the lens assembly of a camera. This filter allows you to add a simulated lens flare to an object.
This filter can be used to simulate a bright light source in the picture.

- Center: Sets the position of the center of the lens flare.
You can also use the Adjust Item tool to modify this parameter with onscreen controls. For more information, see Editing Generators Using Onscreen Controls.
- Streak Map: An image well that displays a thumbnail of the map chosen for the streaks of the lens flare.
For information on using image wells, see Source Well.
- Publish OSC: Selecting this checkbox ensures that if this generator is sent to Final Cut Pro X as part of a template, the onscreen controls are accessible in Final Cut Pro. For more about publishing onscreen controls and other parameters see Creating Templates for Final Cut Pro X.
The HUD contains the following controls: Size, Intensity, Falloff, Color, Outer Color, Ring Color, Streak Color, Streak Intensity, Streak Count, Streak Noise Frequency, Streak Noise Level, Ring Radius, Ring Width, Glow Falloff, and Streak Map.
Membrane
The Membrane generator creates a sheer, animated sheet that appears to move gracefully about in 3D space. The speed, start and end points, offset, brightness, and color can be modified and animated. To expand the animation beyond the Canvas borders, increase the Width and Height parameters in the Inspector.

The HUD contains the following controls: Speed, Start 1–4, End 1–4, Offset, Brightness, and Color.
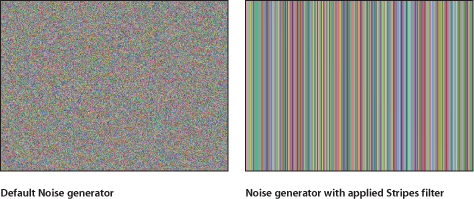
Noise
The Noise generator creates a random, colored static pattern. To make animated noise, you can keyframe the Random Seed parameter in the Noise HUD or Inspector. When filters are applied to an animated Noise generator, you can create unique textures. In the second image below, the Stripes distortion filter is applied to an animated Noise generator to create a vibrant, electric light-type texture.
- Random Seed: Because each seed value creates a different noise image, modifying this value over time yields a constantly changing noise pattern. The easiest way to see and use the Random Seed parameter is to add a Ramp behavior to it (in the Parameter behavior category), then ramp from a very small random seed value to a very large random seed value over time.
The HUD contains the following control: Random Seed.
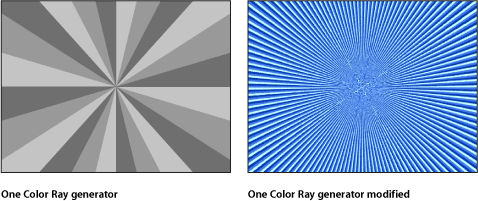
One Color Ray
The One Color Ray generator creates a ray pattern based on variations of a color. You can select the color, the degree of variance, the number of divisions represented, and the rotation of the pattern.
- Offset: Sets the coordinates of the ray pattern’s center. Coordinates are calculated from the center of your object, which is the coordinate origin.
You can also use the Adjust Item tool to modify this parameter with onscreen controls. For more information, see Editing Generators Using Onscreen Controls.
- Publish OSC: Selecting this checkbox ensures that if this generator is sent to Final Cut Pro X as part of a template, the onscreen controls are accessible in Final Cut Pro. For more about publishing onscreen controls and other parameters see Creating Templates for Final Cut Pro X.
The HUD contains the following controls: Color, Color Variance, Divisions, Sharpness, Waviness, Frequency, Phase, Inner Cutoff, and Outer Cutoff.
Op Art 1
There are three Op Art generators to help confuse your background-foreground senses. The Op Art generators create mathematically oriented patterns using a repetition of simple shapes. Although some static patterns create a visual illusion of movement, you can keyframe Op Art parameters to create moving moiré patterns.
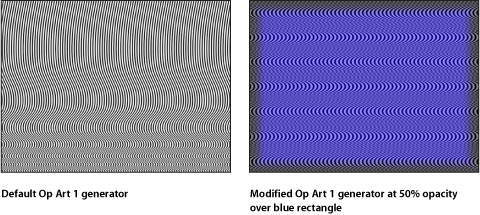
The HUD contains the following controls: Line Thickness, Color 1, Color 2, Contrast, Wavelength 1, Wavelength 2, Amplitude, and Roundness.
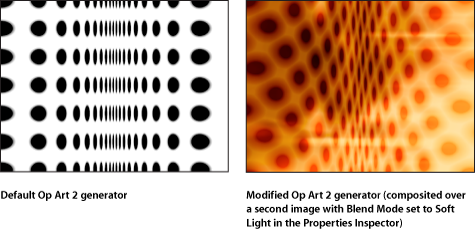
Op Art 2
This generator creates mathematically oriented patterns using a repetition of simple shapes. Although some static patterns create a visual illusion of movement, you can keyframe Op Art parameters to create moving moiré patterns.
- Background Color: Sets the color of the background.
For more information on using the color controls, see Color Controls.
The HUD contains the following controls: Scale, Angle, Dot Color, Background Color, Contrast, Dot Size, and Compression.
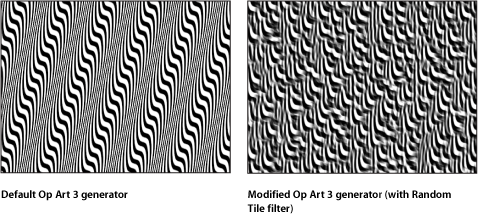
Op Art 3
This generator creates mathematically oriented patterns using a repetition of simple shapes. Although some static patterns create a visual illusion of movement, you can keyframe Op Art parameters to create moving moiré patterns.
- Color 2: Sets the second color of the generator. Click the disclosure triangle to display Red, Green, Blue, and Opacity sliders for more precise color selection.
For more information on using the color controls, see Color Controls.
The HUD contains the following controls: Line Thickness, Color 1, Color 2, Contrast, Wavelength, Amplitude, Skew, and Roundness.
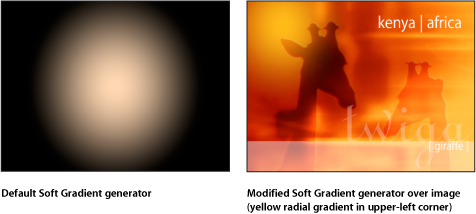
Soft Gradient
The Soft Gradient generator creates a soft-edged, radial gradient. The gradient contains an alpha channel so you can place the generator over another image in the project. You can change and keyframe the color, size, and position of the Soft Gradient.
- Center: Sets the position of the center of the gradient.
You can also use the Adjust Item tool to modify this parameter with onscreen controls. For more information, see Editing Generators Using Onscreen Controls.
- Publish OSC: Selecting this checkbox ensures that if this generator is sent to Final Cut Pro X as part of a template, the onscreen controls are accessible in Final Cut Pro. For more about publishing onscreen controls and other parameters see Creating Templates for Final Cut Pro X.
The HUD contains the following controls: Color and Radius.
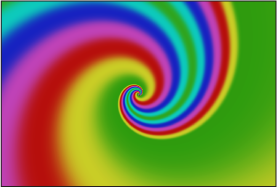
Spirals
This generator creates a repeating circular spiral pattern.

- Type: A pop-up menu that specifies whether a modern or classic spiral is created. There are two menu items:
- Modern (Linear): Creates a modern spiral pattern: The color swirls remain evenly spaced as they move toward the center of the spiral. When Modern is selected, the Scale parameter becomes available.
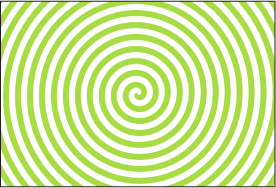
- Classic (Exponential): Creates a classic spiral pattern: The color swirls become thinner as they move toward the center of the spiral. When Classic is selected, the Tightness parameter becomes available.

- Center: Sets the center point of the generator in the Canvas. The left value slider represents X; the right value slider represents Y. To access individual X and Y controls, click the disclosure triangle.
You can also use the Adjust Item tool to modify this parameter with onscreen controls. For more information, see Editing Generators Using Onscreen Controls.
- Color Type: Specifies whether the spirals are two-color or a gradient fill.
- 2 Color: Creates two-color spirals. When 2 Color is selected from the Color Type pop-up menu, the Color 1, Color 2, and Contrast parameters become available.
- Gradient: Allows you to add colors to the spiral, creating soft transitions between colors. Spiral colors are determined by the Gradient editor. You can create a custom gradient or apply a preset gradient to the spirals.
For more information on using gradient editors, see Using the Gradient Editor.
- Publish OSC: Selecting this checkbox ensures that if this generator is sent to Final Cut Pro X as part of a template, the onscreen controls are accessible in Final Cut Pro. For more about publishing onscreen controls and other parameters see Creating Templates for Final Cut Pro X.
The HUD contains the following controls: Type, Color Type, Color 1, Color 2, Gradient, Scale, Tightness, Contrast, and Rotation.
Star
The Star generator creates a glowing star shape that contains an alpha channel. The scale, width, angle, epsilon (which fine-tunes the size of the star spikes), and opacity of the spikes can be modified and keyframed, as well as the position, color, and radius of the star.

- Center: Sets the position of the center of the star.
You can also use the Adjust Item tool to modify this parameter with onscreen controls. For more information, see Editing Generators Using Onscreen Controls.
- Publish OSC: Selecting this checkbox ensures that if this generator is sent to Final Cut Pro X as part of a template, the onscreen controls are accessible in Final Cut Pro. For more about publishing onscreen controls and other parameters see Creating Templates for Final Cut Pro X.
The HUD contains the following controls: Color, Radius, Spike Scale, Spike Angle, Spike Opacity, Spike Width, and Epsilon.
Stripes
The Stripes generator creates a default image with vertical bands of two alternating colors. You can change and keyframe the position, colors, size, and contrast of the stripes. Animate the Center parameter to make the stripes move continuously across the screen.

- Center: Sets the position of the center of the stripe pattern.
You can also use the Adjust Item tool to modify this parameter with onscreen controls. For more information, see Editing Generators Using Onscreen Controls.
- Publish OSC: Selecting this checkbox ensures that if this generator is sent to Final Cut Pro X as part of a template, the onscreen controls are accessible in Final Cut Pro. For more about publishing onscreen controls and other parameters see Creating Templates for Final Cut Pro X.
The HUD contains the following controls: Color 1, Color 2, Size, and Contrast.
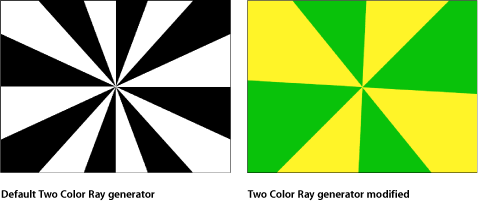
Two Color Ray
The Two Color Ray generator creates a ray pattern alternating between two colors. You can select the colors, the number of divisions represented, and rotation of the pattern.
- Offset: Sets the coordinates of the center of the ray pattern. Coordinates are calculated from the center of the object, which is the coordinate origin.
You can also use the Adjust Item tool to modify this parameter with onscreen controls. For more information, see Editing Generators Using Onscreen Controls.
- Publish OSC: Selecting this checkbox ensures that if this generator is sent to Final Cut Pro X as part of a template, the onscreen controls are accessible in Final Cut Pro. For more about publishing onscreen controls and other parameters see Creating Templates for Final Cut Pro X.
The HUD contains the following controls: Color 1, Color 2, Divisions, Rotation, Contrast, Waviness, Frequency, Phase, Inner Cutoff, and Outer Cutoff.