Gradient Controls
Most attributes that can be filled with a color can also be filled with a gradient. Like color controls, gradient controls are a group of compound settings with additional options revealed when you click the disclosure triangle.
Gradient Preset Pop-up Menu
When the gradient controls are collapsed, you can select a preset gradient from the Gradient preset pop-up menu, located to the right of the gradient bar.
Click the Gradient preset pop-up menu and choose a gradient preset from the list.
The new gradient is shown in the gradient bar and applied to the selected object in the Canvas.
Gradient Editor
To customize or modify a gradient, click the disclosure triangle in the Gradient row to expand the controls and reveal the gradient editor.
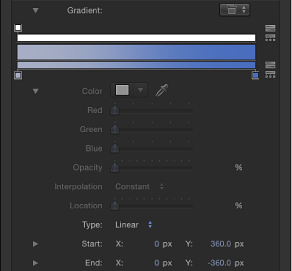
Controls in the Gradient Editor
Use the gradient editor to change the color, color position, number of colors, opacity, direction, and interpolation of a gradient. Click the disclosure triangle in the Gradient row to reveal the gradient editor, which comprises a graphical control and additional subparameter controls. The color and opacity of a gradient can be animated.
Important: This section covers common gradient editor controls. However, the gradient editor in the Style pane of the Text Inspector has an additional Angle parameter.
- Graphical controls: Three horizontal bars that let you set and preview the opacity, color, and spread of a gradient.
The narrow, white top bar (the opacity bar) controls opacity and transparency in the gradient. Adjust the spread of opacity across the gradient by dragging one of the small box-shaped opacity tags horizontally along the bar. Click in the opacity bar to add opacity tags, creating a gradient with varying levels of transparency. Delete an opacity tag by dragging it away from the color bar. Change the value of an opacity tag by selecting it and dragging the Opacity slider (described below).
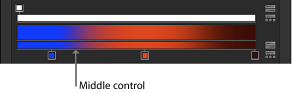
Opacity tags have a value range of 0% (completely transparent) to 100% (completely opaque). Adjust the transition between two opacity tags by dragging the middle control—a small triangle between adjacent tags, available when Interpolation is set to Continuous (described below). By default, the opacity of a gradient applied to text is 100%.
The wide middle bar shows a preview of the current gradient.
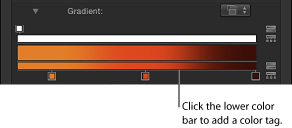
The narrow bottom bar (the gradient bar) controls color in the gradient. Adjust the spread of color across the gradient by dragging one of the small box-shaped color tags horizontally along the bar. Click in the gradient bar to add more color tags. Delete a color tag by dragging it away from the gradient bar. Change the value of a color tag by selecting it and choosing a color from the color well below, or by double-clicking the tag and choosing a color from the Colors window. Adjust the transition between color tags by dragging the middle control—a small triangle between adjacent tags, available when Interpolation is set to Continuous (described below).
Selecting a color tag activates the Color and Location controls (described below). Selecting an opacity tag activates the Opacity slider (described below). Selecting a middle control activates the Middle slider (described below).
- Color: A color well and eyedropper that sets the hue of a selected color tag in the gradient bar. For more information about color wells, see Color Well.
- Interpolation: A pop-up menu that sets the interpolation of a selected color tag or opacity tag. There are three options:
- Constant: Creates a constant color distribution from the color or opacity tag, moving from left to right in the gradient. For example, if the left color tag is set to Constant, the area of the gradient between that tag and the next one to the right is a single, solid color.
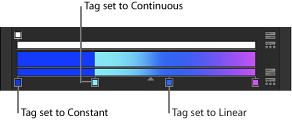
- Linear: Creates a uniform distribution of opacity or color between the tags.
- Continuous: Sets an adjustable rate of change between adjacent opacity or color tags. Adjust the rate of change by dragging a middle control in the opacity bar or gradient bar, or by dragging the Middle slider (described below).
- Start: Value sliders that set the start position of the gradient in the selected object. This parameter affects the gradient as a whole—colors and opacity. Clicking the disclosure triangle stacks the X and Y value sliders vertically instead of horizontally.
- X: Controls the X start position of the gradient.
- Y: Controls the Y start position of the gradient.
- End: Value sliders that set the end position of the gradient in the selected object. This parameter affects the gradient as a whole—colors and opacity. Clicking the disclosure triangle stacks the X and Y value sliders vertically instead of horizontally.
- X: Controls the X end position of the gradient.
- Y: Controls the Y end position of the gradient.
Using the Gradient Editor
The gradient editor is a flexible and powerful tool, allowing you to create custom styles.
Click the Gradient disclosure triangle to show the gradient editor.
To change the color of a color tag in the gradient editor, do one of the following:
Double-click a color tag.
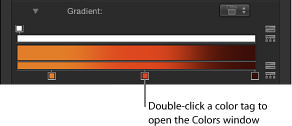
The Colors window appears. Use the Colors window to set a color for the tag.
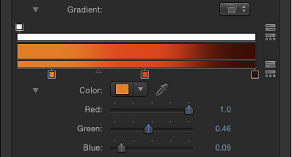
Click a color tag, click the disclosure triangle to the left of Color parameter name, then adjust the Red, Green, and Blue color channel sliders.
Control-click a color tag to display the pop-up color palette. Drag the eyedropper in the palette to select a color. Drag in the lower palette to set the tag to a grayscale color.
Click a color tag, then Control-click the color well to display the pop-up color palette.
Click a color tag, click the eyedropper tool, then click a color in the Canvas.
Click the color tag or opacity tag to move.
Do one of the following:
Drag the color tag left or right.
Use the Location slider (or adjacent value slider) to modify the position of the selected tag. A value of 100% is the rightmost position of the gradient, and a value of 0% is the leftmost position of the gradient.
Drag the small triangle between adjacent color tags or opacity tags to change the point where one tag’s effect ends and the next tag’s effect begins. The closer the middle control is to a tag, the sharper the color or opacity transition.
Note: The middle control does not appear for color or opacity tags set to Linear or Constant.
Click a tag, then choose Constant, Linear, or Continuous from the Interpolation pop-up menu.
Position the pointer in the lower gradient bar where you want to add the new color, then click.
A new color tag is added to the gradient.
Note: Although the color, opacity, and position of the tags of a gradient can be animated, the number of color tags and opacity tags cannot.
Position the pointer in the opacity bar where you want to add the tag, then click.
A new opacity tag is added to the gradient.
Until the value is adjusted, the gradient opacity is 100%.
Option-drag the tag to a position.
Drag the tag away from the gradient bar.
The tag is removed.
Click an opacity tag.
The Opacity slider is enabled.
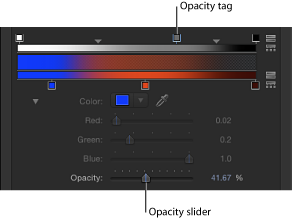
Use the Opacity slider or adjacent value slider to change the level of transparency.
The gradient transparency reflects the new opacity values.
Tip: The lower the percentage of the opacity, the greater the transparency.
Editing Color and Opacity Direction and Distribution
You can reverse the direction or evenly distribute the gradient color and opacity tags.
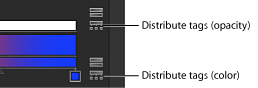
Click the Reverse Tags icon next to the opacity or color bar.
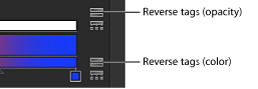
The tags are reversed.
Click the Distribute Tags icon next to the opacity or color bar.
With the shape selected and the Inspector open, click the Gradient disclosure triangle to show the gradient editor.
Use the Start and End value sliders to change the direction of the gradient.
Saving Gradient Presets
As with shape styles, after you create a gradient, you can save it in the Library.
Select the object with the gradient to save.
From the Gradient preset pop-up menu, choose Save Gradient.

In the Save Preset To Library dialog, enter the name of the gradient.
Click Save.
The custom gradient appears in the Gradients category in the Library. Custom presets can be identified in the Library by the small user badge that appears in the lower-right corner of the larger gradient icon. The gradient also appears in the Gradient preset pop-up menu.
Using Onscreen Gradient Controls
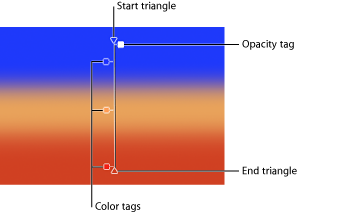
Onscreen controls provide a more interactive way to edit a gradient’s color, location and value of color tags and opacity tags, and start and end points. You can also use onscreen controls to add color tags and opacity tags, as well as change their interpolation.
In the Canvas, Control-click the object with the applied gradient, then choose Edit Gradient from the shortcut menu.
Choose the Adjust Item tool from the 2D transform tools pop-up menu.
The onscreen controls appear.
To adjust the Start X and Y position of the gradient, drag the top triangle (at the end of the gradient line).
To adjust the End X and Y position of the gradient, drag the bottom triangle (at the end of the gradient line).
To change the location of gradient colors, drag the color tags along the gradient line.
To change the location of the gradient opacity, drag the opacity tags along the gradient line.
Drag the color tag or opacity tag away from the gradient line and release the mouse button.
Double-click the gradient control line.
Control-click the gradient control line where you want the tag, then choose Add Color Tag from the shortcut menu.
Option-click the gradient control line where you want the tag.
Option-drag the tag to a position.
Control-click the tag, then drag the eyedropper in the pop-up color palette to select a color. As you drag over the color spectrum, the gradient color is actively updated.
Control-click the gradient control line where you want the tag, then choose Add Opacity Tag from the shortcut menu. By default the tag is set to 100% opacity.
Option-Shift-click the gradient control line at the location where you want the tag.
Control-click the tag, then drag the eyedropper in the pop-up palette to set an opacity value for the tag. White represents more opaque values; progressively darker levels of gray represent decreasing opacity; and black represents complete transparency. As you drag over the spectrum, the gradient is actively updated.
Control-click the gradient control line next to the tag, then choose Constant, Linear, or Continuous from the Color Interpolation submenu.
Control-click the line next to the tag, then choose Constant, Linear, or Continuous from the Opacity Interpolation submenu.
Control-click the gradient control line, then choose Reverse Color from the shortcut menu.
Control-click the gradient control line, then choose Reverse Opacity from the shortcut menu.
Control-click the gradient control line, then choose Distribute Color from the shortcut menu.
Control-click the gradient control line, then choose Distribute Opacity from the shortcut menu.
Control-click the gradient control line, choose Presets from the shortcut menu, then choose a preset style from the submenu.