Synchronization Project Settings
Synchronization project settings consist of the following four tabs: General, Audio, MIDI, and Unitor.

Choose File > Project Settings > Synchronization (or use the Open Synchronization Project Settings key command, default assignment: Option-Y).
Click the Settings button in the Arrange toolbar, then choose Synchronization from the pop-up menu.
Control-click the Sync button in the Transport bar, then choose Synchronization Settings from the shortcut menu.
General Synchronization Settings
The General pane of the Synchronization project settings offers the following synchronization parameters, which are used when running Logic Pro as a slave.
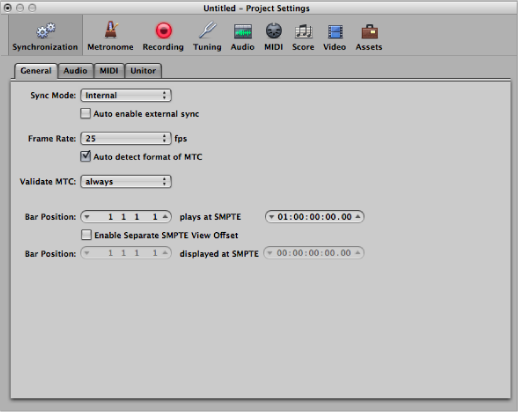
- Sync Mode pop-up menu: This parameter defines the master (time code type) that Logic Pro is synchronized to:
- Internal: The internal timer of Logic Pro. Logic Pro is the master. External devices can be synchronized via MIDI Clock or MTC. (The relevant settings are made in the MIDI pane.)
- MTC: MIDI Time Code mode. Logic Pro runs as a slave. MIDI time code can either arrive at a MIDI In port, or be generated by a MIDI interface that translates it from incoming SMPTE time code (the Unitor8, for example).
- Manual: Tempo Interpreter mode. Logic Pro runs as a slave to impulses that are recognized as valid beats by the Tempo Interpreter. The Tempo Interpreter can be controlled by MIDI events, or a key on the computer keyboard. See Using the Tempo Interpreter Window.
- “Auto enable external sync” checkbox: When this option is activated, Logic Pro runs as the master (Internal sync mode), until it receives a synchronization signal—either in the form of MTC, or from the Tempo Interpreter.
Logic Pro automatically locks to the first synchronization signal it receives.
Important: Ensure that different synchronization signals don’t arrive simultaneously—remember that there can only be one time code master.
- Frame Rate pop-up menu: Choose the frame rate (in fps, frames per second). This frame rate applies to both transmitted and received time code.
Note: In drop frame formats, certain frames are left out. (This follows a regular pattern.) To distinguish between formats, those without dropped frames are sometimes referred to as “nd” or “non drop.”
- 24 fps: Film, high definition video
- 25 fps: PAL video/television broadcasts
- 30 fps (drop frame): NTSC video/television broadcast; rarely used
- 30 fps: High definition video; early black-and-white NTSC video; older rate that is rarely used today
- 29.97 fps (drop frame): NTSC video/television broadcasts
- 29.97 fps: Standard definition NTSC
- 23.976 fps: 24 fps running at 99.9%, which facilitates easier transfer of film to NTSC video
- “Auto detect format of MTC” checkbox: This checkbox, when active, analyzes the incoming time code and automatically sets the correct frame rate. You should generally leave this option selected.
Note that it is not possible to automatically distinguish between the 29.97 and 30 fps MTC frame rates:
The MTC standard does not allow a distinction.
A measured rate of 30 fps could also be 29.97 fps time code running too fast, and vice versa.
Logic Pro automatically interprets frame rates of “approximately 30 fps” as either 29.97 (drop frame) or 30 fps (non drop), depending on whether or not the drop frame format is used. This interpretation will usually be correct, because these two formats are used as a standard.
The “Auto detect format of MTC” option only switches to 29.97 (drop frame) or 30 fps (non drop) if one of the other conventional formats was previously set. If you want to synchronize Logic Pro to one of these unconventional frame rates, you need to define the format manually. This setting will not be altered by the “Auto detect format of MTC” function.
- Validate MTC pop-up menu: The Validate MTC pop-up menu allows you to specify how often Logic Pro checks for incoming time code, in order to ensure synchronization integrity. In general, you should leave this option on the “always” setting.
There are some devices that generate time code pulses that may require a specific number of frames to be set, in order to maintain synchronization. The “never, Jam Sync” setting basically sets Logic Pro to free-wheel if the synchronization signal is lost. In other words, Logic Pro will run on its own internal clock (at the most recently received tempo) if the synchronization pulse is lost. This approach ensures that recording will continue, even if the incoming timing pulse fails.
- SMPTE Offset (Top Bar Position Row): This is where you set the SMPTE offset for the project. As songs don’t always need to start precisely at bar 1, you can select any bar position to be played at the set SMPTE time.
The default is Bar Position: 1 1 1 1 plays as SMPTE 01:00:00:00.
The SMPTE offset of 01:00:00:00 (one hour) is normally used, because it allows you to pre-roll an amount of time code.
- SMPTE View Offset (Lower Bar Position Row): These fields become available if you select the Enable Separate SMPTE View Offset checkbox. Choose Bar Position 1 1 1 1 displayed as SMPTE 00:00:00:00 (preset). If necessary, you can set other view offset values here.
The Tempo List always shows the real SMPTE time, never the SMPTE View Offset. The SMPTE View Offset is used in all other windows (including the Transport bar).
Tip: It is common practice in many video (and audio) post-production houses to set a one-hour SMPTE offset (01:00:00:00). This avoids a problem commonly referred to as midnight, where a pre-roll passes through SMPTE time 00:00:00:00, which causes issues with some tape machines (such as the ADAT).
Audio Synchronization Settings
Use the parameters in the Audio pane of the Synchronization project settings to keep your audio and MIDI tracks synchronized.
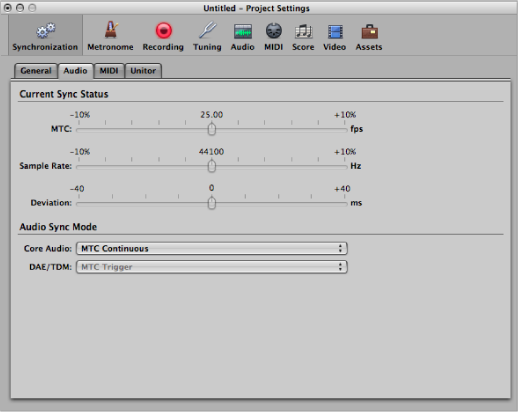
- MTC slider: This real-time display shows the deviation between the incoming MTC and its nominal frame rate. If the deviation is significant, make sure that the right frame rate is set in the General pane of the Synchronization project settings. If in doubt, set the frame rate to 24 fps and select “Auto detect format of MTC.” If the frame rate is correct, you can use this display to adjust the tape speed of the master machine to the nominal value (the same speed used when the time code was recorded). Adjust the varipitch control on the master machine, until the slider is centered.
- Deviation slider: This display shows the current phase deviation of the Word Clock from the time code master—in other words, the deviation between audio and MIDI. Varying time code signals shown in this display indicate how Logic Pro regulates the sample rate of the hardware when in MTC Continuous sync mode. Even large time code variations result in no deviation between audio and MIDI synchronization. Your audio hardware must be capable of continuously variable sample rates for this to function. Small deviations between audio and MIDI are unavoidable, because MIDI can (and should) follow the time code master directly.
Note: The real-time sample rate conversion feature of Logic Pro allows it to follow an external MTC signal (MTC Continuous), while maintaining the correct audio playback pitch and speed. This feature even works when recording in MTC-slave mode.
- Core Audio pop-up menu: This is where you define how your Core Audio hardware is synchronized to an external time code master.
- MTC Continuous: Audio regions are started in sync, and the sample rate is continuously regulated to match variations in the time code master signal. Even very long audio regions stay in sync in this mode.
- MTC Trigger + Auto Speed Detection: Similar to MTC Trigger (see below), but the tempo of the time code master is constantly monitored while Logic Pro is open. The next time you start Logic Pro, it will use an adapted sample rate. This mode keeps long regions in better sync with the time code master, although not as closely as MTC Continuous. It does, however, use a constant sample rate, which is not affected by variations in the time code master signal.
- MTC Trigger: Audio regions are started in sync, but are then played at a constant sample rate, regardless of any variations in the time code master signal. Logic Pro always uses the set nominal sample rate (44.1, 48, 88.2, 96, 192 kHz). This mode is suitable when it is vital to retain the absolute pitch of a recording. If the speed of the time code master deviates from the nominal value, you may need to split long audio regions into shorter sections.
- External or Free: Logic Pro has no influence on the sample rate. The audio hardware is responsible for ensuring that the position and sample rate of audio regions match. This mode is only advisable if you are sure that the Word Clock and time code master are running in sync—by using an external SMPTE or Word Clock synchronizer, for example.
MIDI Synchronization Settings
The MIDI pane configures Logic Pro to send time code via MIDI, when it is in playback or record mode. This pane lets you synchronize external slave devices to Logic Pro, which acts as the master.
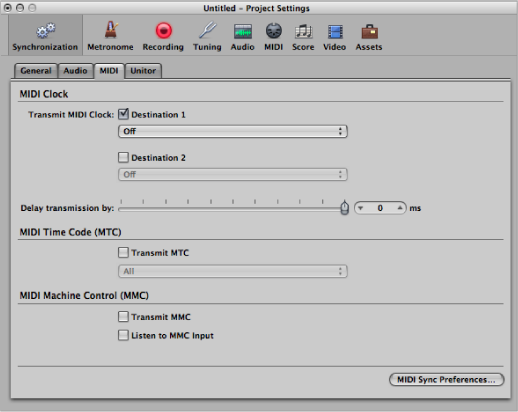
- Transmit MIDI Clock: Destination 1 checkbox: Allows you to activate MIDI Clock transmission.
Every time you start, a Song Position Pointer (SPP) message is also sent. Because not all devices can process SPP, the MIDI system real-time Continue message is also sent. The exception is when you start at position 1 1 1 1. In this situation, the real-time Start message is sent.
MIDI Clock can easily be sent with other normal MIDI events (notes and controllers, for example). When using multi-port MIDI interfaces (such as the Unitor8), better timing is achieved by sending MIDI Clock to All ports, rather than to several individual ports.
If MIDI Clock is transmitted to all ports, the events are only sent once from the computer to the interface. If you address individual ports, one event needs to be sent for each port, placing a higher strain on the bandwidth of all ports.
- Transmit MMC checkbox: Select this checkbox to enable transmission of MIDI Machine Control (see MIDI Machine Control). These commands are then sent whenever you operate the transport functions (Start, Stop, Rewind, and so on) of Logic Pro.
MMC is normally used when Logic Pro is running as a slave to an external master (such as an ADAT), and you want to control the external master’s transport functions from Logic Pro. Logic Pro therefore acts as MMC master and MTC slave simultaneously. If you want to use the external master’s transport controls, you don’t need to use MMC. In this situation, Logic Pro follows the MTC master as a slave. You can also use MMC to place tracks on the MMC slave device into Record-Enabled mode.
- Listen to MMC Input checkbox: Select this checkbox to control Logic Pro by MMC (MIDI Machine Control) and so-called Full Frame Messages.
Logic Pro recognizes these commands when listening to MMC Input:
Play
Deferred Play
Stop
Deferred Play is a special command for mechanically slow synchronization slaves such as reel-based tape recorders. Rather than having the machine play immediately, it is asked to reach the desired SMPTE position before playback is started. There is no noticeable difference in the response of Logic Pro to the Play and Deferred Play commands, as Logic Pro can locate to any position almost instantly.
Logic Pro ignores these messages when incoming external MTC (MIDI time code) commands are detected.
Logic Pro also obeys Full Frame Messages, and sets the playhead to a new location, without starting playback. Once again, incoming MTC data has higher priority, if conflicting information is received.
Some synchronizers send Full Frame Messages (instead of MTC) to locate the slave device (Logic Pro in this case) to a new position, without implicitly starting playback. This is useful when in Slow Shuttle or Single Frame Advance mode with video machines, because the slave device is perfectly located, without being in playback mode.
- MIDI Sync Preferences button: The MIDI Sync Preferences button opens the Sync pane of the MIDI preferences. (See MIDI Preferences in Logic Pro.)
Unitor Synchronization Settings
The Unitor pane of the Synchronization project settings is used to set the major synchronization parameters for the Unitor8 MIDI interface.
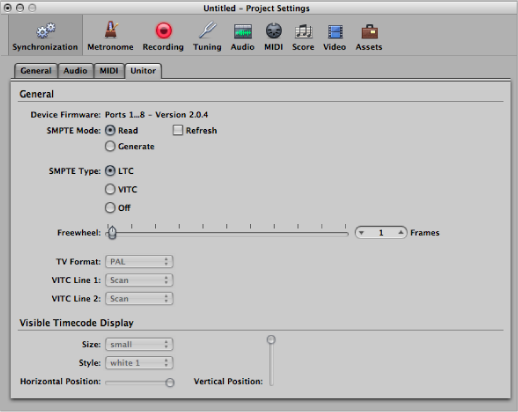
- SMPTE Mode Refresh checkbox: Activates Refresh mode, where fresh time code is generated, in sync with received time code. Refresh mode works with both VITC and LTC (see below). You should always use Refresh mode whenever you need to copy an LTC track, because you cannot directly copy LTC without a considerable loss of quality. When copying entire multitrack tapes, you should patch all tracks directly, but refresh the time code track via the Unitor8.
Note: You should only use Refresh mode if you are copying time code.
- Freewheel slider: You can set the freewheel time (in frames) for LTC and VITC. The freewheel parameter affects the SMPTE reader, and specifies how long the synchronizer continues transferring MTC to the sequencer, after time code ceases to be read.
Long freewheel times can maintain synchronization, even if there are dropouts in the time code, but they also increase the reaction time of Logic Pro after the time code master stops. In practice, you should set a value that is as large as necessary (for sustained operation), and as small as possible (to reduce waiting times).
- VITC Line 1 and VITC Line 2 pop-up menus: VITC is written into two lines of the video picture, which are normally invisible. The lines should not be adjacent, and are usually situated between 12 and 20.
If the Scan option is enabled, the VITC lines are automatically recognized. You should only enter the lines manually if there are problems with Scan mode.