Using the Tempo Interpreter Window
You can use the computer keyboard or incoming MIDI events to set the project tempo. Put another way, Logic Pro will chase a manual synchronization signal (also known as human sync). This method of synchronization is fairly loose, in that if the manual sync impulses stop coming in, Logic Pro continues at the last tempo it received.
You use the Tap Tempo command to generate tempo timing events, by literally tapping a computer or MIDI keyboard key.
Choose Manual in the Sync Mode pop-up menu of the File > Project Settings > Synchronization > General pane.
Select the “Auto enable external sync” checkbox (on by default) in the Project Settings > Synchronization > General pane.
If Logic Pro “hears” a Tap Tempo command, it automatically follows this tempo.
The parameters that control how Logic Pro responds to tap tempo commands can be found in the Tempo Interpreter window.
Choose Options > Tempo > Tempo Interpreter (or use the Open Tempo Interpreter key command).
Control-click the Sync button in the Transport bar (if visible), and choose Open Tempo Interpreter from the shortcut menu.
Note: Only the selected software instrument track, and all external MIDI tracks, can play when the Tempo Interpreter window is open.
The following parameters are in the Tempo Interpreter window.
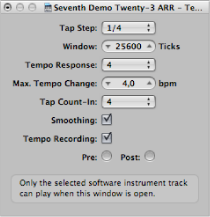
- Tap Step: This parameter sets the note value that Logic Pro assigns to manual taps. You will achieve the best results with larger, rather than smaller, values. 1/4 note usually works well.
- Window: This parameter determines the time span (or window) that tap notes can be entered (set in ticks, or 1/3840 note). Only taps made within this time window are used to determine the tempo. Any taps outside it are ignored.
The narrower the window, the more effectively Logic Pro is able to withstand the influence (on the tempo) of any taps that fall between the note values—set with the Tap Step parameter.
The larger the window is set, the easier it becomes to create drastic tempo changes.
If you set the window parameter to 0, the tap window disappears altogether, and all taps are accepted as tempo-determining information. Logic Pro also comes to a halt, if taps are not generated.
- Tempo Response: This parameter sets the sensitivity to tempo changes: the larger the value, the greater the sensitivity. You should set this value to 4, for most situations. If you find that your tap timing is imprecise, but want Logic Pro to play at a relatively constant tempo, reduce this value to 2 or so.
- Max. Tempo Change: Use this parameter to set the maximum tempo change possible per tap (in bpm). To obtain the most regular, or even tempo curve, follow this rule: set the smallest possible value (in other words, only as large as necessary).
- Tap Count-In: This sets the number of taps used as a count-in. Logic Pro starts following the tempo on the first tap after the count-in taps.
- Smoothing: Turning on this function smooths out jumps in tempo, resulting from incoming taps (which could prove useful when using Logic Pro live). You should turn it off if you want Logic Pro to follow your taps precisely and quickly.
- Tempo Recording: The Tempo Recording function creates a tempo list that follows your taps, when in record mode. This Option should normally be turned off.
- Pre and Post: These are the ways your tap signals are displayed:
- Pre: Displays every incoming tap.
- Post: Displays every accepted tap that occurs within the time window (as defined by the Window parameter), or close to, or on, a tap step.
The Pre/Post tap signals flash yellow if the taps are within the allowed range, and red if they are out of range.