MIDI Machine Control
MMC is a set of MIDI commands that Logic Pro uses to control the transport functions of any MMC-capable tape machine. The recording process can also be controlled and automated from Logic Pro via MMC. This tape machine then provides the SMPTE signal that Logic Pro uses as a synchronization source (with Logic Pro as the slave).
You can control connected devices from Logic Pro by using the normal transport functions (including direct positioning and cycle jumps). Don’t forget that Logic Pro needs to wait for the connected device to finish rewinding or forwarding. If MIDI Machine Control is enabled, dragging the playhead will send MMC Locate commands continuously, until the mouse button is released.
Control-click the Transport bar Sync button and choose the MIDI Machine Control (MMC) setting in the shortcut menu.
Choose File > Project Settings > Synchronization, and choose the Transmit MMC option in the MIDI tab.
Logic Pro supports up to 64 MMC tracks, allowing devices such as the Alesis ADAT to be operated via MIDI machine control.
Each arrange track can act as a tape (control) track, by selecting an instrument with the tape deck icon (#305).
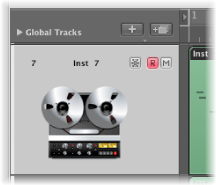
You only need to create one instrument with the tape deck icon, and you can then assign that same instrument to as many tracks as needed, to control your external recorder. It’s a good idea to group these tracks together in their own folder. These tracks must be placed at the top of the Arrange window track list. If you pack them into a folder, this must be the first track in the list.
The tape deck icon is the only icon that actually affects the way an object behaves. All other icons are purely graphical in nature.
If the tape track is the current record track, the following functions apply:
Selecting the tape track switches the corresponding track on the tape machine to record ready, and deactivates the record ready status of any other tracks. To select several tracks for recording, use Shift when clicking.
The Record button in the Transport bar sends the record strobe command to the tape machine. This also puts Logic Pro into MIDI record mode, and sends an MMC Play command to the tape machine. Logic Pro doesn’t start until it receives time code back from the MMC device.
If you use the Autopunch function, the tape machine goes into record mode at the punch in locator, and stops recording at the punch out locator positions.
If you click any track—not just a tape track—while holding down Control-Shift, you can individually toggle the record ready status for each track of the tape machine (selected tracks are switched on, and unselected tracks are switched off). Control-clicking a track switches all other tracks out of record ready mode. If the current record track was assigned a tape deck icon (see above), you must not use the Control modifier.
The Record Toggle key command is used to toggle record status, if a tape track is the currently selected record track.
Following an MMC-controlled recording, Logic Pro automatically creates an empty MIDI region on the tape track. This is to let you know that a recording has taken place on the tape machine. This applies to all MMC recordings, including those controlled by the Autopunch function. If you activate several tape tracks (by Shift-clicking), the corresponding number of regions are created. If a MIDI region with an identical start point already exists on a tape track, no new MIDI region is created on that track. This avoids overlapping regions.
A double stop command sets the project back to the beginning.
The MMC Record buttons also offer you a simple way to arm tracks on your tape machine with Logic Pro (see MMC Record Buttons Objects).
You should finish all MMC-controlled recordings with Stop or Space. Some tape machines react differently to a series of MMC Record commands. Sometimes, this can result in Logic Pro showing a track as recording, when the tape is actually playing back (or even worse, the opposite situation). As such, you should always finish a recording with Stop or Space, just to be on the safe side.