Creating and Editing Note Events in the Piano Roll Editor
Handling note events in the Piano Roll Editor is very similar to region handling in the Arrange area. Many of the same techniques used to lengthen, cut, and move regions apply to note events.
Snapping Edits to Time Positions in the Piano Roll Editor
You move and resize events in the Piano Roll Editor because you want them to start and end at a specific point in time.
Logic Pro offers a snap feature that automatically aligns event start and end points to a selected grid value, when you move or resize them.
Choose one of the following values in the Snap menu at the top of the Piano Roll Editor:
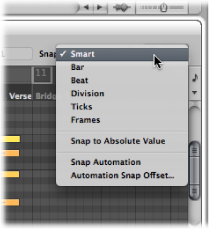
- Smart: Edit operations snap to the nearest bar, beat, sub beat, and so on, depending on the current Bar ruler division value and the zoom level.
- Bar: Edit operations snap to the nearest bar.
- Beat: Edit operations snap to the nearest beat in a bar.
- Division: Edit operations snap to the nearest division (this is the time signature shown in the Transport bar and Bar ruler).
- Ticks: Edit operations snap to the nearest clock tick (1/3840th of a beat).
- Frames: Edit operations snap to the nearest SMPTE frame.
The Snap functionality is relative, which means that the edit operation is snapped to the nearest bar, beat, and so on—retaining the event’s distance from its original position. For example, if an event is placed at position 1.2.1.16, and you move it to around bar 2 (with the Snap menu set to Bar), it automatically snaps the event to position 2.2.1.16—rather than 2.1.1.1 (the bar 2 start point). You can override relative snaps with the Snap to Absolute Value option.
Choose the Snap to Absolute Value setting in the Snap menu.
A tick appears to the left of the setting when it is chosen. This feature works in conjunction with the chosen snap grid format.
To explain, if Bar is chosen in the Snap menu, when Snap to Absolute Value is active, moving an event (from position 1.2.1.16) to around bar 2 results in it being snapped to position 2.1.1.1 (the bar 2 start point), rather than its relative position (2.2.1.16).
The Snap menu setting applies to the following edit operations:
Moving and copying events
Resizing events
Cutting events
Moving, adding, and resizing markers
Setting cycle boundaries
You can temporarily override the snap grid, allowing finer edits and adjustments.
Hold Control while performing the editing operation.
The division value chosen in the Transport bar (1/16, for example) determines the editing grid scale.
Hold Control-Shift while performing the editing operation.
The editing grid switches to ticks.
Selecting Notes in the Piano Roll Editor
You must select note events before you can edit them. The usual selection methods—clicking, Shift-clicking, and dragging with the Pointer tool—also apply to the Piano Roll Editor.
The following selection options—unique to the Piano Roll Editor—are also available:
Click the corresponding key of the onscreen keyboard.

This is similar to selecting all regions on a track lane, by clicking the track name.
Click-drag over the key range of the onscreen keyboard.
All MIDI notes that fall within this pitch range are selected.
The info display shows the number of selected notes. The MIDI region name is shown beside the number of selected notes. For example, 3/Piano means three notes are selected from a MIDI region called Piano.
When you select multiple overlapping notes, the info display shows the chord name.
When no notes are selected, the info display shows the name of the most recently selected MIDI region.
Creating Notes in the Piano Roll Editor
You will often create note events with the mouse in the Piano Roll Editor, to replace a deleted note or to add a note to a chord or region. This feature is also handy when a keyboard is unavailable, or even when one is available, because it’s faster to insert a note with the mouse.
You can also create note events with your computer keyboard. For details, see Using the Step Input Keyboard.
Control-click (or right-click) the Piano Roll Editor background, then choose Create Note from the shortcut menu.
Select the Pencil tool, and click a position in the Piano Roll Editor background.
A MIDI note is created at the clicked position, with the note’s channel, velocity, and length values matching that of the previously created or edited note event. The default values when you start a new project are MIDI channel 1, velocity of 80, and length of 240 ticks.
Note: If using the Pencil tool to create a note event, you can change note length on-the-fly; simply hold down the mouse key and drag to the left or to the right.
Drag to the right or left with the Pencil tool.
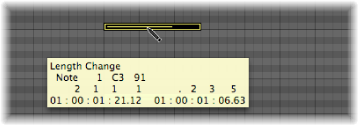
A help tag indicates the length change in real time.
Finer adjustments can be made by holding down Option or Control while altering the note length (see Snapping Edits to Time Positions in the Piano Roll Editor).
Do one of the following:
Control-click (or right-click) the original note, then choose Define as Default Note from the shortcut menu.
Click the original note with the Pencil tool.
Note: Editing an existing note also defines it as the default note.
Click a position in the Piano Roll Editor background with the Pencil tool.
The new note’s channel, velocity, and length are identical to the original (or edited) note.
Deleting Notes in the Piano Roll Editor
You can delete selected notes by pressing Delete, or clicking them with the Eraser.
Select the Eraser tool, then click the note you want to delete.

Select the notes you want to delete, then click one of the selected notes with the Eraser tool (or press Delete).
This deletes all selected events.
Select one of the notes you want to delete.
Choose Edit > Select Similar Events or Edit > Select Equal Events (notes of the same pitch, for example), and then delete the selected events by pressing Delete.
For more information about similar and equal events, see Selecting Similar or Identical Objects, Regions, or Events.
You can also delete events by choosing one of the Delete MIDI Events commands from the Piano Roll Editor’s local menu bar.
Choose Functions > Delete MIDI Events > Duplicates (or use the Delete Duplicated Events key command, default assignment: D).
Any events occurring twice or more at the same position (and pitch) are deleted, allowing one to remain.
Duplicated events may have different second data bytes (velocity, aftertouch, or controller values). Logic Pro only looks at the event type and position when determining whether or not two or more events are duplicated.
Events of the same type, but on different MIDI channels, are not viewed as being identical.
The “same time position” includes two notes that are output simultaneously because of the current quantization setting. Full details on all quantization options are described in Quantizing Audio and MIDI.
Set the left and right locator positions as desired.
Do one of the following:
Choose Functions > Delete MIDI Events > Inside Locators.
Choose Functions > Delete MIDI Events > Outside Locators.
This deletes all events between or outside the locator positions.
When copying events or reducing the length of MIDI regions, events can sometimes end up outside the limits of a MIDI region. These technically still belong to the MIDI region, although they won’t be played or heard.
Choose Functions > Delete MIDI Events > Outside Region Borders.
Choose Functions > Delete MIDI Events > Unselected Within Selection.
All unselected notes between the (start point of the) first and the (end point of the) last selected note are deleted.
Select the event you want to delete.
Use the Delete and Select Next Region/Event key command.
Restoring Deleted Notes in the Piano Roll Editor
Accidental deletions of one or more notes, or a simple change of mind or editing mistake is an inevitable part of song creation. Fortunately, you can backtrack your edits easily in Logic Pro. You also have the option of simply re-creating an event with the Pencil tool.
Choose Edit > Undo from the main menu bar (or use the corresponding key command, default assignment: Command-Z) immediately after making the error.
Choose Edit > Undo History. The Undo History window opens. The most recent editing step (at the bottom of the list) is highlighted.
Click any entry to undo or redo all steps between the clicked and highlighted entries. All steps are animated during this process.
Important: A Redo list is not displayed until an Undo operation has been performed. The Redo list appears below the Undo items. The first item that can be redone is indicated by gray text.
Command-click the step. A warning dialog opens.
Click Apply to undo or redo the step. Click Cancel to abort the step.
This procedure will undo or redo an isolated step without influencing all steps between the clicked and higlighted (most recent) entries.
Moving Notes in the Piano Roll Editor
You can move selected notes by grabbing them (near the middle) and dragging them. If you move notes vertically, they are transposed, and if you move them horizontally, they are moved in time.
The current position and pitch are shown in a help tag while dragging. The deviation from the original pitch is shown as a positive or negative number of semitone steps at the bottom left of the help tag. The original pitch remains in the info display of the Piano Roll Editor.
When you move notes horizontally, they snap to the division defined in the Snap menu (you can alter this setting at any time).
Select the notes.
Press Control, and drag the notes to the new position.
The resolution of the drag steps depends on the current Snap menu setting and zoom level (see Snapping Edits to Time Positions in the Piano Roll Editor).
Alternately, you can follow the procedure above, but press Control-Shift as you drag to move the notes in tick steps, completely overriding the Snap menu setting.
Open the General preferences by doing one of the following:
Choose Logic Pro > Preferences > General (or use the Open General Preferences key command).
Click the Preferences button in the Arrange toolbar, and choose General from the menu.
Click the Editing tab, then select the Limit Dragging to One Direction in Piano Roll and Score checkbox.
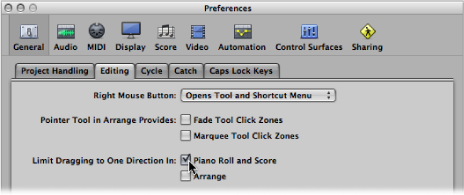
When active, this option helps you to avoid accidental transpositions of notes when moving them horizontally, or changing the position of notes when you’re trying to change their pitch. The initial movement—vertical or horizontal—restricts further movements to this plane, while the mouse button is held. Release the mouse button and click the event to move in the other direction.
Moving Events via Key Commands
Editing can be greatly accelerated by assigning, and using, the following key commands to move one or more events.
Nudge Region/Event Position Right by SMPTE Frame
Nudge Region/Event Position Left by SMPTE Frame
Nudge Region/Event Position Right by 1/2 SMPTE Frame
Nudge Region/Event Position Left by 1/2 SMPTE Frame
Nudge Region/Event Position Right by 5 SMPTE Frames
Nudge Region/Event Position Left by 5 SMPTE Frames
Nudge Region/Event Position Right by SMPTE Bit
Nudge Region/Event Position Left by SMPTE Bit
Nudge Region/Event Position Right by Tick
Nudge Region/Event Position Left by Tick
Nudge Region/Event Position Right by Division
Nudge Region/Event Position Left by Division
Nudge Region/Event Position Right by Beat
Nudge Region/Event Position Left by Beat
Nudge Region/Event Position Right by Bar
Nudge Region/Event Position Left by Bar
Nudge Region/Event Position Right by Nudge Value
Nudge Region/Event Position Left by Nudge Value
Nudge Region/Event Position Right by Sample
Nudge Region/Event Position Left by Sample
Nudge Region/Event Position Right by 1 ms
Nudge Region/Event Position Left by 1 ms
Nudge Region/Event Position Right by 10 ms
Nudge Region/Event Position Left by 10 ms
The selected events are shifted one step right or left, by whatever unit is referred to in the particular command name.
Including Non-Note MIDI Events
Turn on the Functions > Include Non-Note MIDI Events setting to tie other data (such as pitch-bend, modulation, aftertouch, or poly pressure) in a region to the region’s notes. This may be useful when a region contains note-related controller data that you want to copy or move.
Changing Note Length in the Piano Roll Editor
You can use the Pointer, Finger, or Pencil tool to alter note lengths.
Tip: It’s advisable to use the Pointer or Finger tool, as these avoid the accidental creation of new notes, which is possible with the Pencil tool.
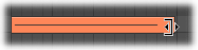
Position the Pointer, Finger, or Pencil tool over the lower-right edge of a note event, then drag when the tool icon changes to the length change icon.
A help tag informs you about the precise end point and length of the note while dragging.
Tip: It can sometimes be difficult to grab the bottom-right corner of very short notes. In this situation, you should use the Finger tool, which allows you to grab notes anywhere, in order to alter their end point (and therefore, length).
Position the Pointer or Pencil tool over the lower-left edge of a note event, then drag when the tool icon changes to the length change icon.
A help tag informs you about the precise start point and length of the note while dragging.
Note: The original end point of the note is retained when adjusting the start point.
Altering the Lengths of Several Notes Simultaneously
You can adjust the lengths of several selected notes at once (in a chord, for example), by simply altering the length of one of them. The relative differences between the (selected) note lengths are maintained.
Press Shift while altering the length of one of the selected notes.
Hold Option-Shift while dragging one of several selected notes.
Setting Note Start and End Points to the Playhead Position
You can move the start or end point of one or more selected notes to the playhead location with the following key commands:
Set Region/Event/Marquee Start to Playhead Position
Set Region/Event/Marquee End to Playhead Position
Advanced Note Length Functions
The Functions > Note Events submenu in the Piano Roll Editor menu bar contains commands that change the length of selected notes. These changes are influenced by the notes surrounding or overlapping them. This is ideal for tidying up the start and end points of notes.
Select the notes you want to affect.
Choose one of the following commands in the Functions > Note Events submenu (these commands are also available as key commands):
- Note Overlap Correction (selected/any): This command removes overlaps for all selected notes, regardless of whether the following overlapped notes are selected or not.
- Note Overlap Correction (selected/selected): This command removes overlaps for all selected notes, but only if the following overlapped notes are selected.
- Note Overlap Correction for Repeated Notes: This command removes overlaps for all selected notes, but only if the following overlapped notes have the same note number (are of the same pitch).
The Overlap Correction functions view vertically stacked notes (notes in the same location, but of different pitches) as a chord. A dialog indicates that the overlapping notes appear to be part of a chord, and you are asked to choose one of the following options:
- Keep: Simultaneously sounding notes are reduced in length (moved to the same end point).
- Delete: Simultaneously sounding notes are removed, leaving a monophonic line behind.
- Shorten: Simultaneously sounding notes are individually reduced in length, resulting in a number of short notes in a monophonic line remaining.
Select the notes you want to affect.
Choose one of the following commands in the Functions > Note Events submenu:
- Note Force Legato (selected/any): This command forces legato for (lengthens) all selected notes, regardless of whether the following note is selected or not.
- Note Force Legato (selected/selected): This function forces legato for all selected notes, but only if the following note is selected.
The end of the MIDI region is treated as an unselected note:
Note Force Legato (selected/any) lengthens the last note to the end point of the MIDI region.
Note Force Legato (selected/selected) does not alter the length of the last note.
If Logic Pro finds chords, it asks if you want to delete them or shorten overlapped notes.
Click the Delete button to erase any incorrect notes in a poorly played monophonic line.
Click the Keep button to even out (shorten) the start points and durations of all (intentionally played/recorded) notes in chords.
Choose Functions > Note Events > Sustain Pedal to Note Length.
All sustain pedal events (controller #64) used on selected note events are analyzed, and the note events are actually increased in length. This increase matches the controller #64 (sustain pedal) off message position.
The pedal events (controller #64 on and off) are erased after use of this command.
Copying or Moving Notes in the Piano Roll Editor
There are a number of ways to copy or move notes in the Piano Roll Editor.
Hold down Option while dragging the notes to the new position.

Tip: You can use this method to copy or move notes between two Piano Roll Editor windows (showing different regions, for example), or even between the Piano Roll Editor windows of different projects.
Use one of the following clipboard commands:
Edit > Copy (or Command-C) to copy notes into the Clipboard.
Edit > Cut (or Command-X) to move notes into the Clipboard.
Edit > Paste (or Command-V) to paste notes at the current playhead position, at their original pitch.
Advanced Note Copy and Move Options
You can also perform advanced copy and move operations within the Piano Roll Editor. These allow you to directly swap events, or to merge a group of notes from one section of a region to the same, or another, region, for example.
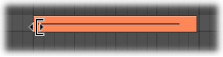
Define the area that you want to move or copy with the left and right locators.
As an optional step: Select the track you want to copy the events to, if you want to copy or move the events to another track.
Set the playhead to the insert position.
Choose Functions > Copy MIDI Events. The Copy MIDI events dialog opens.
Choose settings in the Copy MIDI Events dialog.
See the following section for a detailed description of the settings.
Using the Copy MIDI Events Settings
The following describes the settings found in the Copy MIDI Events dialog.
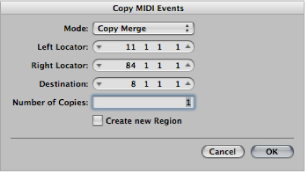
- Mode pop-up menu: Determines how MIDI events are copied or moved. You can choose from the following options:
- Copy Merge: The copied data is blended with any data present at the destination position.
- Copy Replace: The data at the destination position is deleted, and replaced with the copied data.
- Copy Insert: All data at the destination position is moved to the right, by the length of the source area.
- Move Merge, Move Replace, Move Insert: These three modes work similarly to the Copy modes, but actually move the selected events, removing them from their original positions.
- Rotate: The source events are moved to the destination position. The data that was previously at the destination position, and the data that falls between the source and destination positions are all moved toward the source position. This rotates the data around a central pivot point (halfway between the source and destination positions).
- Direct Swap: Exchanges the source data with data of the same length, starting at the target position. This allows you to swap the notes in bar 1 of a four-bar MIDI region with the notes in bar 3 of the same region, for example.
- Remove: Removes the MIDI data from the source region, but leaves the region at its original position.
Protecting the Position of Events in the Piano Roll Editor
There are times when you will want to protect certain events from being moved. For example, several note events may be used to trigger footstep samples that match an actor walking down a corridor, in a video soundtrack.
You have already created the music for this scene, but have been asked to increase the tempo to match several cuts of different camera angles in the corridor. Obviously, a change in the tempo will move the events, resulting in out-of-sync footstep samples. Fortunately, Logic Pro has a feature that preserves the absolute time position of events.
Choose Functions > Lock SMPTE Position (or use the corresponding key command).
This ensures that events that fall at a particular absolute time position—1 hour, 3 minutes, 15 seconds, 12 frames, for example—remain at this position when tempo changes are made.
Choose Functions > Unlock SMPTE Position (or use the corresponding key command).
Changing Note Velocity in the Piano Roll Editor
Note velocity is usually tied to the level of the note, and given the use of color to indicate different velocities, you can quickly identify the “loud” and “soft” notes in a region.
Note: Velocity can also be used as a controller for other synthesizer parameters, such as filter resonance or cutoff, either alone or in conjunction with level. As such, you may find that changes to note velocity not only affect the level of the note, but also tonality.
Drag a note vertically with the Velocity tool.
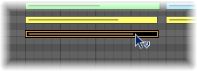
A help tag indicates the velocity value of the note you clicked, with the value changing as you drag. The color of the note event changes and the horizontal line inside the event either lengthens or shortens.
If the MIDI Out function is turned on (and it should be), the note is output as you alter the velocity.
All selected notes can be altered simultaneously; the differences in their respective velocity values are retained. If the velocity value of any of the selected notes reaches an extreme value (0 or 127), none of the other selected notes can be adjusted further.
You can override this behavior by holding Option while dragging. This allows you to continue altering the velocity values until the selected (clicked) note reaches an extreme value. Of course, this will alter the velocity relationship of this note to the other notes.
Hold down Option-Shift while dragging one of the notes with the Velocity tool.
Muting Notes in the Piano Roll Editor
The Piano Roll Editor features a Mute tool that allows specific notes in a MIDI region to be muted.
Click the note with the Mute tool.
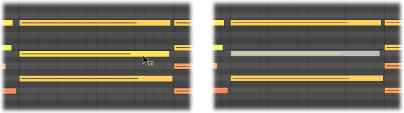
Muted notes are grayed out (shown without color).
Click a piano key to the left of the Piano Roll Editor with the Mute tool.
This mutes or unmutes all notes of that particular pitch, which is ideal for muting the hi-hats in a MIDI region that is triggering an entire drum kit, for example.
Select the notes, then click one of the selected notes with the Mute tool.
The Select Muted Regions/Events key command is also available in the Piano Roll Editor. It allows the selection of all muted notes in a MIDI region. The next logical operation would be to delete these muted notes by pressing Delete.
Changing Note Color in the Piano Roll Editor
You can change the color of notes in the Piano Roll Editor, according to the following options:
- Velocity Colors: Applies color in accordance with MIDI note velocity.
- Region Colors: Applies color in accordance with the color of the MIDI region that contains the notes.
- MIDI Channel Colors: Applies color in accordance with the MIDI channel that processes the notes.
Choose the required color assignment from the Piano Roll Editor’s View menu.
Control-click (or right-click) the Piano Roll Editor’s background, then choose the required color assignment from the shortcut menu.