MIDI Step Input Recording
The Step Input features allow you to insert MIDI notes when Logic Pro is not in a real-time recording mode.
You can use Step Input to create note runs that may be too fast for you to play, or to replicate sheet music that’s too difficult for you to play. You can use one or more of the following for step entry:
The Step Input Keyboard
Step Input Keyboard key commands
A MIDI keyboard
The computer keyboard (Caps Lock Keyboard)
Notes are inserted at the current playhead position when using all non-real-time input modes. You can and should combine methods to make full use of the features that each option offers. For example, you can set the note length in the Step Input Keyboard window, insert notes via a MIDI keyboard, and position the playhead with key commands.
Use the mouse while familiarizing yourself with the Step Input Keyboard. It is best to also learn the Step Input key commands, which provide a number of navigation and note entry options—such as “Step forward,” “Step backward,” and “Rest” insertion—that are not available to the Step Input Keyboard. See Using Step Input Keyboard Key Commands.
Activating MIDI Step Input Mode
MIDI Step Input mode is available in the Event List, Piano Roll, and Score Editors.
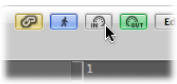
Click the MIDI In button next to the local menu bar of the Event List, the Piano Roll Editor, or the Score Editor.
Click the button again to exit Step Input mode.
Using the Step Input Keyboard
You can open the Step Input Keyboard window by choosing Options > Step Input Keyboard.
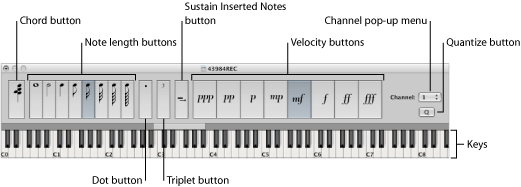
- Keys: Click to insert a note of the desired pitch. The insert range bar above the keyboard updates to display the selected octave.
- Note length and velocity buttons: Determine the length or velocity of the inserted note. There are eight velocity values—represented by the traditional volume indicators ppp, pp, p, mp, mf, f, ff, and fff. These correspond to MIDI velocity values 16, 32, 48, 64, 80, 96, 112, and 127, respectively.
- Triplet button: Click to make the next three notes you enter a triplet group. The rhythmic value of the triplets is based on the currently selected note value.
- Dot button: Works in a similar way to the Triplet button. A pair of complementary notes will be inserted—a dotted eighth and a sixteenth note, for example.
- Sustain Inserted Notes button: Lengthens the selected (usually the most recently inserted) note by the selected note length value (the active note length button).
- Quantize button: Quantizes the start of the next inserted note to the nearest bar or beat line. Positioning of the playhead is critical when you use this option.
- Channel pop-up menu: Determines the MIDI channel of an inserted note. The channel settings of individual notes usually have no effect on the playback channel, and therefore the sound, of the MIDI region. The channel settings of individual notes are mainly used for polyphonic score display.
- Chord button: When the Chord button is active, you can insert notes of different pitches and lengths. These are “stacked” at the same position, resulting in a chord. The playhead does not advance until the Chord button is deactivated.
Open the MIDI region in the editor you wish to work in.
Move the playhead to an insert location.
Set the buttons for note length, velocity, and other parameters.
Click a key in the Step Input Keyboard to insert a note of the key’s pitch.
A note of the chosen pitch, note length, and velocity is inserted, and the playhead automatically advances to the end of the inserted note. The next note can be inserted immediately, following the step above.
Chord mode prevents the playhead from moving after the insertion of a note, allowing you to insert as many notes as desired at the same bar position.
Turn on Chord mode by clicking the Chord button at the far left of the window (or use the Chord Mode key command), then follow the procedure outlined above.
Before you insert the last note into the chord, click the Chord button again (or use the Chord Mode key command) to deactivate Chord mode, and the playhead will advance as usual after note insertion.
Using Step Input Keyboard Key Commands
Note input using Step Input key commands follows the same principles as note input using the Step Input Keyboard, but there is one difference. Whereas you use Step Input key commands for all functions, when you use the Step Input Keyboard you use the mouse for some functions—such as choosing pitch, velocity, note length, and so on.
All step input key commands are user-definable. They can be found in the Step Input Keyboard folder of the Key Commands window.
Note: You can also enter note data in real time with the computer keyboard (see Using the Caps Lock Keyboard for MIDI Step Input).
Note Length and Velocity
Note Length and Velocity are determined before a pitch command is used to actually insert a note. The currently selected values can be seen in the Step Input Keyboard window.
Pitch Key Commands
The 12 “Note C” to “Note B” key commands insert a note of the selected pitch—with the set length and velocity—at the current playhead position in the selected MIDI region. Use the Chord Mode key command if you want to insert chords. You can disable Chord mode with the same key command.
Rather than assigning key commands to all 12 pitches, you also have the option of defining key commands for the 7 pitches of the C major scale. These can be used in conjunction with the “Next note will be sharp” and “Next note will be flat” key commands, allowing you to insert the other pitches.
When you are creating a system for these key command assignments, consider the following approaches:
Lay out these commands on the computer keyboard to resemble a piano keyboard (C D E F G A B in one row, next to each other, and C# D# F# G# A# above these at corresponding positions).
Assign alphabetical keys to pitches of the C major scale—in accordance with their note names—especially when you are defining key commands for only the 7 pitches of the C major scale as discussed above.
Octave Range Key Commands
The octave of an inserted note depends on the current position of the insert range bar. There is a small horizontal bar that spans one octave above the piano keyboard in the Step Input Keyboard. The chosen note will always be inserted inside the range indicated by this bar.
This bar continuously changes its position in accordance with the last inserted note: The center of the insert range bar is always aligned with the last inserted note. The next note is inserted within this octave range—unless the range bar is moved with key commands or with the mouse.
For example, if you insert a G immediately after inserting a C, the G will be placed below the C. Inserting the C places the insert range bar between G (the left end) and F# (the right end), with the C in the center. Regardless of which note you choose next, it will always be inserted inside this range. The range bar will move, however, as further notes are inserted, with the range bar center always aligned to the most recently inserted note.
Further key commands allow you to place the range bar in different octaves: Octave 0 to Octave 6, and also Octave +1/−1/+2/−2, which moves the range bar up or down 1 or 2 octaves. The range bar can also be moved with the mouse.
Rests, Stepping Forward and Backward, Corrections
The Rest key command moves the playhead forward (in accordance with the currently set note value) without inserting a note, thereby creating a rest.
The Step Forward and Step Backward key commands also move the playhead forward or back by the length of the selected note value.
The Delete key command deletes the most recently inserted note and moves the playhead back to the position where the note (previously) began. This allows for quick corrections—another note can be inserted immediately, replacing the erased one.
Triplets, Dotted Note Groups
The “Next three notes are triplets” key command is self-explanatory. The rhythmic value of the triplets corresponds to the currently selected note value in the Step Input Keyboard window. If an eighth note is selected, an eighth-note triplet will be created. After three notes have been inserted, binary values will be inserted, unless the command is reused.
The “Next two notes are a dotted group” key command works in a similar way, but it has a special feature. When you use this key command, a pair of notes that complement each other will be inserted—a dotted eighth and a sixteenth note, for example.
Interaction with Other Key Commands
When Step Input mode (the MIDI In button) is activated in the Score Editor, Piano Roll Editor, or Event List, the Step Input key commands have priority over all other key commands.
This means that you can assign keys or key combinations to these functions even if these keys or key combinations are already assigned to other functions. As long as Step Input mode is active, these key assignments will apply; if Step Input mode is turned off, other assignments for the same keys will have priority.
Note: Because you can use key assignments that are already in use for other functions, avoid using keys that are assigned to functions that you might also want to use when working in Step Input mode. For example, the Space bar is used for Play/Stop/Continue, so assigning it to Rest could be problematic.
Using a MIDI Keyboard for Step Input
Note input via MIDI works in the same way as input via the Step Input Keyboard (see Using the Step Input Keyboard). One difference, of course, is that you press keys on your real-world MIDI keyboard, rather than clicking onscreen keyboard notes.
MIDI note velocity information—how hard you strike the keys on your MIDI keyboard—is sent when you use MIDI Step Input.
You can insert chords by simply playing the chord on the MIDI keyboard. You don’t need to turn on Chord mode to insert a chord.
It is recommended that you keep the Step Input Keyboard window open when first using these functions, to make the learning process easier. After you are familiar with it, you can leave the Step Input Keyboard window closed, because it is just an aid for MIDI step input, not a requirement.
It is also recommended that you use the Input key commands (see Using Step Input Keyboard Key Commands) to quickly switch values such as the note length, or to determine the insert position.
Using the Caps Lock Keyboard for MIDI Step Input
The Caps Lock Keyboard enables you to use the computer keyboard as a real-time virtual MIDI keyboard (referred to as Musical Typing in GarageBand). You can also use it for MIDI Step Input. This makes it ideal for situations where no external MIDI or USB keyboard is available, such as when you’re traveling with your portable Mac computer.
The Caps Lock Keyboard spans more than ten octaves and even includes support for sustain and velocity information.
Press the Caps Lock key on your computer keyboard.
A green dot on the key indicates that it is active.
Note that many keys have different functions that override their usual key command assignments, while in this mode.
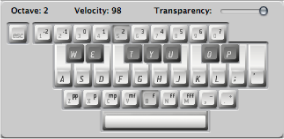
This is the English version of the Caps Lock Keyboard—another language version may appear, depending on your Input Menu settings in International preferences.
The Escape key sends an All Notes Off command, should you encounter hanging notes.
The numeric keys (above the QWERTY keyboard) are used to define the octave for the MIDI keyboard.
The two rows below the numeric keys function as counterparts for MIDI keyboard keys, starting with the note C, assigned to the alphabetical A key (or Q, as would be the case with a French keyboard, for example).
See the black and white keys in the figure above for details.
The lowest row of letter keys sets the velocity for MIDI notes. There are preset values—ranging from pianissimo to forte fortissimo. Each value can be finely adjusted with the two keys to the right of this row (these are assigned to the comma and period keys on an English QWERTY keyboard). This keyboard configuration allows you to send any MIDI velocity value from 1 to 127.
The Space bar provides a Sustain function—played with your thumbs rather than your feet. You can trigger new notes or switch between octave or velocity values while notes are sustained.
The current octave and velocity values of MIDI notes are displayed at the upper edge of the Caps Lock Keyboard window. A Transparency fader is also available for this window, making visualization clearer or allowing the window to be “ghosted” over the background.
Caps Lock Keyboard Preferences
The “Enable Caps Lock keys” option allows you to completely enable or disable the Caps Lock Keyboard functionality.

If you want to use the Space bar to start, stop, or continue Logic Pro playback—rather than as the Sustain function for the Caps Lock Keyboard (when active)—you can deselect the “Space bar acts as sustain pedal” option.
Additional Caps Lock Keyboard Information
Due to technical limitations of computer keyboards, you can play a maximum number of six notes simultaneously, and there are additional limitations regarding timing precision and playing certain unusual note clusters.
The original intention of this feature, however, was to be a useful aid for composing on a train or plane—not a full-on replacement for a real MIDI keyboard.