
Use the following advanced techniques to improve your tracking results.
You can smooth a track with the Keyframe Thinning function. Before smoothing the curve, you might want to copy the behavior (as a backup) to the Library or duplicate the behavior in the project. (For information on saving items to the Library, see Save custom objects to the Library.
In the following graph, there’s a keyframe at every frame, and the curve is quite jagged. The following example shows how you can simplify and smooth this curve.
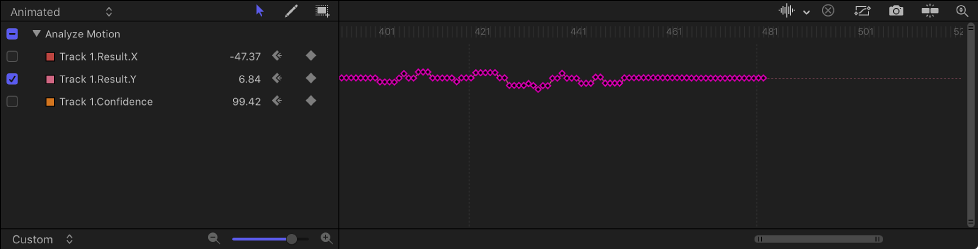
In the parameter list of the Keyframe Editor, move the pointer over the parameter you want to smooth; when the down arrow appears on the right, click it and choose Reduce Keyframes.
The Reduce Keyframes dialog appears.
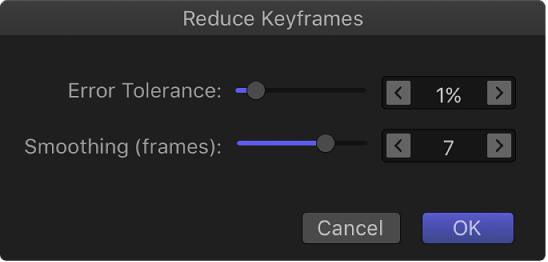
The Reduce Keyframes dialog applies a thinning algorithm to the keyframes for the parameter, reducing the number of keyframes while attempting to maintain a similar curve shape.
Adjust the sliders to smooth the curve:
Error Tolerance: Drag right to reduce the number of keyframes used in the curve.
Smoothing (frames): Drag right to create smoother curves between keyframes.
The Smoothing (frames) control modifies the curve by calculating the average of each track point plus its neighboring track points. In other words, if you set Smoothing (frames) to 5, when the value of frame 12 is computed, frames 10, 11, 12, 13, and 14 are considered. If Smoothing (frames) is set to 3, the algorithm uses frames 11, 12, and 13. The larger the Smoothing value, the more points are considered (and thus more calculations done) for every point in the curve.
As you adjust the sliders in the dialog, the curve is modified in the Keyframe Editor.
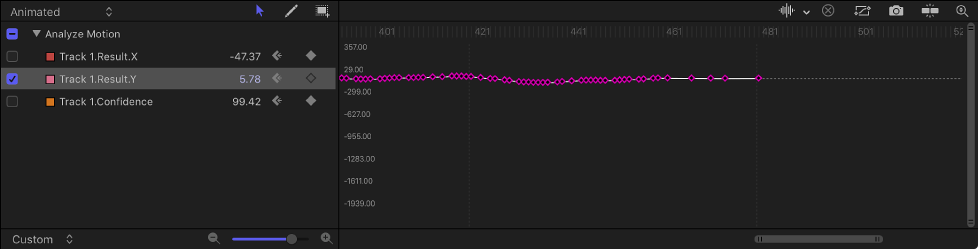
Click OK.
Another smoothing option is to apply the Average parameter behavior to a track curve in the Keyframe Editor. This behavior smooths the transition from one keyframe value to another. Averaged motion moves more fluidly.
In the parameter list of the Keyframe Editor, control-click the name of the keyframed parameter, then choose Average from the shortcut menu.
The track is averaged, and its curve is simplified in the Keyframe Editor.
For more information on using the Average parameter behavior, see Average.
Tracking data recorded or referenced by the Match Move, Stabilize, or Unstabilize behavior can be “baked” into keyframes on the transformed object. The tracking keyframes are applied to the tracked object, and the behavior is deleted. You can then modify the animation curves in the Keyframe Editor.
Because the Analyze Motion behavior does not transform the image, analyzed tracks cannot be converted into keyframes. However, a Match Move or Stabilize behavior that references data from an Analyze Motion behavior can be converted into keyframes.
In the Layers list, select the Match Move, Stabilize, or Unstabilize behavior to convert.
Choose Object > Convert to Keyframes (or press Command-K).
A dialog appears confirming the conversion.
Click Convert.
The behavior is converted into editable keyframes and the tracking behavior is deleted.
For more information, see Convert behaviors to keyframes and Keyframing overview.
When using the Analyze Motion behavior, you can direct a tracker where to look in a later frame for its reference pattern. This tool is ideal for the following types of clips:
Clips that contain fast-moving features
Clips with subjects moving in a relatively straight vector (with or without obstructions)
Clips with swish pans (you may need to reset the “look-ahead” tracker at each panning change)
Important: If your track fails and you reposition your tracker, you must also reset the look-ahead tracker in the canvas to provide a new motion vector from the new reference point.
Apply an Analyze Motion behavior to a clip.
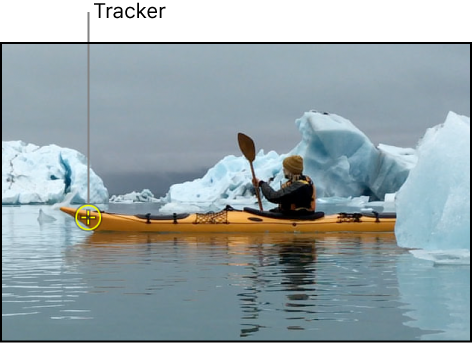
In the canvas, position the tracker on a reference pattern.
In the following image, the tracker is positioned on a reference pattern on the front of the kayak.
In the Behaviors Inspector, adjust the Look Ahead Frames slider to specify how many frames you want the tracker to look ahead.
Note: The maximum default for the Look Ahead Frames slider is 10 frames. However, you can enter a larger frame amount using the adjacent value slider.
While pressing and holding the Command key, drag the tracker in the canvas in the direction the reference pattern is moving in the clip.
As you Command-drag the track point, a magnified inset displays the frame specified in the Look Ahead Frames parameter.
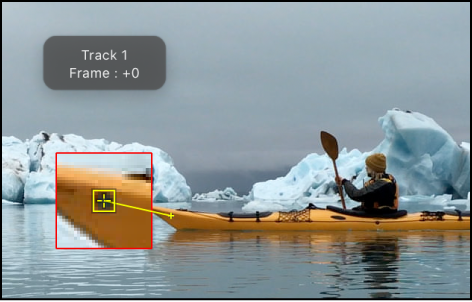
When the look-ahead tracker is positioned on the reference pattern, release the mouse button.
When you click the Analyze button, the new reference point is used as the tracking pattern.
Note: Look Ahead Frames can be used when tracking in reverse. When the Reverse checkbox is selected in the tracking behavior’s parameters and you use the Look Ahead Frames parameter, you’re looking at previous frames rather than future frames. The Reverse checkbox is available only for the Analyze Motion, Track (in the Parameter behaviors category), and Track Points (in the Shape behaviors category) behaviors.
For challenging tracks, you can manually insert track position keyframes to help guide the tracker toward a reference pattern. For example, if you have footage with significant motion blur or objects that partially obscure the tracking pattern, you can manually create tracker position keyframes to help guide the tracker.
Apply a Motion Tracking behavior to the clip, then press A to enable keyframe recording.
In the canvas, drag the tracker at the reference point you want to track.
A track position keyframe is created in the behavior (visible in the Keyframe Editor).
Navigate to the next frame where you want to create a keyframe.
Note: You can press the Shift-Right Arrow key to jump forward ten frames, or press Shift-Left Arrow key to jump backward ten frames.
In the canvas, position the tracker at the reference point you want to track.
Repeat steps 3–4 until you’ve completed the track.
In the Behaviors Inspector, move the pointer over the track row of the track you’ve manually adjusted, then click Show.
Additional parameter controls for the track appear.
Click the Fail Behavior pop-up menu, then choose Use Existing Keyframes.
Press A again to turn off keyframe recording.
Go to the first frame of the clip, then click the Analyze button in the behavior in the Behaviors Inspector.
Apply a Motion Tracking behavior to the clip.
In the canvas, drag the tracker at the reference point you want to track.
Choose Object > Add Position Keyframe.
This command is available for the Analyze Motion, Match Move, Stabilize (when you use manual trackers), Track Points, and Track behaviors.
Note: Keyframes cannot be created for automatically stabilized footage. Use the Track Region option for adjusting automatic stabilization, or convert the stabilized footage to keyframes. For more information on the Track Region parameter, see Stabilize a shaky clip. For more information on converting tracking data to keyframes, see Convert motion tracks to keyframes above.
Navigate to the next frame where you want to create a keyframe.
Repeat steps 2–4 until you’ve completed the track.
In the Behaviors Inspector, move the pointer over the track row of the track you’ve manually adjusted, then click Show.
Additional parameter controls for the track appear.
Click the Fail Behavior pop-up menu, then choose Use Existing Keyframes.
Go to the first frame of the clip, then click the Analyze button in the Behaviors Inspector.
Note: You can also use the Tracker Preview in the Behaviors Inspector to reposition trackers in the canvas.
If none of the prior solutions helps, you can review the analysis data in the Keyframe Editor, then manually adjust or delete problem tracking point data.
Note: This technique is applicable only to trackers that you can adjust in the canvas or Behaviors Inspector.
In the Layers list or Timeline, select an applied behavior.
In the Keyframe Editor, review the curve of the confidence parameter (Track1.Confidence, for example) for frames where the values are very low; if you see unusual spikes at frames where the Confidence curve value is low, proceed to step 3.
Choose Object > Convert to Keyframes (or press Command-K).
A dialog appears confirming the conversion.
Click Confirm.
The behavior is converted into editable keyframes and the tracking behavior is deleted.
In the Layers list or Timeline, select the clip.
In the Keyframe Editor, modify or delete the points where the Confidence value is low.
For more information, see Add or delete keyframes or Modify keyframes.