Audio Files in Motion Projects
You can add different kinds of audio files to a Motion project. In addition, Motion lets you preview files before adding them to your project and lets you view the audio files in a project in several ways.
Import File Formats
Motion supports audio in a variety of common file formats, sample rates, and bit depths. Supported import file formats include:
CAF
AIFF
WAV
AAC (except rights-protected AAC files)
QuickTime Audio (.mov)
Note: Multitrack QuickTime movie files and multichannel audio files are also supported.
You can import audio files with sample rates up to 192 kHz and with bit depths up to 32 bits. Mono and stereo files are supported.
Note: Because MP3 and AAC are compressed file formats, playback quality may not be as high as with uncompressed formats such as AIFF.
When you add an audio file to your project, Motion converts it to its own internal format. This allows you to use audio files with different formats, sample rates, and bit depths in the same project. When you export your project, the audio is exported according to the current audio settings in the Export dialog.
Previewing an Audio File
You can listen to, or preview, an audio file in the File Browser before adding it to a project.
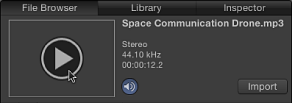
In the File Browser, select an audio file.
If “Play items automatically on a single click” in the General pane of Motion Preferences is selected, the file begins to play.
If the file does not play, move the pointer over the preview area and click the Play button over the image thumbnail. While the file is playing, you can click the Play button again to pause playback or click the Mute button to mute/unmute the sound.
Adding an Audio File
To work with audio in Motion, you start by adding an audio file to the project.
Drag an audio file from the File Browser or the Finder into the Layers list, Timeline, Canvas, Audio Timeline, or Audio list.
The audio file is added to the project and appears in the Audio Timeline, Audio list, mini-Timeline, and Media list.
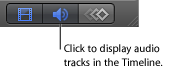
Note: To display the Audio Timeline, click the Show/Hide Audio Timeline button in the lower-right corner of the Motion project window.
In the Audio list, click the Add button (+), locate the file you want to add in the Import Files dialog, then click Import.
The audio file is added to the project and appears in the Audio Timeline, Audio list, mini-Timeline, and Media list.
In the Library, select the Music category.
Select a playlist, then select a song in the file stack.
Do one of the following:
In the preview area, click Apply.
Drag the file to the Layers list, Canvas, Timeline, Audio Timeline, or Audio list.
Note: Rights-protected AAC files cannot be imported into Motion and do not appear in the file stack. This includes non-iTunes Plus music purchased from the iTunes Store.
The audio file is added to the project and appears in the Audio Timeline, Audio list, mini-Timeline, and Audio list. The start point of the audio file is determined by the Create Layers At preference in the Project pane of Motion Preferences. If set to “Start of project,” the file is placed at the beginning of the project. If set to “Current frame,” the file is placed at the current location of the Timeline playhead. A HUD for the audio appears.
Note: If the HUD does not appear, press D or F7.
You can also add an audio file to your project without having it appear in the composition. For example, you might want to archive an audio file for later use. You do this by dragging the file into the Media list.
Drag an audio file from the File Browser or the Finder into the Media list.
The audio file is added to the Media list, but not to the Audio Timeline or Audio layer. If you later decide to add the file to the active composition, drag the audio layer from the Media list to the Canvas, Timeline, or Audio Timeline.
When you drag a QuickTime movie into the Canvas or the Layers list of the Project pane, the movie’s video and audio tracks are imported into your project. You can choose to add only the audio track of a QuickTime movie.
In the File Browser or in the Finder, locate the QuickTime movie file, then drag it into the Audio list of the Project pane.
The audio track from the movie is added to your project, without the video footage. The video footage is added to the Media list.
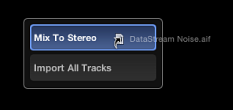
If the QuickTime movie contains multiple audio tracks, drag the file over the Audio list, the Canvas, or the Timeline layer list, holding down the mouse button until the drop menu appears. To import the file with a single audio track, choose Mix To Stereo. To import the file with individual tracks, choose Import All Tracks. For more information, see Importing Multichannel Audio to Motion below.
Importing Multichannel Audio to Motion
Multichannel audio files can be imported as a single track or as individual tracks. The same applies to QuickTime movie files that contain multiple audio tracks, including files with stereo audio tracks. Because Motion treats multichannel audio files and multitrack QuickTime files identically, references to QuickTime files in this chapter also apply to multichannel audio files, and vice versa.
When importing a multitrack QuickTime movie file, you can import the audio portion of the file as a single audio track or as individual tracks.
When you add any media file to Motion, an audio track appears that can be used independently of the video file. When the file is unlinked from its source, a track can be individually enabled, disabled, or deleted. However, deleting a source QuickTime movie file from the Media list, deletes all audio and video that originated from that file.
Note: When you export a multichannel audio file from Motion, you may choose whether to export all channels or mix them down into a single track.
Drag the file from the File Browser or the Finder to the Canvas, holding down the mouse button until a drop menu appears.
Do one of the following:
To import the movie with a single audio track, choose Mix To Stereo, then release the mouse button.
To import the movie file with a single audio track for each track, choose Import All Tracks, then release the mouse button.
When you choose Mix To Stereo, the file appears in the Audio list as a single audio track and the video appears in the Canvas (and Layers list). The link icon in the Audio list (next to the lock icon) indicates that the audio object has a corresponding video element.
Note: When a stereo QuickTime file is imported without using the drop menu, Mix To Stereo is the default import method.
Drag the file from the File Browser or the Finder to the Canvas.
Each audio track is imported as an individual audio object in the Audio list.
Important: Audio tracks from files with more then two tracks of audio (such as 5.1 surround audio) import as individual audio objects.
The link icon for the object also appears in the Layers list, indicating that the object has a corresponding audio element.

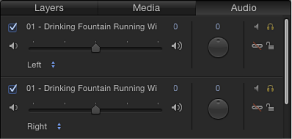
When you choose Import All Tracks from the drop menu, the file appears in the Audio list with an individual audio track for each track in the file. The following image shows the Audio list after importing a stereo QuickTime movie file using the Import All Tracks option, with the resulting left and right tracks.
Choose File > Import (or press Command-I).
In the Import File dialog, select the QuickTime file.
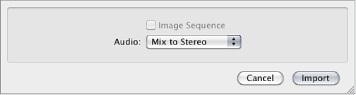
Choose an import option from the Audio pop-up menu (located at the bottom of the Import Files dialog), then click Import.
The file is imported with your chosen option.
Important: Audio tracks from files with more then two tracks of audio (such as 5.1 surround audio) cannot be mixed to stereo. All audio tracks are imported as individual audio objects.
Viewing Audio Files
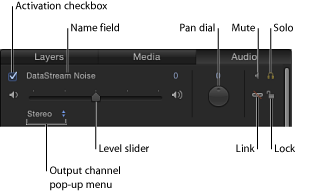
You can view a list of all audio tracks in your project and the audio waveform for an individual track. You can also view information about each track, including its duration, sample rate, and file size. In the Audio list, each channel in a multichannel audio file—or each track in a multitrack file—can be selected separately.
In the Project pane, open the Audio list to see the audio files in your project.
Select an audio file or channel of a multichannel file in the Audio list, then do one of the following:
Click the Show/Hide Audio Timeline button in the lower-right corner of the Motion project window.
The Audio Timeline opens (in the Timing pane), displaying a green bar containing the waveform of the file, if the Audio Timeline row size is tall enough. If the bar does not show a waveform, adjust the height of the tracks. For more information about how to adjust Timeline tracks, see Showing and Hiding Effects.
Important: In a multichannel audio file, all audio channels in the file appear in the Audio Timeline.
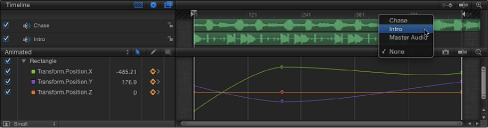
Click the Show/Hide Keyframe Editor button in the lower-right corner of the Motion project window, then choose an option from the waveform pop-up menu at the top-right side of the Keyframe Editor.
The waveform of the track appears in the Keyframe Editor, along with keyframes, if the Timeline tracks are tall enough.
Note: If there are multiple audio tracks in the project, by default only the waveform of the master track appears in the Keyframe Editor. To view individual tracks, choose a track name from the waveform pop-up menu at the top-right side of the Keyframe Editor.
In the Project pane, open the Media list.
Select the audio file in the Media list, then open the Media pane in the Inspector.
The Media list in the Project pane and the Media pane in the Inspector display information about each audio file, including kind, duration, sample rate, format, file size, and other details.
Cutting, Copying, and Pasting Audio Tracks
You can cut, copy, and paste audio tracks in the Audio list. You can also duplicate tracks.
In the Audio list, select the audio track, then do one of the following:
Choose Edit > Cut (or press Command-X).
Control-click the track, then choose Cut from the shortcut menu.
In the Audio list, select the audio track, then do one of the following:
Choose Edit > Copy (or press Command-C).
Control-click the track, then choose Copy from the shortcut menu.
In the Audio list, do one of the following:
Choose Edit > Paste (or press Command-V).
Control-click an empty area, then choose Paste from the shortcut menu.
In the Audio list, select the audio track, then do one of the following:
Choose Edit > Duplicate (or press Command-D).
Control-click the track, then choose Duplicate from the shortcut menu.
The duplicate appears below the original file in the Audio list.
Deleting an Audio Track
There are two ways to remove an audio track from your project.
In the Audio list, select the audio track, then do one of the following:
Press Delete.
Control-click the file to remove, then choose Delete from the shortcut menu.
If you try to delete an audio file with linked video, an alert dialog appears, warning: “One or more linked video objects will also be deleted. Are you sure you want to delete the audio? You can delete just the audio by first unlinking it from the video.”
Note: Deleting a track from the Audio list removes the associated file from the Media list if “Automatically manage unused media” is selected in the General pane of Motion Preferences.