Blur Filters
Blur filters take many forms in Motion. They can be used to simulate the real-world blurring that occurs due to the depth of field in photographed material. They can also be used to create designed effects.
Channel Blur
Gives you control over blurring each color channel of an object. The Channel blur can be applied selectively to each color channel of an object: red, green, blue, and alpha.
Blurring individual channels allows you to create customized glow effects by retaining sharpness in selected channels while softening others.
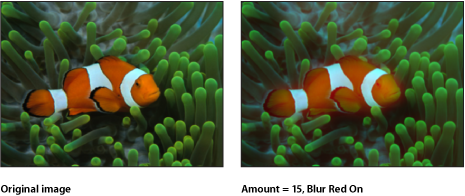
The HUD contains the following controls: Amount, Blur Red, Blur Green, Blur Blue, and Blur Alpha.
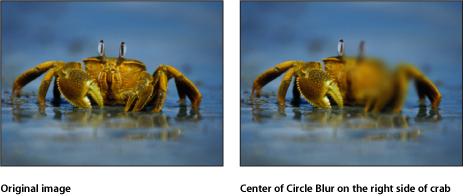
Circle Blur
Creates a circular blur within an image, specified by a center point that sets the center of the blur effect and a radius that sets the size of the affected region. The amount of blur in the affected area can also be customized.
This filter is useful for blurring a limited area in an image. For more sophisticated control of the image region to be blurred, use the Compound Blur filter.
This filter causes rasterization in 3D groups. For more information on rasterization, see About Rasterization.
- Publish OSC: Publishes the filter’s onscreen controls in Final Cut Pro X. For more information on creating content for use in Final Cut Pro, see Creating Templates for Final Cut Pro X.
The HUD contains the following controls: Amount, Radius, and Crop.
Compound Blur
Blurs an object using the specified channel of a designated map image. You can use any shape, text object, still image, or movie file as the map image. You can select any red, green, blue, alpha, or luminance channel to create the shape of the blur.
Tip: Use this filter to blur specific sections of an image. For example: trace the subject of the image to blur with a Bezier or B-spline shape, then assign this shape as the Blur Map image. Use its Luminance or Alpha channel to define the blurred area, then turn off the original shape object in the Layers list or Timeline to hide the source of the blur. For more information, see Editing Shapes.
This filter causes rasterization in 3D groups. For more information on rasterization, see About Rasterization.
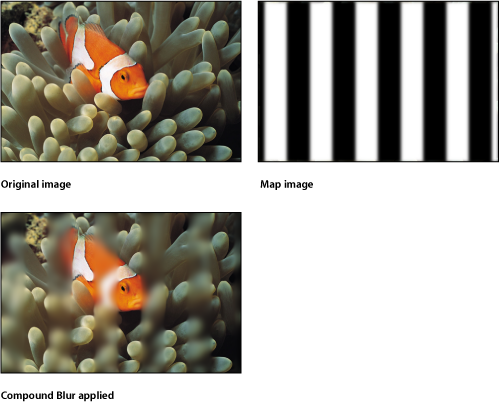
The HUD contains the following controls: Amount, Blur Map, and Map Channel.
Defocus
Mimics the out-of-focus effect that occurs through a real-world camera lens. The Defocus filter blurs an image while creating realistic lens artifacts that mimic the aperture shape in brighter areas of the image. The shape of the blur can be customized.
Tip: Use this filter when you are trying to blur an image to match video or stills shot with a camera. For example, if you key a woman standing in front of a blue screen, and you intend to place a background image behind her to make it look like she’s standing in a valley with mountains in the background, use the Defocus filter instead of a Gaussian Blur to create a realistic depth-of-field effect for the mountains in the distance.
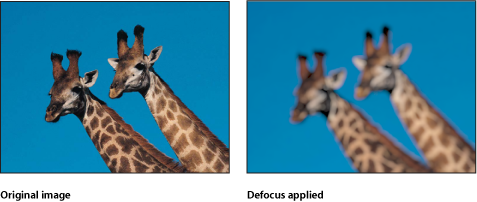
The HUD contains the following controls: Amount, Gain, Shape, Sides, Rotation, and Aspect Ratio.
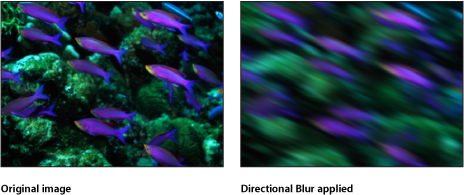
Directional Blur
Blurs an object along a specific angle. This filter creates a blurred streaking effect.
Note: The more filters you use in a project, the more you impact the performance of Motion.
- Publish OSC: Publishes the filter’s onscreen controls in Final Cut Pro X. For more information on creating content for use in Final Cut Pro, see Creating Templates for Final Cut Pro X.
The HUD contains the following controls: Amount and Angle.
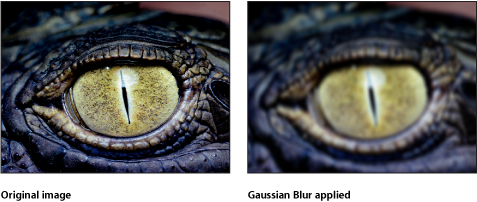
Gaussian Blur
Creates a soft blur effect. The Gaussian blur is the softest blur effect you can apply and is a frequently used blur effect. By default, this filter affects the image uniformly, although you can control the amount of horizontal and vertical blur independently.
Gaussian blur is relevant for most motion graphics tasks, and can be animated for various focus-control effects. However, to more accurately simulate camera focus, the Defocus filter might be a better choice. For more information on the Defocus filter, see Defocus.
The HUD contains the following controls: Amount, Horizontal, and Vertical.
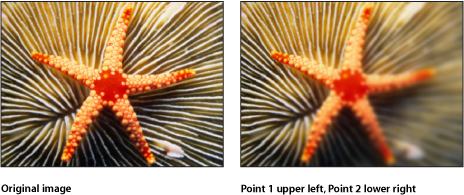
Gradient Blur
Creates a graduated blur between two points. Point one is the beginning of the blur, and the point at which the image is at its sharpest. Point two is the end of the blur, and the point at which the image is at its blurriest, depending on the value set in the Amount parameter.
This filter causes rasterization in 3D groups. For more information on rasterization, see About Rasterization.
- Publish OSC: Publishes the filter’s onscreen controls in Final Cut Pro X. For more information on creating content for use in Final Cut Pro, see Creating Templates for Final Cut Pro X.
The HUD contains the following controls: Amount and Crop.
Prism
Blurs and refracts the image as if seen through a prism, creating a rainbow effect.

- Publish OSC: Publishes the filter’s onscreen controls in Final Cut Pro X. For more information on creating content for use in Final Cut Pro, see Creating Templates for Final Cut Pro X.
The HUD contains the following controls: Amount and Angle.
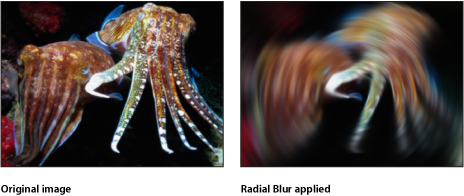
Radial Blur
Creates a rotational blur centered on a point. The effect is similar to the motion blur you would see if an image were spinning quickly.
- Publish OSC: Publishes the filter’s onscreen controls in Final Cut Pro X. For more information on creating content for use in Final Cut Pro, see Creating Templates for Final Cut Pro X.
The HUD contains the following controls: Angle and Crop.
Soft Focus
Creates an effect similar to duplicating an object, applying the Screen blend mode to composite the object against itself, then blurring an overlapping object—within a single filter. The Strength parameter controls how much of the blurred image is added back to the original image.
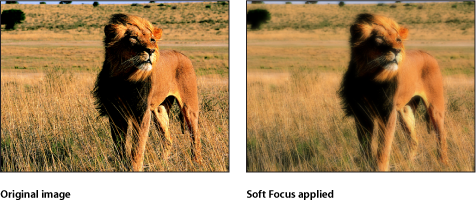
The HUD contains the following controls: Amount and Strength.
Variable Blur
Creates a tunnel focus effect with a blur applied inside or outside a circular region. If the inner radius of the circle is larger than the outer radius of the circle, the blur is applied inside the circle.
This filter causes rasterization in 3D groups. For more information on rasterization, see About Rasterization.
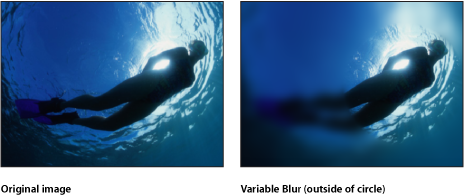
- Publish OSC: Publishes the filter’s onscreen controls in Final Cut Pro X. For more information on creating content for use in Final Cut Pro, see Creating Templates for Final Cut Pro X.
The HUD contains the following controls: Amount, Inner Radius, Outer Radius, and Crop.
Zoom Blur
Creates a blur that simulates a fast camera zoom-in to a point. This filter causes rasterization in 3D groups. For more information on rasterization, see About Rasterization.
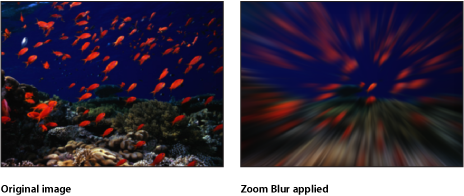
- Publish OSC: Publishes the filter’s onscreen controls in Final Cut Pro X. For more information on creating content for use in Final Cut Pro, see Creating Templates for Final Cut Pro X.
The HUD contains the following controls: Look, Amount, and Swirl.