Distortion Filters
Distortion filters are used to change the shape of objects, warping, twisting, and pulling them in all directions.
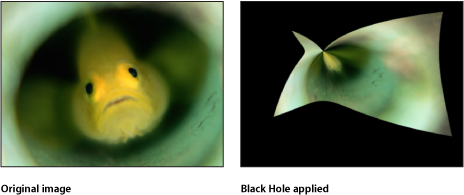
Black Hole
Distorts an image by causing part of it to disappear into the specified center point, and by bowing the top, bottom, and sides inward. As the value of the Amount parameter increases, the more the sides bow in, and the more of the image at the center point disappears into it. The Poke filter has a similar effect without removing part of the image.
This filter causes rasterization in 3D groups. For more information on rasterization, see About Rasterization.
- Publish OSC: Publishes the filter’s onscreen controls in Final Cut Pro X. For more information on creating content for use in Final Cut Pro, see Creating Templates for Final Cut Pro X.
The HUD contains the following control: Amount.
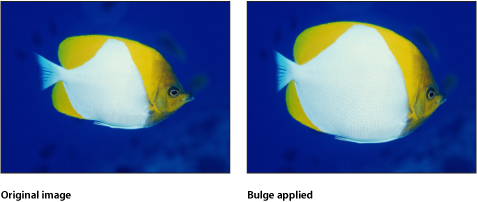
Bulge
Distorts an image as if pushed outward by something pushing it from behind.
This filter causes rasterization in 3D groups. For more information on rasterization, see About Rasterization.
- Publish OSC: Publishes the filter’s onscreen controls in Final Cut Pro X. For more information on creating content for use in Final Cut Pro, see Creating Templates for Final Cut Pro X.
The HUD contains the following controls: Amount and Scale.
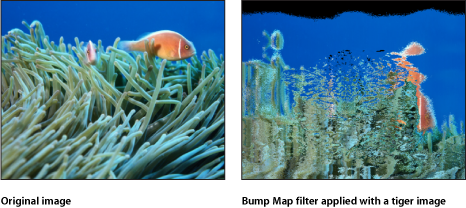
Bump Map
Uses a source object to define a bump pattern that can be used to deform an object, with parameters to control the amount of displacement. You can use any image, movie, or shape as the source object.
This filter causes rasterization in 3D groups. For more information on rasterization, see About Rasterization.
- Map Image: Displays a thumbnail of the map chosen. To add a map image or replace the current one, drag an object (image, shape, text, and so on) into the well.To learn how to add an object to the Map Image well, see Source Well.
The HUD contains the following controls: Map Image, Direction, and Amount.
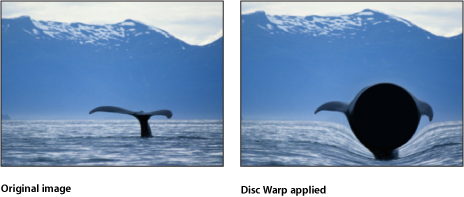
Disc Warp
Stretches the image outward around a circular region. As the radius of the warping region increases, the image is warped outward with a greater amount of distortion. The color of the resulting disk is determined by the color value of the pixel where the center is placed.
This filter causes rasterization in 3D groups. For more information on rasterization, see About Rasterization.
- Publish OSC: Publishes the filter’s onscreen controls in Final Cut Pro X. For more information on creating content for use in Final Cut Pro, see Creating Templates for Final Cut Pro X.
The HUD contains the following control: Radius.
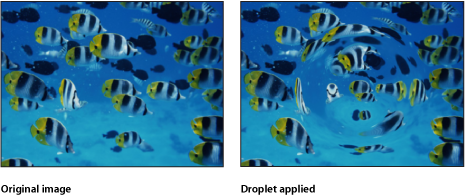
Droplet
Simulates the effect of a drop of liquid falling onto the surface of a pool, with the image displaced by concentric ripples. This filter is not automatically animated, but animating the Thickness parameter of this filter creates the effect of the ripples spreading out from the center.
This filter causes rasterization in 3D groups. For more information on rasterization, see About Rasterization.
- Publish OSC: Publishes the filter’s onscreen controls in Final Cut Pro X. For more information on creating content for use in Final Cut Pro, see Creating Templates for Final Cut Pro X.
The HUD contains the following controls: Radius, Thickness, and Height.
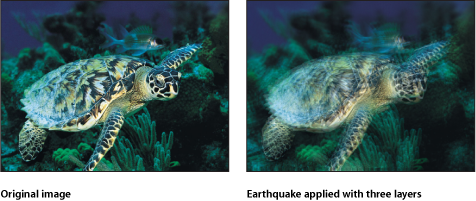
Earthquake
Creates an animated displacement effect on an object, adjusting its position as if shaken by an earthquake. This filter causes rasterization in 3D groups. For more information on rasterization, see About Rasterization.
- Publish OSC: Publishes the filter’s onscreen controls in Final Cut Pro X. For more information on creating content for use in Final Cut Pro, see Creating Templates for Final Cut Pro X.
The HUD contains the following controls: Twist, Horizontal Shake, Vertical Shake, Layers, and Random Seed.
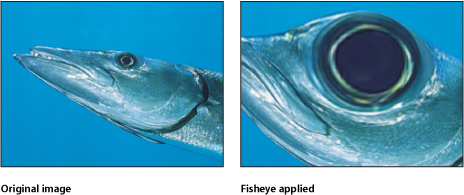
Fisheye
Distorts an object as if it were seen through the view of a fisheye lens. The result is an extremely wide-angle warping effect also known as barrel distortion.
Use the Fisheye filter with a negative Amount value as an imprecise way to correct for barrel distortion in images shot using a wide-angle lens.
This filter causes rasterization in 3D groups. For more information on rasterization, see About Rasterization.
- Publish OSC: Publishes the filter’s onscreen controls in Final Cut Pro X. For more information on creating content for use in Final Cut Pro, see Creating Templates for Final Cut Pro X.
The HUD contains the following controls: Radius and Amount.
Flop
Reverses an image horizontally, vertically, or in both directions. This filter causes rasterization in 3D groups. For more information on rasterization, see About Rasterization.

The HUD contains the following control: Flop.
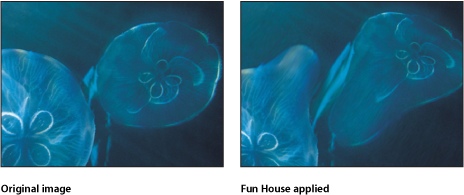
Fun House
Simulates the distortion caused by an imperfectly shaped mirror, similar to those in a carnival fun house. This filter causes rasterization in 3D groups. For more information on rasterization, see About Rasterization.
- Publish OSC: Publishes the filter’s onscreen controls in Final Cut Pro X. For more information on creating content for use in Final Cut Pro, see Creating Templates for Final Cut Pro X.
The HUD contains the following controls: Width, Amount, and Angle.
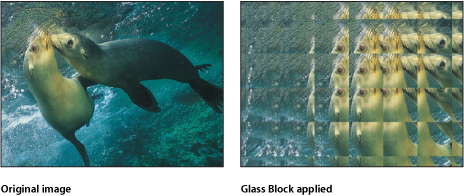
Glass Block
Cuts an object into a series of tiles and offsets the portion of the image in each tile to create a duplicated pattern effect. The number of tiles and the amount that each tile is offset, can be customized.
This filter causes rasterization in 3D groups. For more information on rasterization, see About Rasterization.
- Publish OSC: Publishes the filter’s onscreen controls in Final Cut Pro X. For more information on creating content for use in Final Cut Pro, see Creating Templates for Final Cut Pro X.
The HUD contains the following controls: Scale, Angle, and Tile Size.
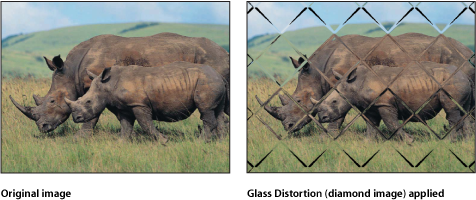
Glass Distortion
Simulates the effect of your object being deformed as it shows through a piece of glass. An image well lets you assign an object to use as the pattern in the glass, using any image, movie, or shape. Other parameters let you control the scale and amount of distortion.
When this filter is initially applied, Glass Distortion behaves as if there were a black image applied to the Distort Input well, which leaves the target object unchanged.
This filter causes rasterization in 3D groups. For more information on rasterization, see About Rasterization.
- Distort Input: Displays a thumbnail of the image map chosen. To learn how to add an object to the Distort Input well, see Source Well.
- Publish OSC: Publishes the filter’s onscreen controls in Final Cut Pro X. For more information on creating content for use in Final Cut Pro, see Creating Templates for Final Cut Pro X.
The HUD contains the following controls: Fit, X Scale, Y Scale, Amount, and Softness.
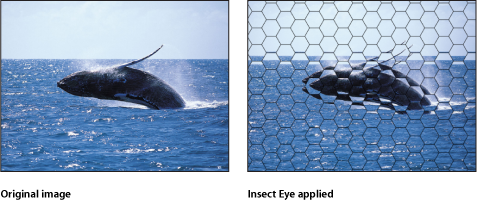
Insect Eye
Maps a repeating hexagonal distortion pattern to an image, mimicking the POV of an insect. This filter causes rasterization in 3D groups. For more information on rasterization, see About Rasterization.
The HUD contains the following controls: Size, Refraction, Border Size, and Border Color.
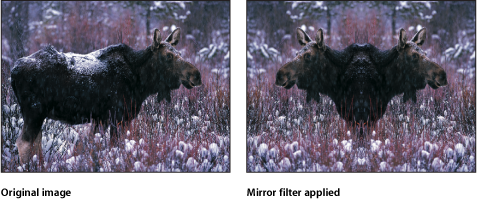
Mirror
Splits an image in half vertically and reverses the remaining half to create a reflection. The center point and angle of this split point can be customized. This filter is excellent for recreating the magic of 1980s music videos.
This filter causes rasterization in 3D groups. For more information on rasterization, see About Rasterization.
- Publish OSC: Publishes the filter’s onscreen controls in Final Cut Pro X. For more information on creating content for use in Final Cut Pro, see Creating Templates for Final Cut Pro X.
The HUD contains the following control: Angle.
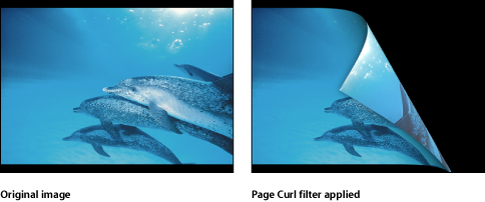
Page Curl
Animates the image as if it is a page peeling away from the upper-left corner of the Canvas to the lower-right corner.
This filter causes rasterization in 3D groups. For more information on rasterization, see About Rasterization.
- Angle: Defines the angle of the page turn. Alternatively, use the Angle onscreen control (the small circle between the center circle and arrow) with the Rotate control (the arrow) to set the direction of the page turn. For example, at an Angle value of 180 degrees, the page turn begins along the right edge of the image.
- Rotation: Defines the rotation of the page turn. Alternatively, use the Rotation onscreen control (the arrow) with the Angle control (the small circle between the center circle and arrow) to set the direction of the page turn. For example, when Angle is set to 180 degrees and Rotation is set to 130 degrees, the page turn begins along the upper-right corner of the image.
- Publish OSC: Publishes the filter’s onscreen controls in Final Cut Pro X. For more information on creating content for use in Final Cut Pro, see Creating Templates for Final Cut Pro X.
The HUD contains the following controls: Direction, Angle, Rotation, Radius, Fade Out, Shadow, Highlight Color, Back Color, Animate, and Percent.
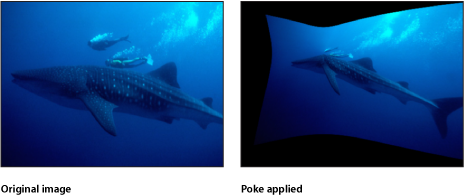
Poke
Distorts an image by bowing the top, bottom, and sides inward, and appears to push the object into the Canvas at the specified Center point. As the value of the Amount parameter increases, the more the sides bow in. The Black Hole filter has a similar effect but also removes part of the image at the center point.
This filter causes rasterization in 3D groups. For more information on rasterization, see About Rasterization.
- Publish OSC: Publishes the filter’s onscreen controls in Final Cut Pro X. For more information on creating content for use in Final Cut Pro, see Creating Templates for Final Cut Pro X.
The HUD contains the following controls: Radius and Scale.
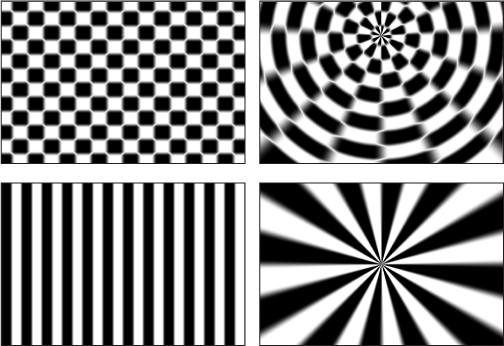
Polar
Converts images from rectangular coordinates to polar coordinates, and vice versa.
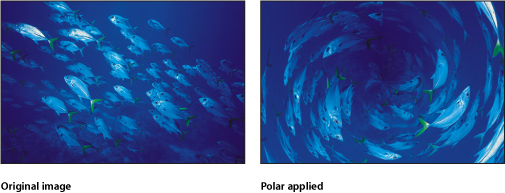
Tip: This filter works well with objects containing horizontal or vertical lines, such as the Stripes or Checkerboard generators. A similar effect can be created with any image by adding the Line Screen or other related filters.
- Publish OSC: Publishes the filter’s onscreen controls in Final Cut Pro X. For more information on creating content for use in Final Cut Pro, see Creating Templates for Final Cut Pro X.
The HUD contains the following control: Polar to Rect.
Refraction
Creates a glass-distortion effect on an image, with an optional height map. This filter causes rasterization in 3D groups. For more information on rasterization, see About Rasterization.
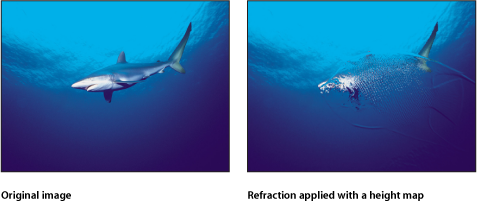
- Height Map: Displays a thumbnail of the height map chosen. The height map is used to determine the edges along which the image is refracted. To learn how to add an object to the Height Map well, see Source Well.
The HUD contains the following controls: Softness, Refraction, Height Map, and Map Channel.
Ring Lens
Creates a ring of distortion over the image, creating a donut-like bulge. This filter causes rasterization in 3D groups. For more information on rasterization, see About Rasterization.
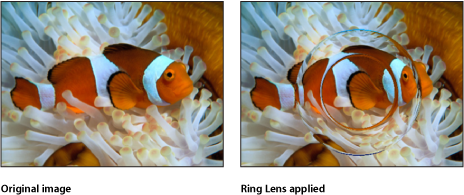
- Thickness: Sets the thickness of the ring as a percentage of the radius. Values range from 0 (no thickness) to 1.00 (no hole in the center of the ring lens). Drag the outer circle of the onscreen controls to adjust the Thickness value in the Canvas. Drag between the inner and outer circles to adjust the Thickness and Radius parameters simultaneously.
- Publish OSC: Publishes the filter’s onscreen controls in Final Cut Pro X. For more information on creating content for use in Final Cut Pro, see Creating Templates for Final Cut Pro X.
The HUD contains the following controls: Radius, Thickness, and Refraction.
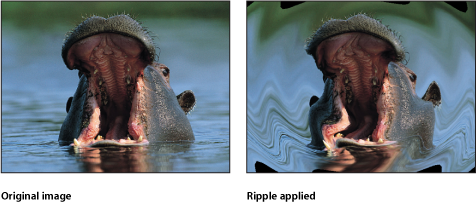
Ripple
Creates animated ripples over the surface of an object. This filter is automatically animated to create an undulating effect on the surface of the affected image. The amplitude can be adjusted to increase or decrease the rippling effect.
This filter causes rasterization in 3D groups. For more information on rasterization, see About Rasterization.
- Publish OSC: Publishes the filter’s onscreen controls in Final Cut Pro X. For more information on creating content for use in Final Cut Pro, see Creating Templates for Final Cut Pro X.
The HUD contains the following control: Amplitude.
Scrape
Smears an image along an angle defined by the Rotation parameter. The Scrape effect starts at the center point, and continues to the edge of the object.
This filter causes rasterization in 3D groups. For more information on rasterization, see About Rasterization.

- Publish OSC: Publishes the filter’s onscreen controls in Final Cut Pro X. For more information on creating content for use in Final Cut Pro, see Creating Templates for Final Cut Pro X.
The HUD contains the following controls: Rotation and Amount.
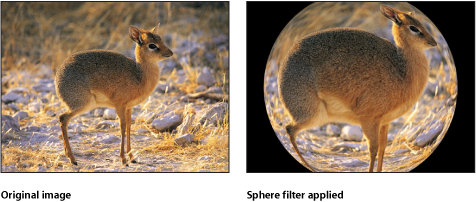
Sphere
Simulates the effect of an image wrapped around a sphere. This filter can be used to turn an image of a map into an imprecise globe.
This filter causes rasterization in 3D groups. For more information on rasterization, see About Rasterization.
- Publish OSC: Publishes the filter’s onscreen controls in Final Cut Pro X. For more information on creating content for use in Final Cut Pro, see Creating Templates for Final Cut Pro X.
The HUD contains the following control: Radius.
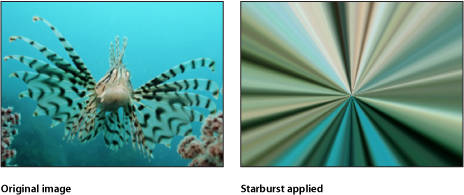
Starburst
Radiates solid-colored rays out from the center of your object. The colors are derived from pixel values around the selected center point, with the number of colors used determined by the Radius parameter.
This filter causes rasterization in 3D groups. For more information on rasterization, see About Rasterization.
- Publish OSC: Publishes the filter’s onscreen controls in Final Cut Pro X. For more information on creating content for use in Final Cut Pro, see Creating Templates for Final Cut Pro X.
The HUD contains the following control: Radius.
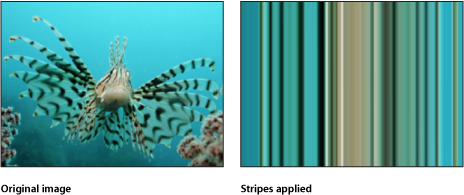
Stripes
Turns an image into a series of vertical stripes. The angle of generated stripes can be changed using the Angle parameter. The stripe colors are derived from pixel values along a line through the center point at the angle specified by the Angle parameter. The distribution of colors is determined by the Offset parameter.
This filter causes rasterization in 3D groups. For more information on rasterization, see About Rasterization.
- Publish OSC: Publishes the filter’s onscreen controls in Final Cut Pro X. For more information on creating content for use in Final Cut Pro, see Creating Templates for Final Cut Pro X.
The HUD contains the following controls: Angle and Offset.
Target
Draws bands of concentric circles outward from the center point value. The target colors are derived from pixel values around the selected center point, with the distribution of colors determined by the Angle parameter.
This filter causes rasterization in 3D groups. For more information on rasterization, see About Rasterization.

- Publish OSC: Publishes the filter’s onscreen controls in Final Cut Pro X. For more information on creating content for use in Final Cut Pro, see Creating Templates for Final Cut Pro X.
The HUD contains the following control: Angle.
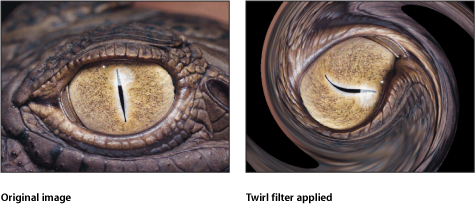
Twirl
Twirls an image like a fork twisting a plate of spaghetti. The image appears to stretch from the sides to the center in a spiral. The amount of spiraling is determined by the Twirl parameter.
This filter causes rasterization in 3D groups. For more information on rasterization, see About Rasterization.
- Publish OSC: Publishes the filter’s onscreen controls in Final Cut Pro X. For more information on creating content for use in Final Cut Pro, see Creating Templates for Final Cut Pro X.
The HUD contains the following controls: Amount and Twirl.
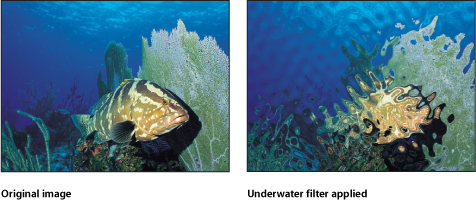
Underwater
Applies an animated distortion to an image, simulating a view through water. This filter causes rasterization in 3D groups. For more information on rasterization, see About Rasterization.
The HUD contains the following controls: Size, Speed, and Refraction.
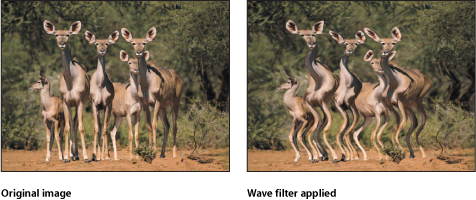
Wave
Distorts an image to simulate waves oscillating across it. The wave filter is not automatically animated, but you can animate the Offset parameter to create an undulating effect.
For information on animating parameters, see Parameter Behaviors.
This filter causes rasterization in 3D groups. For more information on rasterization, see About Rasterization.
The HUD contains the following controls: Amplitude, Wavelength, Offset, and Vertical.