Using the Sequence Replicator Behavior
The Sequence Replicator behavior allows you to animate elements of a replicator in sequence over time. This is the only way to animate elements individually—keyframing the cell parameters or applying other behaviors affects all elements in the pattern uniformly.
Using the Sequence Replicator behavior, you can select and apply replicator cell parameters such as Position, Color, Scale, Rotation, or Opacity, then animate those parameters in a cascading sequence that passes through each element in a replicator pattern.
The starting point for the sequence animation is based on the replicator’s origin or build style. For example, if a spiral replicator’s Origin parameter is set to Center, the sequence animation begins at the center of the spiral and moves outward; if the Origin of a rectangle replicator with a tile fill is set to Upper Left, and the Build Style is set to Across, the sequence begins with the elements in the upper-left corner of the pattern, then moves toward the lower-right corner.
The Sequence Replicator behavior can be applied to the replicator object, or to the cells of the replicator. When applied to each cell of a replicator with multiple cells, animations can be created for each cell.
After you create a Sequence Replicator behavior, you can save the behavior to the Library.
In the Layers list or Timeline, select the replicator, then choose Replicator > Sequence Replicator from the Add Behavior pop-up menu in the toolbar.

In the Library, select the Behaviors category and then the Replicator subcategory. Drag the Sequence Replicator behavior from the stack to the replicator in the Layers list, Canvas, or Timeline.
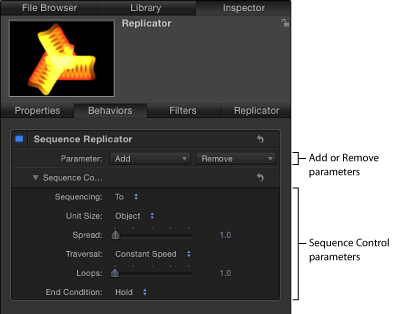
The Sequence Replicator controls appear in the Behaviors Inspector.
At the top of the Sequence Replicator controls in the Inspector are the Parameter pop-up menus, which are used to add parameters to the behavior, or to remove them after they’ve been added. The added parameters determine which properties are animated.
Underneath the Parameter pop-up menus are the Sequence Control parameters, which determine how added parameters affect onscreen elements. These controls include options for setting the direction of the animation, whether the animation is applied per element or to the whole pattern, the number of times the animation cycles through the pattern, and so on.
Important: Before any sequencing animation can occur, you must add at least one parameter to the behavior in the Inspector and then set a value for that parameter. Until a parameter is added, adjusting the Sequence Controls in the HUD or Inspector has no effect.
Adding Parameters to the Sequence Replicator Behavior
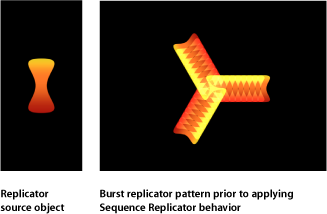
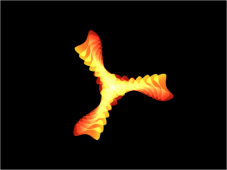
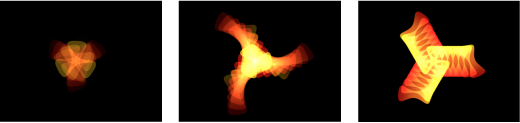
In the following example, the Rotation, Opacity, and Scale parameters are added to the Sequence Replicator behavior. The behavior is applied to a replicator with its Shape set to Burst and its Origin set to Center.
With the Sequence Replicator behavior selected, display the Behaviors Inspector.
In the Parameter row, do the following:
Choose Rotation from the Add Parameter pop-up menu.
Choose Opacity from the Add Parameter pop-up menu.
Choose Scale from the Add Parameter pop-up menu.
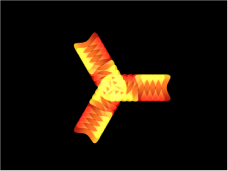
The added parameters appear above the Add and Remove pop-up menus. No animation occurs until you set a value for the parameters.
Play the project (press the Space bar) to see the effects of the sequencing adjustments as they begin to take effect in the next steps.
Ensure that Record Animation is turned off (no checkmark appears when you choose Mark > Record Animation, or the Record button in the toolbar is turned off).
Set Rotation to the largest (or smallest) value you want the cells to spin in the animation.
In this example, Rotation is set to 160 degrees.
Each element rotates from 0 degrees to 160 degrees over the pattern for the duration of the Sequence Replicator behavior.
Note: If the elements are already rotated (in the Cell Controls), the elements are rotated 160 degrees from their original rotation value.
Each element rotates and pops into place before the next element begins its animation. To soften this effect, increase the Spread value.
Increase the Spread value.
In this example, Spread is set to 12.
In addition to creating a more graceful animation, changing the Spread value can also dramatically change the appearance of the pattern.
Set Opacity to the lowest value you want the elements to become in the animation.
In this example, Opacity is set to 0.
Each element fades from 100% opacity to 0% opacity over the pattern for the duration of the Sequence Replicator behavior.
Note: If the elements contain some transparency, they fade from their original opacity value to 0%.
Increase the Scale value.
In this example, Scale is set to 190%.
The animation begins at the original value for any added parameter, then transforms to the value you specify in the Sequence Replicator parameters. The animation begins at the origin of the pattern (set in the Origin or Build Style parameter of the Replicator Inspector or HUD) and moves to the end of the pattern.
Adjusting the Sequence Control Parameters
After you create a sequence animation, you can use Sequence Control parameters to change the manner in which the sequence moves through the replicator pattern. The following section continues with the project used in the previous example.
With the Sequence Replicator behavior selected, display the Behaviors Inspector.
Play the project (press the Space bar) to see the effects of the sequencing.
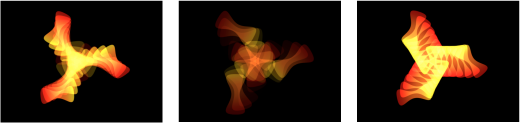
By default, Sequencing is set to To, which specifies that the animation begins at the original value of the cells and moves to the value set in the Sequence Replicator behavior for that parameter. The starting point for the sequence animation is based on the build or origin of the pattern (as defined in the Origin or Build Style parameters in the Replicator Inspector). In the current example, the elements begin completely opaque, at 100% scale, and with 0 degrees of rotation at the origin of the pattern. As the sequence moves toward the end of the pattern, the elements become completely transparent, are scaled to 190%, and are rotated 160 degrees.
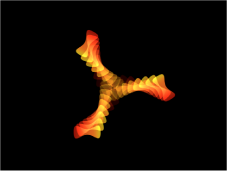
In the Sequencing pop-up menu, choose From.
The animation moves from the value set in the Sequence Replicator behavior to the original value of the cells. This is the opposite of the To Sequencing option.
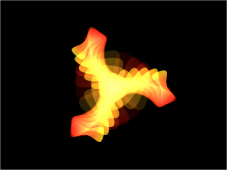
In the Sequencing pop-up menu, choose Through.
The sequence goes through a full animation cycle starting at the original value of the cells, moving to the value set in the Sequence Replicator, then returning to the original value of the cells. This is similar to combining the To and From Sequencing options.
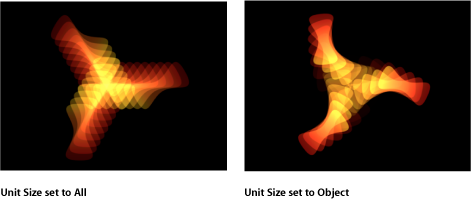
From the Unit Size pop-up menu, choose All.
The sequence animation affects all replicator elements simultaneously. The default is Object, which applies the sequence animation to the elements of the replicator based on the origin of the pattern.
Increase the Loops value to a minimum value of 3.
By default, a sequence animation plays through one time. The value of the Loops parameter defines the number of times the animation repeats over the duration of the replicator object.
From the End Condition pop-up menu, choose Ping Pong.
By default, the End Condition parameter is set to Hold, which completes a sequence animation cycle, then starts the cycle again from the beginning. When set to Ping Pong, the animation cycles forward one time, then cycles backward, then forward, and so on.
Note: The End Condition parameter has no effect for Loop values less than or equal to 1.
Sequence Replicator Controls
Use the following parameters to modify the sequence animation. Except for the Add and Remove Parameter pop-up menus, these parameters also appear in the Sequence Replicator HUD.
- Parameter: Use the Add and Remove pop-up menus in the Parameter row to add and remove replicator cell parameters. When you choose an item from the pop-up menu, additional controls appear in the Behaviors Inspector above the Parameter row. You can adjust these controls (or keyframe them) to modify the sequence animation, which is based on the change in value between these parameters and the original values of the cells. The Add pop-up menu items include:
- Rotation: Adds a rotation dial and value slider that enables you to Specify (in degrees) the rotation of replicator elements.
- Color: Adds a row of color controls that let you specify a tint for replicator elements. You can click the color well to choose a color or open the disclosure triangle and use the Red, Green, and Blue sliders.
- Opacity: Adds an opacity slider, allowing you to define the transparency of the pattern elements.
- Scale: Adds a scale slider that lets you define the size of replicator elements. Click the disclosure triangle next to the Scale slider to reveal separate X scaling and Y scaling subparameters that can be used to adjust the width and height of the cells separately. By default, Scale is set to 100%—the size of the replicator cells is equal to the original size defined in the cell parameters.
- Position: Adds two value fields that define the offset of elements from their original position in X and Y space. Click the disclosure triangle next to the parameter name to reveal separate X, Y, and Z position subparameters. For example, to create an animation in which elements move upward in Y over the replicator pattern, enter a positive value in the Y Position field. In the following images, Y Position is set to 300.
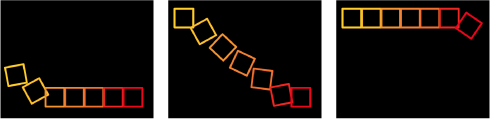
- Sequencing: This pop-up menu specifies how the sequence animation moves through the elements of the pattern, based on the change from the original parameter value to the value set in the Sequence Replicator parameters. The starting point for the sequence animation is based on the selected Origin or Build Style parameters (in the Replicator Inspector). For example, if a line replicator’s Origin parameter is set to End Point, the sequence animation begins at the end of the line and moves toward the start of the line by default. To change the starting point for the sequence animation, change the Origin or Build Style of the pattern in the replicator controls (in the Replicator Inspector or HUD). The Sequencing options are:
- To: Specifies that the animation begins at the original value of the cells and moves to the value set in the Sequence Replicator behavior for that parameter. For example, if the original opacity value of a cell is 100%, and opacity is set to 0% in the Sequence Replicator parameters, onscreen elements begin completely opaque and become completely transparent.
- From: Specifies that the animation moves from the value set in the Sequence Replicator behavior to the original value of the cells. For example, if the original opacity value of a cell is 100% and opacity is set to 0% in the Sequence Replicator parameters, onscreen elements begin completely transparent and become completely opaque. This is the opposite of the To option in the Sequencing pop-up menu.
- Through: Specifies that the sequence goes through a full animation cycle starting at the original value of the cells, moves to the value set in the Sequence Replicator, and then returns to the original value of the cells. For example, if the original opacity value of a cell is 100% and opacity is set to 0% in the Sequence Replicator parameters, onscreen elements begin completely opaque, become transparent, and then become completely opaque again.
- Through Inverted: Specifies that the sequence goes through an inverted animation cycle starting from the value set in the Sequence Replicator, moves to the original value of the cells, and then returns to the value set in the Sequence Replicator. For example, if the original opacity value of a cell is 100% and opacity is set to 0% in the Sequence Replicator parameters, the onscreen elements begin completely transparent, become opaque, and then become completely transparent. This is the opposite of the Through Sequencing option.
- Custom: Allows you to use animation originally created in the source layer’s parameters (except alpha parameters) or to keyframe how the animation moves through the values set in the Sequence Replicator parameters over an element. Each element undergoes the same value sequence. When Custom is chosen from the Sequencing pop-up menu, the Source parameter becomes available.
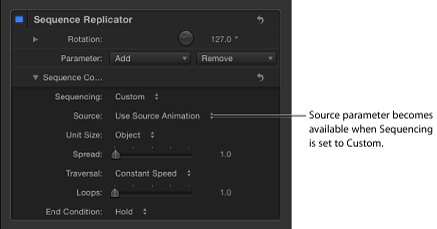
- Source: This pop-up menu becomes available when Custom is chosen from the Sequencing pop-up menu. The Source options are:
- Use Source Animation: If the source layer parameters are keyframed (in the Replicator Inspector or HUD), choose this option to enable the animation created by those keyframes.
- Ignore Source Animation: If the source layer parameters are keyframed (in the Replicator Inspector or HUD), choose this option to ignore the animation created by those keyframes.
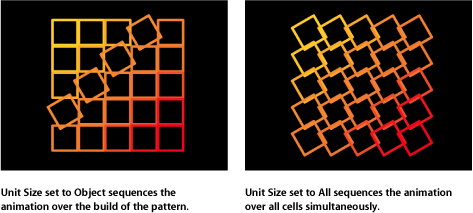
- Unit Size: This pop-up menu specifies whether the sequence animation is applied to the replicator pattern as a whole, to its elements, or to a keyframed range. The Unit Size options are:
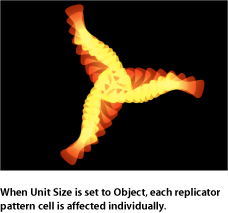
- Object: Applies the sequence animation over each element as its own entity. Object is the default setting.
- All: Applies the sequence animation to all replicator elements simultaneously.
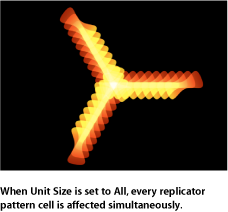
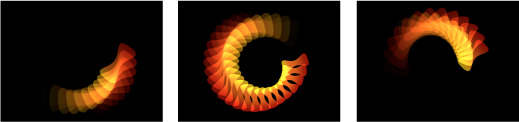
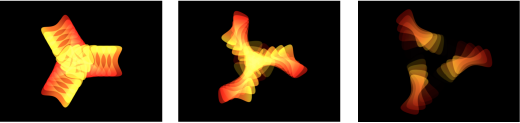
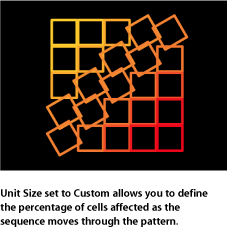
- Custom: Allows you to specify the percentage of elements in the pattern that are affected by the sequence animation at once. Although you can create keyframes for the Custom option, it is not required to affect the sequence. As shown in the following images, the Object and All options allow you to sequence the animation only through the origin or build style of the pattern, or through all pattern elements simultaneously.
Custom allows you to define an area of elements—based on percentage—that are affected by the sequence.
When Custom is chosen from the Unit Size pop-up menu, the Start and End parameters become available.
- End: This slider, available when Custom is chosen from the Unit Size pop-up menu, specifies the end of the range of elements affected by the sequence animation as it moves over the replicator pattern. By default, End is set to 10%. In the above image, End is set to 30%.
Note: If the Sequencing pop-up menu is set to Custom, the Custom option in the Unit Size parameter has no affect.
- Traversal: This pop-up menu sets the action of the sequence behavior to one of the following:
- Constant Speed: The sequence animation moves from the origin of the replicator pattern through the end of the pattern at a constant speed. The sequence moves in the direction specified in the replicator parameters, such as the origin or build style.
- Ease In: The sequence animation begins slowly and increases to normal speed as it moves through the replicator pattern.
- Ease Out: The sequence animation begins at normal speed and slows toward the end of the replicator pattern.
- Ease In/Out: The sequence animation begins slowly, increases to normal speed as it moves toward the middle of the duration of the replicator pattern, and slows as it reaches the end of the replicator pattern.
- Accelerate: The sequence animation increases in speed.
- Decelerate: The sequence animation decreases in speed.
- Custom: This option allows you to keyframe how the animation moves through the replicator pattern. When Custom is selected from the Traversal pop-up menu, the Location parameter replaces the Loops parameter.
- Location: This slider, available when Custom is chosen from the Traversal pop-up menu, defines the location of the pattern where the animation is in effect.
For more information on using the Custom Traversal option, see Using the Sequence Replicator Custom Traversal Option.
- End Condition: A pop-up menu that sets how the sequence animation is repeated over the duration of the replicator object. This parameter has no effect for Loop values less than or equal to 1. End Condition options are:
- Hold: Completes the sequence animation cycle one time, then starts it again from the beginning (after the last element in the sequence completes its animation).
- Wrap: Treats the sequence animation as a continuous loop so the spread wraps from the last element in the sequence to the first element.
- Ping Pong: Completes the sequence animation cycle forward, then completes the animation backward, then forward, and so on.
Using the Sequence Replicator Custom Traversal Option
When the Traversal parameter in the Sequence Replicator behavior is set to Custom, you can create location keyframes to specify where the effect of the sequence is at a given moment. This allows you to create a sequence animation that travels through a replicator pattern in a unique way. This example shows how to use the Custom Traversal option to scale the elements around a circle replicator shape by creating keyframes.
After the Sequence Replicator behavior is applied to the replicator, add the parameters (in the Behaviors Inspector) you want to include in the sequence.
Set the values for the added parameters.
In this example, the Scale parameter is added and the Scale value set to 200%.
For more information on adding parameters to the Sequence Replicator behavior, see Adding Parameters to the Sequence Replicator Behavior.
From the Traversal pop-up menu, choose Custom.
The Location parameter becomes available. Use the Location slider to keyframe how the sequence moves through the replicator pattern.
Press A to enable keyframe recording.
At the frame where you want to begin the animation, drag the Location slider (or use the adjacent value slider) to set where the sequence begins.
As you drag the slider, the sequence moves through the pattern elements. Values displayed in the Location parameter specify where in the pattern the sequence is (in percentage points)—0 representing the origin of the pattern, and 100% representing the end of the pattern.
In the Inspector, a keyframe is added to the Location parameter.
Go to the next frame where you want to set a keyframe, and move the Location slider.
Repeat step 6 until you create all your keyframes.
Play the project (press the Space bar).
The animation moves through the replicator pattern based on its keyframed locations. In this case, the scale moves erratically back and forth around the circle, rather than in a constant direction.
Using Parameter Behaviors with the Sequence Replicator Behavior
Like all other layers in Motion, you can add Parameter behaviors to Sequence Replicator parameters to create even more varied, complex effects without keyframing.
In the Layers list or Timeline, select the Sequence Replicator behavior.
In the Inspector, Control-click the parameter you want to add a Parameter behavior to, then choose a behavior from the Add Parameter Behavior submenu menu.
Note: You can only add a Parameter behavior to parameters that include the Animation menu. The Animation menu appears when you place your mouse at the right side of the parameter row.
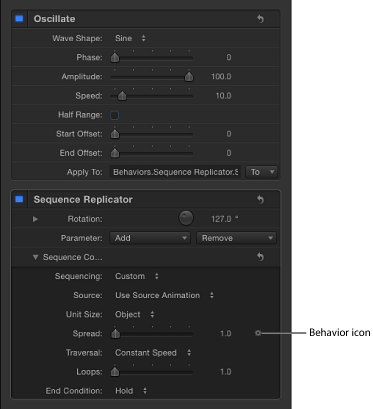
The Parameter behavior is added and appears above the Sequence Replicator behavior in the Behaviors Inspector. A behavior icon appears in the Animation menu of the Sequence Replicator parameter.
Note: When the Wriggle or Randomize parameter behavior is added to a Sequence Replicator parameter, the Affect Subobjects checkbox becomes available. Select the checkbox if you want each element in the pattern to display a different random behavior.
For more information on using Parameter behaviors, see Parameter Behaviors.