Animating Using the Inspector
Although you can animate many attributes using the HUD, many other parameters are only accessible in the Inspector. Each section of the Inspector contains keyframeable parameters. You can animate the position and shape of a mask, the color and styles of a text object, or the options in the generators. The parameters that are keyframeable depend on which object is selected and which effects are applied to that object.
In the Canvas, select the object to keyframe.
Click the Record button (or press A) to turn on keyframe recording.
Place the playhead on the frame where you want the effect to begin.
Open the Inspector pane corresponding to the parameter you want to modify (Filters, in this example).
Note: When the Record button is turned on, animateable parameter values appear red. When the Record button is off, parameter values that have no keyframes remain a light shade of gray.
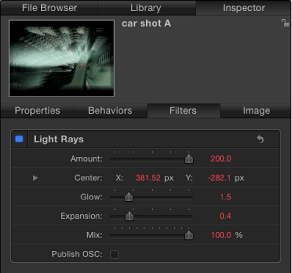
Set the parameter to the beginning value.
Move the playhead to a new position.
In the Inspector, change the parameter to a new value.
Click the Record button (or press A) again to disable record.
The parameter now changes over time.
In the Canvas, select the object to keyframe.
Place the playhead on the frame where you want the effect to begin.
Open the Inspector pane corresponding to the parameter you want to modify.
Set the parameter to the beginning value, then do one of the following:
Press Control-K.
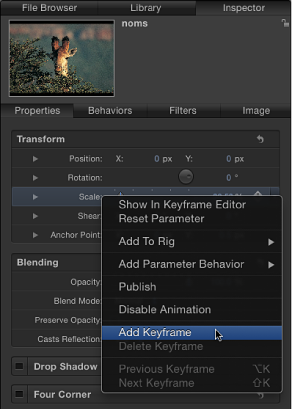
In the Properties Inspector, click the parameter’s Animation menu, then choose Add Keyframe.
In the Properties Inspector, Control-click the parameter name, then choose Add Keyframe from the shortcut menu.
In the Properties Inspector, click the parameter’s Add/Delete Keyframe button.
A keyframe is added at the current frame, and the parameter appears red in the Inspector.
Move the playhead to a new position.
In the Inspector, change the parameter to a new value.
The parameter now changes over time.
Animation Menu
The Animation menu in the Inspector provides additional options, such as the ability to add keyframes to parameters, delete or reset keyframe information, navigate among keyframes, open the Keyframe Editor, add Parameter behaviors, add parameters to Rigs, and Publish parameters.
Every keyframeable parameter has an Animation menu, available by Control-clicking a parameter’s name to reveal a shortcut menu, or by moving the pointer to the right side of a parameter row in the Inspector, and clicking the downward arrow that appears.
Note: If the Animation menu corresponds to a parameter that cannot be animated, the Enable Animation and Keyframe menu items are dimmed.
The Animation menu contains the following options:
- Show in Keyframe Editor: Opens the Keyframe Editor and displays the parameter’s keyframes and curves. For more information, see Animating in the Keyframe Editor.
- Reset Parameter: Removes keyframes and settings for this parameter. The parameter value is reset to its default value.
- Add To Rig: Lets you add a parameter to an existing rig, or to a new rig that you create to control multiple parameters with a single checkbox, slider, or pop-up menu. Rigs are useful when you create templates for Final Cut Pro X. For more information, see Using Rigs and Creating Templates for Final Cut Pro X.
- Add Parameter Behavior: Opens a submenu listing all available Parameter behaviors you can use to animate the parameter. For more information, see Applying Parameter Behaviors to a Behavior.
- Publish: Sends the parameter control to Final Cut Pro X when you create and save a template for the editing application. The Publish command also lets you send rig controls (widgets) to Final Cut Pro. For more information on the Publish command, see Publishing Parameter Controls from Motion to Final Cut Pro X. For more information on rigging, see Using Rigs.
- Enable/Disable Animation: Activates or deactivates the keyframed value. Choosing Disable Animation hides the keyframes already set, restoring the parameter to its default value. However, the keyframes are not thrown away. (A dash appears in the parameter row to indicate the animation is disabled.) Choosing Enable Animation again returns the parameter to its last keyframed state.
- Add Keyframe: Adds a keyframe at the current frame in the project. If the playhead is positioned on a frame where a keyframe has been added, this menu command is dimmed. To add a keyframe without accessing the Animation menu in the Inspector, press Control-K. A keyframe is added to the last modified parameter of the object (regardless of the status of the Record button) at the current frame.
- Delete Keyframe: Deletes the keyframe. The Delete Keyframe option is available only if the playhead is positioned on a frame where a keyframe exists.
- Previous Keyframe: Moves the playhead to the previous keyframe for this parameter. The Previous Keyframe command is available only if a keyframe exists earlier in the project.
- Next Keyframe: Moves the playhead to the next keyframe for this parameter. The Next Keyframe command is available only if a keyframe exists later in the project.
Note: You can also choose Mark > Go To > Previous Keyframe (or press Option-K) or Mark > Go To > Next Keyframe (or press Shift-K) to move from keyframe to keyframe.
Change the value of the parameter you want to keyframe.
Click the Animation menu, then choose Add Keyframe.
A keyframe is added at the frame and the affected parameter appears red in the Inspector, indicating any further edits at other playhead locations will add keyframes.
To set another keyframe for the same parameter, move the playhead to the next location, then change the value of the parameter.
Move the playhead to the frame where the keyframe is currently set.
Click the Animation menu for the parameter you want to change, then choose Delete Keyframe.
Note: To delete all keyframes for a parameter, choose Reset Parameter from the Animation menu.
Click the Animation menu for the parameter you want to reset, then choose Reset Parameter.
All keyframes are removed for that parameter.
Keyframe Controls
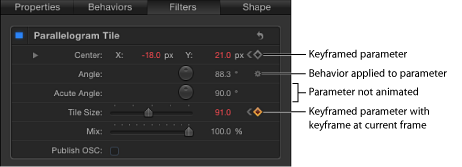
In the Inspector, basic keyframe controls are available on the right side of animateable parameter rows. These controls allow you to determine the status of a parameter at a glance, to add or delete keyframes at the current playhead, and to navigate to next and previous keyframes in the Timeline.
Add/Delete Keyframe Buttons
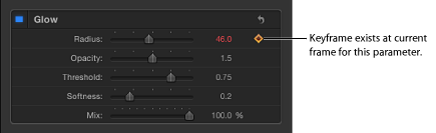
Moving the pointer over an animatable parameter reveals the Add/Delete Keyframe button (a plus sign enclosed in a gray diamond). Click the button to place a keyframe for that parameter at the current frame.
If a parameter is keyframed at the current frame, as well as before and after the current frame, three controls appear to the right of that parameter in the Inspector.
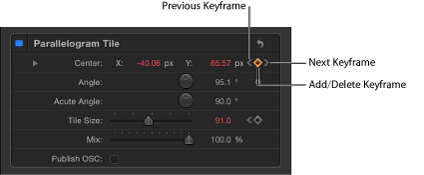
- Add/Delete Keyframe: A diamond-shaped button with several states. A gray diamond button indicates that there is no keyframe at the current frame. Click this button to add a keyframe at the playhead position. When you add a keyframe, the diamond turns orange, indicating that there is a keyframe at the frame. Clicking the orange diamond deletes the keyframe. When the playhead advances to a frame that is not keyframed, the diamond turns gray.

Reset Button
Each parameter set in the Inspector is equipped with a reset button. A parameter set might be a filter, or it might be a category of effects or transformations, such as Transform, Blending, Drop Shadow, or other items in the Properties Inspector.
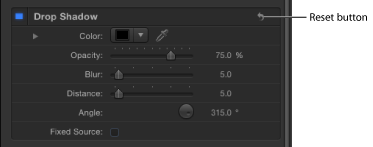
The reset button removes all keyframes applied to all parameters in the set and restores those parameters to their default state.