Using the EXS24 mkII Sampler Instruments Pop-Up Menu
The EXS24 mkII ships with a ready-to-play sampler instrument library. This section outlines the use of the Sampler Instruments pop-up menu. Also see Loading EXS24 Sampler Instruments from Other Locations and Searching for EXS24 Sampler Instruments.
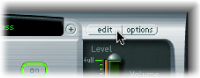
The Edit and Options buttons, shown to the right of the Sampler Instruments field, are discussed in Opening the EXS24 mkII Instrument Editor and Using the EXS24 mkII Options Pop-Up Menu Commands.
Click the Sampler Instruments field to open the Sampler Instruments pop-up menu.
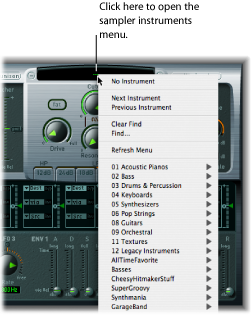
Choose the desired sampler instrument.
Click the plus or minus button on either side of the Sampler Instruments pop-up menu.
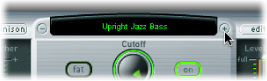
Choose Next Instrument or Previous Instrument in the Sampler Instruments pop-up menu (or use the Next EXS Instrument and Previous EXS Instrument key commands).
If the EXS24 mkII is the key focus window, you can also use the following key commands:
Next Plug-In Setting or EXS Instrument
Next Channel Strip or Plug-In Setting or EXS Instrument
Previous Plug-In Setting or EXS Instrument
Previous Channel Strip or Plug-In Setting or EXS Instrument
Tip: You can also browse through your sampler instruments by using your MIDI keyboard. The Sampler Preferences window offers Previous EXS Instrument and Next EXS Instrument options. These allow you to assign a MIDI event, such as a MIDI note, control change, program change, and so on, to select the previous or next sampler instrument in the Sampler Instruments pop-up menu. See Setting EXS24 mkII Sampler Preferences.
Loading EXS24 Sampler Instruments from Other Locations
You can manually load sampler instruments that are not shown in the Sampler Instruments pop-up menu. This is done from the Instrument pop-up menu in the Instrument Editor window.
Open the Instrument Editor by clicking the Edit button in the upper-right corner of the Parameter window.
Choose Instrument > Open, then locate the desired instrument in the dialog.
Searching for EXS24 Sampler Instruments
To minimize the number of sampler instruments displayed in the Sampler Instruments pop-up menu, you can use the Find function. This limits the Sampler Instruments pop-up menu to displaying only sampler instrument names that contain the search term.
Click to open the Sampler Instruments pop-up menu, then choose Find.
Enter the search term in the Filter window.

Choose Clear Find in the Sampler Instruments pop-up menu.
The full Sampler Instruments pop-up menu is displayed, but the search term you typed into the Filter window is not cleared. You can return to the limited menu by choosing Enable Find in the Sampler Instruments pop-up menu. This allows you to switch between the two views without re-typing the search term.
Choose the Find command again and enter the desired search term.
Opening the EXS24 mkII Instrument Editor
Click the Edit button to the right of the Sampler Instruments pop-up menu to open the currently loaded sampler instrument in the EXS24 mkII Instrument Editor window. The Instrument Editor window provides precise control over each sample, or zone, in the sampler instrument.
Note: Clicking the Edit button when no sampler instrument is loaded also opens the Instrument Editor window and automatically creates a new, empty, sampler instrument.
For detailed information, see An Overview of the EXS24 mkII Instrument Editor, and subsequent sections.
Using the EXS24 mkII Options Pop-Up Menu Commands
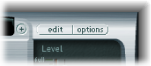
Click the Options button in the upper-right corner of the Parameter window. This opens the Options pop-up menu, which contains the following commands:
- Recall default EXS24 settings: Recalls a neutral setting for all parameters in the Parameter window. This provides a “clean slate” when adjusting the parameters of your sampler instrument.
- Recall settings from instrument: Recalls the original parameter settings of the loaded sampler instrument. This parameter is useful if you’ve been overzealous with your tweaking and want to return to the original sampler instrument parameter settings.
- Save settings to instrument: Stores the current parameter values of the Parameter window in the sampler instrument file. When the instrument is reloaded, these values are recalled.
- Delete settings from instrument: Removes the stored settings (Parameter window values) from the sampler instrument file.
- Rename instrument: Opens a file save dialog, allowing you to rename the loaded instrument. This overwrites the existing instrument name.
- Save instrument as: Opens a file save dialog, allowing you to enter an alternative name for the loaded instrument. This preserves the original name and sampler instrument file, and creates a new sampler instrument—a copy.
Note: This is a good, safe option to use, as any projects or templates that use the originally named sampler instrument will work as expected.
- Delete instrument: Deletes the loaded sampler instrument.
- (Recall default EXS24 mkI settings): Recalls the parameter settings of sampler instruments created in the older version of the EXS24—notably, the modulation paths (see EXS24 mkI Modulation Paths). This parameter is not relevant for sampler instruments created in the EXS24 mkII.
- AKAI Convert: Launches the AKAI Convert window (see Converting AKAI Files with the EXS24 mkII).
- SoundFont Convert, SampleCell Convert, DLS Convert, Giga Convert: Each of these commands launches a dialog with instructions about performing these conversions. See Importing SoundFont2, SampleCell, DLS, and Gigasampler Files for details.
- Preferences: Opens the EXS24 mkII preferences (see Setting EXS24 mkII Sampler Preferences).
- Virtual Memory: Opens a configuration window for the EXS24 mkII’s virtual memory functions. Virtual memory allows samples of almost unlimited length to be played back—by streaming audio directly from the hard disk in real time. For more information, see Configuring EXS24 mkII Virtual Memory. The virtual memory window also allows you to enable direct access to system memory for the EXS24 mkII—in systems with 5 GB of RAM or more. See Advanced EXS24 mkII RAM Management.