Importing EXS24 mkII Sampler Instruments
The EXS24 mkII is compatible with the AKAI S1000 and S3000, SoundFont2, SampleCell, DLS, and Gigasampler sample formats, as well as the Vienna Library. See these sections:
Importing SoundFont2, SampleCell, DLS, and Gigasampler Files
Converting AKAI Files with the EXS24 mkII
Importing SoundFont2, SampleCell, DLS, and Gigasampler Files
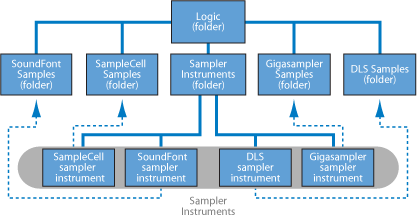
The EXS24 mkII recognizes SoundFont2, SampleCell, DLS, and Gigasampler files placed inside the Sampler Instruments folder, and converts them into sampler instruments.
Copy or move your SoundFont2, SampleCell, DLS, or Gigasampler files into the ~/Library/Application Support/Logic/Sampler Instruments folder.
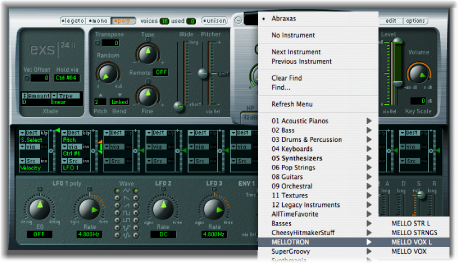
Choose the SoundFont2, SampleCell, DLS, or Gigasampler file in the EXS24 mkII Sampler Instruments pop-up menu. The EXS24 mkII automatically converts the chosen file into an EXS sampler instrument:
An EXS instrument file is created in the Sampler Instruments folder. This contains the file in its original format.
The raw samples associated with the sampler instrument are placed in one of the following folders, depending on the format being converted:
~/Library/Application Support/Logic/SoundFont Samples
~/Library/Application Support/Logic/SampleCell Samples
~/Library/Application Support/Logic/Gigasampler Samples
~/Library/Application Support/Logic/DLS Samples
The procedure outlined above also applies when you are importing SoundFont2 and SampleCell Bank files. These file types contain multiple sounds, in addition to single-instrument files.
When you load a SoundFont2 or SampleCell Bank into the EXS24 mkII, it creates a Bank and a Samples folder, named after the SoundFont2/SampleCell Bank file. The word “Bank” or “Samples” is appended to each folder name.
An EXS sampler instrument file is automatically created for all sounds in the bank, and placed in the new Bank folder. The Sampler Instruments pop-up menu automatically updates to reflect the new folder hierarchy. All samples associated with the bank are automatically added to a Samples folder inside the SoundFont/SampleCell folder.
For example, if you load a SoundFont2 bank file named “Vintage Drums,” which contains over 50 individual drum kits from several different vintage drum machines, into the EXS24 mkII, the following will happen:
A new folder named “Vintage Drums Bank” will be created in the ~/Library/Application Support/Logic/Sampler Instruments folder.
A second folder named “Vintage Drums Samples” will be created in the ~/Library/Application Support/Logic/SoundFont Samples folder.
The Sampler Instruments pop-up menu hierarchy is updated and the original Vintage Drums entry is replaced with a “Vintage Drums.Bank” entry. This new entry is a folder that contains the individual sampler instruments, which can be selected and loaded as usual.

After conversion is complete, the original SoundFont2, SampleCell, or Gigasampler source files can be freely deleted from the hard disks.
Note: You can store your imported sampler instruments in any folder on any of your computer’s hard drives. To access these instruments from the Sampler Instruments pop-up menu, you need to create an alias pointing to the target folder within the ~/Library/Application Support/Logic/Sampler Instruments folder.
Converting AKAI Files with the EXS24 mkII
The EXS24 mkII can import samples in the AKAI S1000 and S3000 sample formats. The AKAI Convert feature can be used to import:
An entire AKAI format CD-ROM disc
An AKAI partition
An AKAI volume
An AKAI program
An individual audio file (sample)
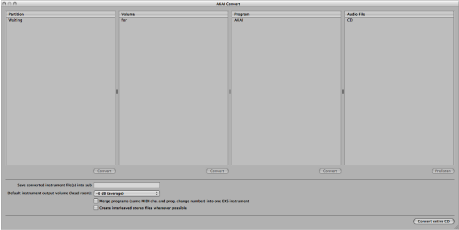
Open the Options pop-up menu in the Parameter window and choose AKAI Convert. This opens the AKAI Convert window, with “Waiting for AKAI CD” displayed across the four columns. See EXS24 mkII AKAI Convert Window Parameters for more information.
Insert an AKAI format sample disc into your optical drive. The display updates to show the contents of the disc. The Partition column will display information—with Partition A, Partition B, and so on, entries listed.
To view the contents of the partitions, click the desired entry to display the volume information contained within the partition.
To navigate deeper into the folder hierarchy of the disc, click the Volume entries to view any programs contained therein. Click the Program entries to view the raw audio files, or samples.
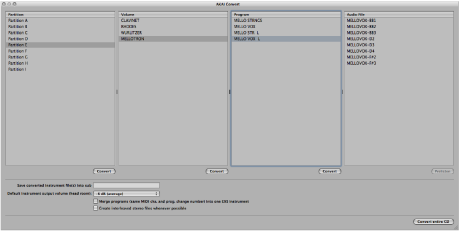
You can use the Prelisten button below the Audio File column to individually audition AKAI audio files before deciding whether to import them.
If desired, set any of the additional AKAI Convert parameters at the bottom of the window (see EXS24 mkII AKAI Convert Window Parameters).
After you have chosen a partition, volume, or program, click the Convert button beneath the corresponding column.
Note: If you want to convert an entire AKAI CD-ROM disc, click the “Convert entire CD” button in the lower-right corner of the AKAI Convert window.
The selected partition, volume, or program will be imported, along with all associated audio files.
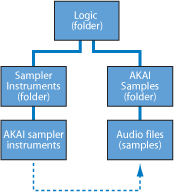
Imported audio files are stored in a folder named after the volume. This folder is created within the ~/Library/Application Support/Logic/AKAI Samples folder.
Sampler instruments created by the import process match the program names. They are placed inside the ~/Library/Application Support/Logic/Sampler Instruments folder, or the sub-folder determined by the “Save converted instrument file(s) into sub” parameter. Sub-folders (named after the volume) are created when you convert a partition. If a volume contains only a single program, no sub-folder is created. Sub-folders named after the partition are created when you convert more than one partition.
The Sampler Instruments pop-up menu displays converted instruments, as shown:
EXS24 mkII AKAI Convert Window Parameters
The following section explains the parameters contained in the EXS24 mkII AKAI Convert window. For more information on converting AKAI files to EXS instruments, see Converting AKAI Files with the EXS24 mkII.
- Save converted instrument file(s) into sub: Use this when importing an entire disc. This creates a folder name that reflects the disc’s name. Alternatively, you may want to save your converted instruments into a sub-folder based on a category, such as Strings. Then, if your AKAI disc consists of string samples, any imported programs or volumes will be added to the Strings sub-folder.
To enter a name for a sub-folder, click in this parameter field, enter the desired name, and press Return. All imported volumes and programs will automatically be added to this folder.
Note: If an existing name is used, the imported sampler instrument will be added to the folder. It will not create a new folder of that name.
- Default instrument output volume (head room): Nondestructively alters the main Output volume in the Parameter window. This can be adjusted after conversion. Sustained pad sounds and polyphonic instruments in AKAI format often tend to have a higher output than a drum groove, for example. This can result in the output levels of some converted AKAI instruments being much higher than the rest of your EXS24 mkII sampler instrument library—occasionally, converted programs may be so loud that they clip. Set this parameter to the desired amount, which will limit the headroom (output level) of the EXS24 mkII parameter settings for each converted AKAI program. The value to choose for a given AKAI disc is a matter of trial and error, but here are some suggestions:
For drum discs, start with either no change (0 dB) or a headroom value of −3 dB.
For piano, string, or pad discs, you might try a headroom value of −9 dB.
For very loud programs, such as layered analog synthesizer instruments, you might even want to try −12 dB.
In cases where you’re not sure of which headroom value to select, start with the average setting of −6 dB.
- Merge programs (same MIDI cha. and prog. change number) into one EXS instrument: Many discs created for AKAI samplers feature programs that contain single velocity layers for an instrument. AKAI samplers require that an entire volume, or all necessary single programs, are loaded in order to play all velocity layers. All of these single programs are automatically assigned to the same MIDI channel, and they also respond to the same MIDI program change number. The EXS24 mkII AKAI conversion intelligently checks for these settings and builds a single EXS sampler instrument out of multiple single programs. In general, when you are importing samples of this type, this option should be switched on.
The same is true for drum discs where single programs contain one instrument from a complete drum kit—kick, snare, hi-hat, and so on, as separate entities. You’ll probably want these single AKAI programs to be merged into a single EXS sampler instrument—as a full drum kit.
There are, however, a number of AKAI discs where a single program of an AKAI volume contains the entire instrument, and where other programs in the same volume have the same MIDI channel and MIDI program change number preset. On this type of disc, use of the merge programs parameter is not desirable, and the option should be switched off.
- Create interleaved stereo files whenever possible: Should always be left enabled, as interleaved files offer better performance within the EXS24 mkII. When you are converting AKAI format samples, some audio files are created as split stereo and as interleaved stereo files. The detection of when it is possible to build an interleaved file is based on information stored with both the AKAI program and audio files. Both the left and right files must have the same settings; otherwise they cannot be used to create an interleaved file.