Working with Tools
Each working area in Logic Pro provides its own set of tools, suitable for the tasks performed in that area. Each toolset, therefore, is only effective in the working area in which it is located.
A tool (the Scissors, for example) basically affects the regions or events that you click. If multiple regions are selected, they are all affected by the tool (the Scissors would cut all selected regions at the same playhead position).
Tools are accessed in the Tool menus, found in the upper-right corner of all windows that allow direct region, event, or file editing and handling operations.
Assigning the Left-Click and Command-Click Tools
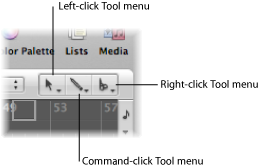
You can freely assign tools to the Left-click and Command-click Tool menus. The mouse pointer adopts the shape of the active tool, allowing you to instantly identify it by looking at the pointer graphic.

The Command-click Tool menu is located on the right, by default, but is located in the middle when a third (Right-click) tool is assigned. For full details about the Right-click tool, see Assigning the Right Mouse Button.
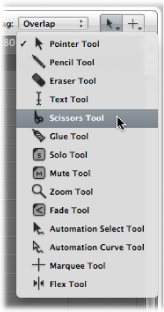
Click the Left-click Tool menu to open it, then choose a tool.
The Left-click tool is available when the left mouse button is pressed while editing.
Click the Command-click Tool menu, then choose a tool.
The Command-click tool is available when the Command key is pressed while editing. Release the Command key to revert to the Left-click tool.
Assigning the Right Mouse Button
If you have a suitable mouse, you can also assign the right mouse button to any of the following:
A third tool (Right-click tool)
Tool menu
Shortcut menu (default setting)
Open General preferences by doing one of the following:
Choose Logic Pro > Preferences > General (or use the corresponding key command).
Click the Preferences button in the Arrange toolbar, then choose General from the pop-up menu.
Click the Editing tab, then choose a setting from the Right Mouse Button pop-up menu.
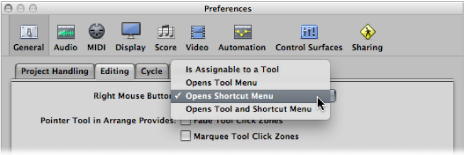
- Is Assignable to a Tool: When this option is chosen, a third Tool menu (Right-click Tool menu) appears to the right of the Left-click and Command-click Tool menus. Choose the appropriate menu item to assign the tool, which is available when the right mouse button is pressed while editing.
- Opens Tool Menu: Right-clicking in the working area of the active window opens the Tool menu with the Pointer tool (and not the currently selected tool) located under the mouse pointer position. Choose a tool by clicking it. When the Tool menu is open, you can also use the key shown next to a tool to select it.
Note: When you choose a tool from the Tool menu by right-clicking, the tool is assigned to the left mouse button. Right-double-clicking in the working area of the active window resets the assigned tool to the Pointer tool.
- Opens Shortcut Menu: Right-clicking in the working area of the active window displays a menu that offers a number of area-specific selection and editing commands. See Using the Shortcut Menu for details.
Setting the Pointer Tool Behavior
You can set two different behaviors for the Pointer tool when using it in the Arrange window.
Open General preferences by doing one of the following:
Choose Logic Pro > Preferences > General (or use the corresponding key command).
Click the Preferences button in the Arrange toolbar, then choose General from the pop-up menu.
Click the Editing tab, then select the checkboxes of the required Pointer Tool in Arrange settings.
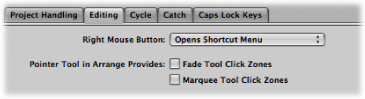
- Fade Tool Click Zones: When this checkbox is selected, placing the mouse pointer over the upper-left and upper-right edges of a region activates the Fade cursor and behavior. The Loop cursor and behavior can still be accessed in these click zones by holding down Option.
- Marquee Tool Click Zones: When this checkbox is selected, placing the mouse pointer over the lower half of a region (with the exception of the lower-left and lower-right edges) activates the Marquee cursor and behavior.
Using Key Commands to Select Tools
You can also use the following key commands to select tools:
- Set Next Tool and Set Previous Tool: Switch to the neighboring tool in the active window.
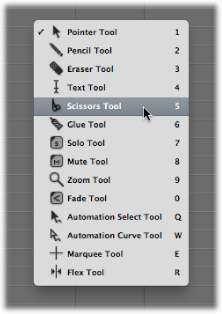
- Show Tool menu: Open the Tool menu at the pointer position. When the Tool menu is open, you can also use one of the number keys shown next to a tool to select it (default key command assignment: Esc).
- Set X tool (where X refers to the tool): You can select each tool via a specific key command. Key commands assigned to a specific tool switch between this tool and the previously selected tool.
Learning About Common Tools
The following section describes the most common tools available in Logic Pro. Tools that are specific to particular editing windows are covered in the respective chapters.
Pointer Tool
The Pointer is the default tool when Logic Pro is first opened. The mouse pointer also takes on this shape outside the working area, when making a menu selection or entering a value.
Within the working area, you can use the Pointer tool for:
Selecting individual or multiple events, regions, or other elements by clicking them. See Using Selection Techniques.
Moving (by grabbing and dragging).
Copying (by Option-dragging).
Changing lengths (by grabbing the bottom-right or bottom-left corner and dragging).
Looping regions (by grabbing the upper-right corner and dragging).
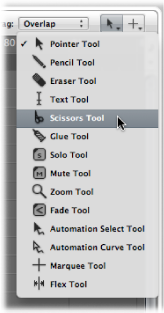
Pencil Tool
The Pencil tool is used to add new regions or events. You can also select, drag, loop regions, and alter the length of regions or events while the Pencil tool is active.
Eraser Tool
The Eraser tool deletes selected regions or events. When you click a region or event with the Eraser, all of the currently selected regions or events are deleted (as if you had used Delete). The Eraser can also delete an unselected region or event by clicking it.
Scissors Tool
The Scissors tool is used to split regions and events, allowing individual sections to be copied, moved, or deleted.
Glue Tool
The Glue tool performs the reverse operation of the Scissors tool. All selected regions or events are merged into a single region or event.
Solo Tool
Click-holding a region with the Solo tool allows you to listen to the selected region or event in isolation. Moving the mouse horizontally also outputs (scrubs) any events the pointer touches.
Mute Tool
Clicking an event or region with the Mute tool prevents it from playing. You can unmute the region or event by clicking it a second time with the Mute tool. If multiple regions or events are selected, the mute state of the clicked region or event applies to all selected regions or events.
Zoom Tool
The Zoom tool allows you to zoom (up to the full window size) by dragging to select a specific region. You can revert to the normal zoom level by clicking the window background with this tool. You can also access the Zoom function—even when other tools are active—by holding down Control-Option.