Customizing the Transport Bar
The Transport bar offers a default set of buttons, displays, and sliders. These are the most commonly used, and most useful, options for the majority of users.
You, however, may need to regularly access particular functions that are not part of the default set, due to:
The type of project you are working on; a film soundtrack, for example
A unique working style
A desire to have everything at your fingertips
Whatever the motivation, you can easily customize the Transport bar to meet your needs.
Showing and Hiding Transport Bar Functions
You can show or hide different parts of the Transport bar independently. This, in turn, allows you to control the width of the Transport bar.
You should limit the Transport bar to functions you actually need to access regularly, or better yet, configure and memorize all of the corresponding transport or mode key commands. This will allow you to expand the display area of the Transport bar, providing more at-a-glance information.
If you want all commands and options to be visible in the Transport bar, you will need either a second computer monitor, or a single monitor with an exceptionally high horizontal resolution.
Tip: Logic Pro allows an unlimited number of Transport bar windows to be opened simultaneously. Additional Transport bar windows can be individually customized, allowing you to view and access additional functions that will not fit on the standard Transport bar at the bottom of the Arrange window. Customized Transport bars (and other windows) can be saved as part of a screenset.
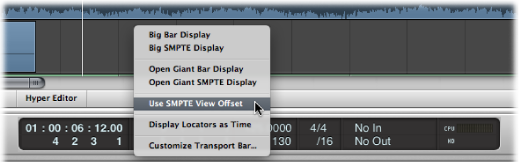
Control-click (or right-click) the Transport bar, and choose Customize Transport Bar from the menu.
Turn on or turn off individual functions by selecting the checkboxes in the Customize dialog.

Choose the appropriate option, as follows:
Click the Cancel button to cancel the action.
Click the OK button to confirm the action.
Click the Save As Default button to save your current user layout, which is then applied whenever you create an empty new project, open a new Arrange window, or click the Restore Defaults button.
Click the Restore Defaults button to apply your saved user layout.
Option-click the Restore Defaults button to apply the Transport bar’s original factory layout.
Getting to Know the Transport Bar Functions
This section describes the buttons, the display area, and the modes and functions found in the Transport bar. You can control the width of the Transport bar by showing or hiding different parts of the Transport bar independently. For further details about customizing the Transport bar, see Showing and Hiding Transport Bar Functions.
Transport Buttons
This area of the Transport bar contains buttons that literally transport the playhead through the project.

For an explanation of the individual functions and commands, see Using the Transport Buttons.
Display Area
This area of the Transport bar primarily informs you of the playhead and locator positions, but can also be used to navigate through the project.

- Positions (SMPTE/Bar): The top row indicates the current position of the playhead in SMPTE format (hours : minutes : seconds : frames), the bottom row in bars, beats, divisions, and ticks.
- Locators (Left/Right): The top row indicates the left locator position, the bottom row the right locator position. Locators are used to define a particular section of the project for a number of recording or playback tasks. You can display locators in the Transport bar in terms of Bar or Time, by Control-clicking (or right-clicking) the display area and turning on/off the Display Locators as Time option. In Transport views which are part of Arrange windows, this option should automatically follow the Ruler mode.
- Sample Rate or Punch Locators: The display shows the current project sample rate, or punch recording in/out locators (when punch recording mode is enabled). As with other Transport bar display fields, you can set the sample rate or punch locators with the mouse or via direct numerical entry.
- Varispeed: The Varispeed display allows you to speed up or slow down a project between –50% and +100% (which equals between 50% and 200% of the original tempo). The top row indicates the Varispeed mode (Speed Only, Varispeed, Varispeed and MIDI), the bottom row the Varispeed value and unit.
- Tempo/Project End: The Tempo display indicates the current playback or recording speed. The Project End display shows the total number of bars. It behaves as stop playback/recording marker for the project.
- Signature/Division: The (Time) Signature display indicates the current playback or recording time signature in a standard musical format; 4/4, 5/4, and so on. The Division display determines the current display (and editing) resolution. A value of /16 means that a 4/4 bar is divided into 16 sub-sections, or 4 sub beats for each beat in the bar.
- MIDI Activity (In/Out): The display indicates incoming and outgoing MIDI data. The MIDI In display (top) will show chord names for incoming MIDI note data.
- Load Meters (CPU/HD): Click this display to show CPU load and hard disk throughput load meters. Double-click to open the load meters as a separate window. Alternatively, you can choose Options > Audio > System Performance from the main menu bar (or use the Open System Performance key command, default assignment: Option-X).
Modes and Functions
The mode buttons and Master Volume slider in this area of the Transport bar are used for several advanced recording and playback functions, including repeating project sections, soloing, and punch recording. The buttons do not immediately trigger an action. Rather, they switch operating states. The relevant button illuminates to indicate that the mode is activated.

- Varispeed: Enables Varispeed mode, allowing you to alter playback speed (keeping the original pitch) or playback speed and pitch, or to transpose classic MIDI output.
- Software Monitoring: Enables software monitoring, allowing you to process external sources via Logic Pro effects. It also allows you to hear external sources while recording.
- Auto Input Monitoring: Automatically allows you to hear external sources at the audio inputs.
- Pre Fader Metering: Switches all of the mixer channel strip meters between pre-fader (the Volume fader on each channel strip) and post-fader modes (when turned off).
- Low Latency Mode: Enables Low Latency mode, allowing you to limit the amount of delay (latency) caused by some effects.
- Set Left Locator by Playhead and Set Right Locator by Playhead: Allow you to use the current playhead position to define the left or right locator value.
- Set Left Locator Numerically and Set Right Locator Numerically: Allow you to enter either of the locator points in a dialog. Also available as key commands.
- Swap Left and Right Locators: Allows you to reverse the location of the left and right locators. For further details, see Using Skip Cycle.
- Move Locators Backwards by Cycle Length and Move Locators Forward by Cycle Length: Retains the existing cycle, but moves it to the left or to the right by the cycle length. For example, if the cycle is 4 bars long, and spans bars 12 to 16, using the Move Locators Backwards by Cycle Length command moves the cycle four bars to the left, resulting in a cycle from bar 8 to 12.
- Cycle: Enables or disables repeated playback or recording over a project section. The cycle boundaries are reflected (or set) by the left and right locator values.
- Autopunch: Enables or disables a recording start and end point. It is commonly used in conjunction with the left and right autopunch locators to automatically record over a particular project section. This method is often used to fix a mistake in a vocal or instrumental recording.
- Set Punch In Locator by Playhead and Set Punch Out Locator by Playhead: Allow you to use the current playhead position to define the punch in or punch out locator value.
- Replace: Enables a new recording to overwrite an existing recording.
- Solo: Only selected regions are played; all other regions are muted.
- Sync: Activate to synchronize Logic Pro with an external source (make Logic Pro the synchronization slave to another device). Control-click or click-hold this button to open the Synchronization menu.
- Click: Used to turn the Logic Pro internal metronome on and off. Control-click or click-hold this button to open the Metronome menu.
- Master Volume: Click to display a volume slider at the right of the Transport bar. This slider is directly tied to the Master channel strip in the Mixer, and acts as a master volume control for all audio and software instrument tracks.
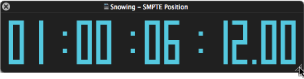
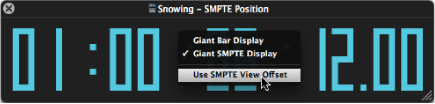
Using a Giant SMPTE or Bar Display
You can configure the Transport bar to display a giant SMPTE or bar display in place of the standard Transport bar display area.
Alternately, you can spawn a new giant SMPTE or Bar Display window.
Control-click (or right-click) the Transport bar display area, and choose Big Bar Display or Big SMPTE Display, as required.
The Transport bar display area is replaced with the chosen big display.

Repeat the step above to return to the standard display.
Control-click (or right-click) the Transport bar display area, and choose Open Giant Bar Display or Open Giant SMPTE Display, as required.
A new, floating window opens.

This window can be freely positioned and resized.
Tip: Control-clicking the window allows you to quickly select the option to switch between the Giant Bar Display and Giant SMPTE Display, as required.
Position the mouse pointer over one of the window edges (right, left, or bottom edge). When the mouse pointer turns into the Resize pointer, drag in the desired direction.

Drag the lower-right corner of the window.
To close the chosen giant display, click the close icon at the top-left corner of the window.
Note: Logic Pro allows an unlimited number of Transport (and Giant SMPTE or Bar Display) windows to be opened simultaneously.
Using SMPTE View Offset
You can configure any open Transport bar display area or Giant SMPTE Display window to show SMPTE time with or without SMPTE view offset.
Control-click (or right-click) any open Transport bar display area.
Control-click (or right-click) any open Giant SMPTE display area.
Customizing the Bar, SMPTE, and Tempo Display
You can customize the Bar, SMPTE, and Tempo display in the Display preferences.
Open General Display preferences by doing one of the following:
Choose Logic Pro > Preferences > Display (or use the Open Display Preferences key command).
Click the Preferences button in the Arrange toolbar, then choose Display from the menu.
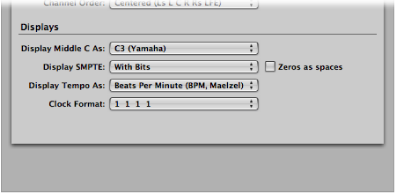
Choose one of the following settings in the Clock Format menu:
Clock Format: 1 1 1 1
Clock Format: 1. 1. 1. 1
Clock Format: 1 1 1 0
Clock Format: 1. 1. 1. 0
Clock Format: 1 1 _1
Clock Format: 1. 1. _1
Clock Format: 1 1 _0
Clock Format: 1. 1. _0
Choose one of the following settings in the Display SMPTE menu:
- With Bits: Subframes (SMPTE bits 0 to 79) are shown.
- Without Bits: Subframes are not shown.
- With Quarter Frames: Quarter frames are shown.
- As Feet Frames, 35 mm film: The display is displayed in feet and frames, for 35mm film.
- As Feet Frames, 16 mm film: The display is displayed in feet and frames, for 16mm film.
- With Milliseconds: The frame fractions are displayed in milliseconds instead of SMPTE bits (also called subframes). Don’t forget that this value is dependent on the frame rate: at 25 fps, a frame is 40 milliseconds long, at 30 fps, approximately 33 ms.
- With Samples: Frame fractions are shown as sample values.
- With Frames and Samples: Both fractional frame and sample values are shown.
Select the “Zeros as spaces” checkbox if you want zero values to appear as blank spaces, rather than the number 0 in SMPTE time displays.
Choose one of the following settings in the Display Tempo As pop-up menu:
- Beats Per Minute (BPM, Maelzel): Beats per minute, to four individually adjustable decimal places.
- BPM without Decimals: Beats per minute, with no decimal places.
- Frames Per Click with Eights: Frames per beat with eighths. After the value, you will see fpc.
- Frames Per Click with Decimals: Frames per beat, to four decimal places. Take care, as this display can easily be confused with the bpm display.