Using Cycle Mode
You can use Cycle mode to repeatedly play a selected passage. This is useful for:
Composing a section of a project (a verse or chorus, for example)
Practicing, before making a recording
Recording individual tracks consecutively
Editing events
Recording multiple takes
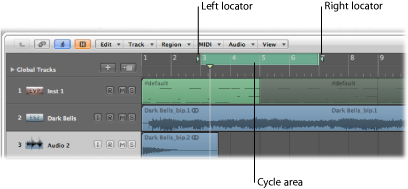
When Cycle mode is active, a green stripe is displayed:
In the top half of the Bar ruler when one ruler is displayed
In the middle part of the Bar ruler when two rulers are displayed
The cycle area is defined by the position of the left and right locators. When Cycle mode is disabled, the left and right locators disappear and the cycle area is dimmed.
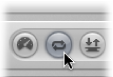
Click the Cycle button in the Transport bar (or use the Cycle Mode key command, default assignment: C).
Click the top part of the Bar ruler (on the gray locators stripe).
In Cycle mode:
The playhead jumps from the end of the cycle to the beginning.
The Play command starts playback from the beginning of the cycle.
To start playback from another position, click Pause twice, or Pause and then Play.
At the cycle jump point, you can use the Chase Events function: File > Project Settings > MIDI > Chase > Chase on Cycle Jump. For more information about chasing events, see Using the Chase Events Function.
You can determine the way recording works in Cycle mode, by using the various options in the File > Project Settings > Recording pane.
Defining a Cycle in the Bar Ruler
You can define, move, and resize a cycle in the Bar ruler.
Drag the mouse from left to right in the top part of the Bar ruler.
The cycle area appears as a green stripe in the Bar ruler, and Cycle mode is automatically turned on.
Grab the green cycle stripe in the middle (the pointer turns into a hand), and drag it to the left or right.
Two lines extend down the screen from the beginning and end points of the cycle. These make it easy to align the cycle with regions in the Arrange area, or events in the Piano Roll Editor.
Grab the handles (triangles) at either end of the cycle to move the start or end points (you can even do this while Logic Pro is open).
Note: You can set either the start or end point of a cycle (whichever is closest) by Shift-clicking a position in the Bar ruler. This works even when the stripe is outside the visible range, or Cycle mode is turned off.
When you set the size of a cycle graphically in the Bar ruler, its start and end points (and therefore, overall size) is quantized to the setting chosen in the Snap menu. For more information, see Snapping Region Edits to Time Positions.
Defining a Cycle with Locator Positions
You can enter the locator positions—therefore setting the cycle boundaries—numerically in the Transport bar Locator display. The locators are shown to the right of the Position display. The top value denotes the left locator position, and the bottom one, the right locator position.
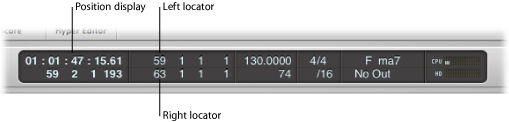
Double-click either locator display field, and enter a left or right position value.
Type in all bar, beat, sub-beat, and tick values (using space or a period between numbers), and press Return to close the entry box and set the locator.
Note: You can quickly set the locator to the beginning of a bar by simply inputting the first digit.
Click-hold any of the left or right locator number fields in the Transport bar, and move the mouse up or down.
The corresponding cycle boundary (if shown in the Bar ruler) moves to match.
You also have the option of displaying the locator positions as SMPTE values, or as musical positions.
Control-click the display area of the Transport bar, and choose Display Locators as Time.
This has no impact on the Bar ruler display mode.
Click the small down arrow icon to the right of the Bar ruler, and choose either Bar mode or Time mode.
This updates the Transport bar Locator display accordingly.
Using the Shortcut Menu to Define a Cycle
You can access a shortcut menu from the Cycle button in the Transport bar. This shortcut menu provides the following options:
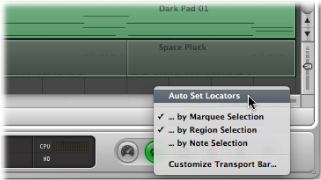
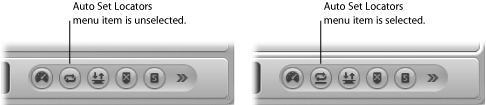
- Auto Set Locators: Choose to automatically set the Locators by Selection whenever a new selection (according to the following three options) is created.
Note: The symbol on the Cycle button indicates the current status of the Auto Set Locators menu item:
- by Marquee selection: Auto Set Locators keeps the cycle range exactly around the marquee-selected area.
- by Region selection: Auto Set Locators keeps the cycle range exactly around the outer borders of all selected regions or folders.
- by Note selection: Auto Set Locators keeps the cycle range—rounded by bars—around all selected note events.
Using the Transport Bar Mode Buttons to Define Locators
You can use the following commands, available as Transport bar buttons, to define the locator positions. You can click the buttons to activate or deactivate functions, or better yet, make use of the corresponding key commands (computer keyboard shortcuts) to speed up your workflow.
Note: The screenshot below shows all relevant buttons. The buttons available in the Transport bar of your project may differ, as you can customize the Transport bar. For further information see Customizing the Transport Bar.
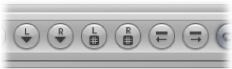
- Set Left Locator and Set Right Locator: These allow you to directly enter either of the locator points in a dialog. Also available as key commands.
- Set Left Locator by Playhead and Set Right Locator by Playhead: The current playhead position is used to define the left or right locator value. Also available as key commands.
- Move Locators Forward by Cycle Length and Move Locators Backwards by Cycle Length: Move the cycled passage by its own length. Also available as key commands.
Defining a Cycle with Regions or Events
You can use the following key commands to set the locators at the start and end points of selected regions or events:
- Set Locators by Regions/Events: Sets the locators at the start and end points of the selected regions or events.
- Set Locators and Play: Sets the locators at the start and end points of the selected regions (or events) and starts playback.
- Set Rounded Locators by Regions/Events: Rounds the position of the locators to the barline that is nearest to the beginning and end points of the selected regions or events.
- Set Rounded Locators and Play and Set Rounded Locators and Record: Rounds the position of the locators to the barline that is nearest to the beginning and end points of the selected regions or events, and starts playback or recording.
- Set Rounded Locators and Cycle Play and Set Rounded Locators and Cycle Record: Rounds the position of the locators to the barline that is nearest to the beginning and end points of the selected regions or events, and switches to cycle play or record mode.
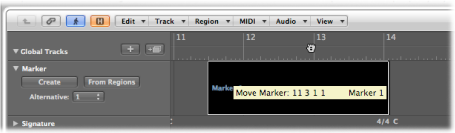
Defining a Cycle with Markers
Dragging a marker into the top part of the Bar ruler creates a cycle with the marker’s length. Details on creating and using markers is covered in Working with Markers.
You can also use one of the following key commands:
- Set Locators by Marker and Enable Cycle: Sets the cycle to the currently selected marker and activates Cycle mode. The length of the cycle is determined by the marker length.
- Set Locators by Next Marker and Enable Cycle: Sets the cycle to the next marker and activates Cycle mode.
- Set Locators by Previous Marker and Enable Cycle: Sets the cycle to the previous marker and activates Cycle mode.
Note: These commands are ideally suited for repeating passages during live performances. Define markers for all parts of the project that you might want to repeat in this way during your performance.
Using Skip Cycle
You can skip a passage in playback mode, which is useful for trying out the musical effect of various transitions from one project section to another, without needing to physically move regions. This is a very handy feature when arranging.
Skip cycle is also useful when editing, to leave out parts of the project that you don’t want to be affected by the edit.
Drag the skip cycle area from right to left in the Bar ruler.
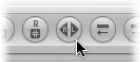
If a (normal) cycle area already exists, you can swap the left and right locator by clicking the Swap Left and Right Locators button in the Transport bar (or using the Swap Left and Right Locator key command).
The skip cycle area is shown as a green candy-striped area in the Bar ruler.

When the playhead reaches the right locator position, it skips to the left locator (in essence, the right and left locators swap positions).