Working with Mixer Groups
Prior to mixing, you may find it useful to define some logical channel strip groups. Logic Pro allows you to create a maximum of 32 groups and it’s possible for a channel strip to be a member of multiple groups. You could, for example, group all drum channel strips under one drum group. This would enable you to control the group meters (volume, pan, and so on) using a single control, while still maintaining the relative parameter values of each channel strip.
Note: Another way to do this is to create subgroups using aux channel strips. For more information, see Creating Mix Subgroups.
Getting to Know the Mixer Group Settings
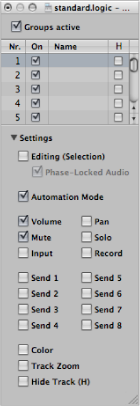
You use the Group Settings window to define the behavior of each group.
Assign a channel strip to an inactive group.
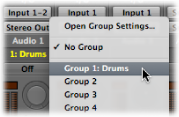
Click the Group slot of a channel strip, then choose Open Group Settings.
Note: Clicking the disclosure triangle in the Group Settings window hides or reveals the settings. You can also resize the window, both vertically and horizontally.
The Group Settings window contains the following settings:

- “Groups active” checkbox: Enables all groups.
- On checkbox: Enables a particular group.
- Name field: Double-click to enter the name of the selected group.
- H checkbox: Hides all tracks belonging to a particular group.
Note: If the Hide Track buttons of grouped tracks are in different states, the H checkbox displays “–”.
- Editing (Selection) checkbox: Selecting a region in the Arrange area selects the same horizontal region range of all channel strips in the group.
- Phase-Locked Audio checkbox: Defines whether an edit group is phase-locked or independent when quantizing audio.
- Automation Mode checkbox: Changing the automation mode of one channel strip changes the automation mode of all channel strips in the group.
- Volume checkbox: Changing the Volume fader of one channel strip changes the volume level of all channel strips in the group.
Note: The channel strips continue to maintain their relative volume levels.
- Mute checkbox: Changing the mute state of one channel strip changes the mute state of all channel strips in the group.
- Input checkbox: Changing the input state of one channel strip changes the input state of all channel strips in the group.
- Pan checkbox: Changing the pan control of one channel strip in the group changes the pan control of all channel strips in the group.
Note: The channel strips continue to maintain their relative pan positions.
- Solo checkbox: Changing the solo state of one channel strip changes the solo state of all channel strips in the group.
- Record checkbox: Changing the record-enable state of one channel strip changes the record-enable state of all channel strips in the group.
Important: Multiple channel strips can be simultaneously record-enabled only if they use different inputs.
- Send 1 to 8 checkboxes: Links the Send knobs individually for Send slots 1 to 8, while still maintaining the relative positions between them.
- Color checkbox: Changing the color of one channel strip assigns this color to all channel strips in the group.
- Track Zoom checkbox: Zooming a region in the Arrange area zooms the regions of all channel strips in the group.
- Hide Track (H) checkbox: Selecting the Hide Track button of a grouped track selects the Hide Track buttons of all tracks in the group.
Editing Mixer Group Membership
This section explains how to assign channel strips to groups, how to remove channel strips from groups, and how to disable all group parameter links.
Assigning Channel Strips to Mixer Groups
You can assign a channel strip to single or multiple groups.
Click the channel strip’s Group slot to open the Group menu.

Choose one of the 32 groups.
When you choose an inactive group, the Group Settings window opens automatically. If you choose a group that is already in use, the Group Settings window does not open (see Getting to Know the Mixer Group Settings).
Press Shift while choosing a group in the Group menu.
The Group slot displays the channel strip’s group membership.

Press Option and click the Group slot of the channel strip.
The most recently accessed group setting—including overlapping groups—is applied to the current channel strip.
Removing Channel Strips from Mixer Groups
You can also remove a channel strip from single or multiple groups.
Click the Group slot to open the Group menu.
Choose the Group that you want to remove the channel strip from.
Click the Group slot to open the Group menu.
Choose No Group.
Disabling Mixer Groups
You can temporarily disable all group parameter links—applying a group clutch—to change the volume of an individual channel strip, for example.
Choose Options > Group Clutch (or use the Toggle Group Clutch key command, default assignment: Command-G).
Deselect the “Groups active” checkbox in the Group Settings window.
While Group Clutch is activated, all Group slots change color—from yellow (normal) to a light gray (all groups temporarily disabled).

Automating Mixer Groups
When you are automating your mix functions (volume, pan, mute, and so on), any channel strip group member can act as the mix automation master for that group. When you use that group member to write an automation parameter value, it is also written for the other group members, depending on their automation mode.
The data is written individually for each channel strip. As a result, you can disable the group later without affecting the automation of any group member—and you can edit or change channel strips individually when they are removed from the group.
For details about automation, see Working with Automation.