Audio Editing and Processing in the Sample Editor
The following section covers the use of several standard audio editing and processing commands or functions. For advanced audio processing options, see Getting to Know the Sample Editor’s Digital Factory.
Most of the audio editing and processing activities in the Sample Editor are destructive. Destructive activities modify the data of the original audio file, as opposed to just editing its playback parameters. You do, however, have the possibility of using the Undo feature (see Undoing Edit Steps in the Sample Editor).
Tip: While you can undo edits and processing commands, you should get into the habit of working on copies of your audio files, rather than the originals. For details about creating and restoring backups in the Sample Editor, see Creating Manual Backups in the Sample Editor.
Using Edit Key Commands in the Sample Editor
You can use key commands to perform destructive sample editing functions. When doing so, you will be asked to confirm your actions before making any changes and overwriting the original audio file. You can, however, bypass this safety feature.
Choose Logic Pro > Preferences > Audio > Sample Editor, and deselect the “Warning before processing function by key command” checkbox.
Using Edit Commands in the Sample Editor
When you have selected an area of an audio file, you can use the usual Cut, Copy, Paste, and Delete commands in the Edit menu to cut, copy, paste, or remove the selected area.
- Cut: Cuts a selected passage out of an audio file, and copies it to the Clipboard. All following audio sections move forward—toward the start point of the audio file—to fill the gap.
- Copy: Copies a selected passage to the Clipboard, leaving the selected area in its original location. Unlike the other Edit menu commands, the Copy command is nondestructive.
- Paste: Inserts the contents of the Clipboard at the clicked position. All audio data that follows the paste (insert) point is moved back—toward the end of the audio file—to make room for the Clipboard contents.
Warning: Anything selected at the time of the paste is deleted—replaced by the Clipboard contents.
- Delete: Erases the selection, without placing it in the Clipboard. All data beyond the deleted passage is moved forward—toward the start point of the audio file—to fill the gap.
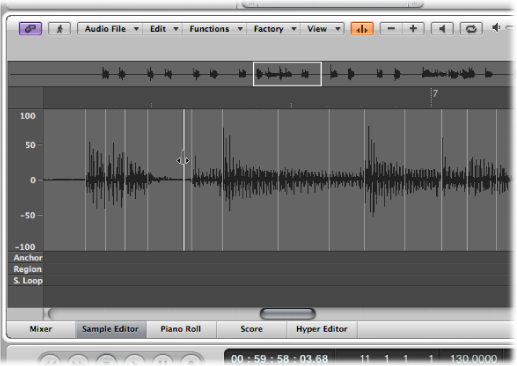
Using Transient Markers to Edit in the Sample Editor
You can use transient markers to edit selected areas of an audio file, or the entire file, in the Sample Editor. For this you need to be in Transient Editing mode.
Note: When you are working in Transient Editing mode in the Sample Editor, the Command-click tool changes default value, from the Hand tool to the Pencil tool.
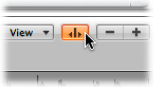
Choose Transient Editing Mode from the local View menu in the Sample Editor (or use the Toggle Transient Editing Mode key command).
Click the Transient Editing Mode button in the Sample Editor.
When you turn on Transient Editing mode, the audio file is analyzed for transient events, and all detected transients are marked in the audio file.
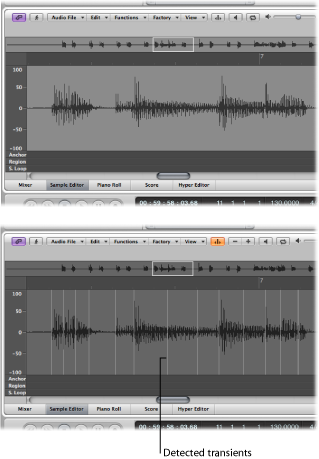
The level of transient detection confidence is based on the clarity of the transients. If an audio file does not have clear, sharp transients, transients will be detected with a lower level of confidence. However, you can choose to display more or less transients using the plus (+) and minus (−) buttons in the Sample Editor. These buttons are visible when you are in Transient Editing mode.
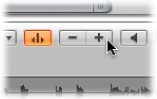
- + button: Increases the number of transients in the selected area of the audio file, or across the entire audio file. You can also use the “Increase Number of Transients” key command, default assignment: Command-plus (+).
- − button: Decreases the number of transients in the selected area of the audio file, or across the entire audio file. You can also use the “Decrease Number of Transients” key command, default assignment: Command-minus (−).
There may also be situations where you need to add or move transient markers within audio files. The following explains how to create, move, delete, and detect transient markers in the Sample Editor.
Click the waveform display with the Pencil tool.
A transient detection process is started for the audio material around the clicked position, and the transient with the highest energy becomes valid and is marked. If no transient is found in the catch area, a transient marker is created at the clicked position.
Drag an existing transient marker to another position.
Note: The new position may or may not snap to zero crossings, depending on whether “Snap Edits to Zero Crossings” is selected in the Edit menu. You can also Control-click (or right-click) to open a shortcut menu and choose “Snap Edits to Zero Crossings.”
Double-click individual markers with the Pointer or Pencil tool.
Click individual markers with the Eraser tool.
Drag over multiple markers with the Eraser tool.
Select an area of the audio file and press the Delete key.
This deletes all transient markers in the selected area.
Note: Transient markers are not actually deleted. Instead, their display threshold is set to maximum, making them invalid. You can revalidate a transient marker using the plus (+) button.
Choose Audio File > Detect Transients (or use the “Detect Transients of Audio File” key command).
This detects transients across the audio file, overwriting (after you confirm the action) any manually added or edited transients.
Note: You can also detect transients in factory audio Apple Loops. This saves a copy of the audio Apple Loop to the project’s Audio Files folder.
Using the Pencil Tool to Edit in the Sample Editor
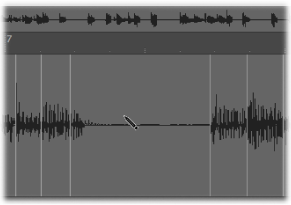
You can use the Pencil tool to correct clicks and pops in your audio, by drawing in the waveform display.
You may find it useful to change the viewing mode of the waveform so that it shows the data structure. For details, see Customizing Waveform Display in the Sample Editor.
Navigate to the desired section of the waveform.
Tip: Pops and clicks are often the loudest part of an audio file, so you may find the Functions > Search Peak command useful when looking for them.
Use the zoom controls to magnify the section of the waveform that you want to correct.
Use the Pointer tool to scrub the audio around the pop or click.
This will help you to identify exactly where you need to draw.
Select the Pencil tool and drag from left to right (including up or down movements) to draw in a new shape for the waveform spike.
The edges of drawn sections are automatically smoothed.
Press Option to affect both sides of stereo waveforms.
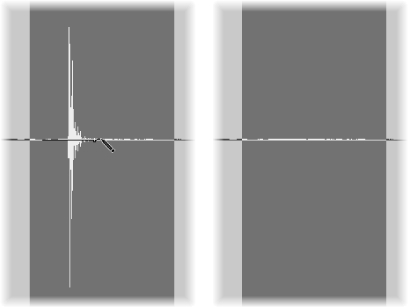
As long as the mouse button is held down, the drawn waveform can be replaced by the original waveform—by moving the pointer to the left.
Trimming Audio Files in the Sample Editor
The Trim function is used to edit areas of the audio file that are not selected.
You can use the Trim command to remove unimportant passages—generally silence—from the start and end of your audio files. Trim can also be used to remove portions of audio files that are not used by regions.
Choose Functions > Trim (or use the corresponding key command, default assignment: Control-T).
Important: Make sure that the areas you are about to delete do not contain any regions that you may need. Regions outside the selected area will be lost. Portions of regions that fall partly outside the selected area are also removed, resulting in a length reduction of the region. If any such regions are being used in the Arrange area, a warning dialog will give you the option of canceling the trim command.
Silencing an Audio File Selection in the Sample Editor
You can use the Silence command to set all amplitude values to 0, rather than removing (with Cut, Delete, or Trim) all data from the selected area of an audio file. This function is generally used to silence unwanted background noise in quiet passages.
Choose Functions > Silence (or use the corresponding key command, default assignment: Control-Delete).
Changing the Level of Audio Files in the Sample Editor
You can use the Change Gain command to change the level of an audio file. Typically used on an entire audio file, this command can also be used to boost portions of it.
Choose Functions > Change Gain.
Choose the desired settings in the Change Gain dialog:
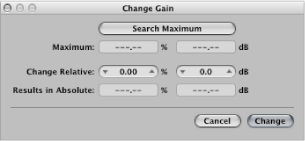
Set the required level change in the Change Relative fields by clicking the up or down arrows in either field, or by directly typing values in either field. You can use the percentage or decibel field to indicate the amount of increase or decrease you want.
Click the Search Maximum button to search for the highest peak level. This automatically sets a value that is used to alter the level of the audio file. The “Results in Absolute” fields display the maximum level that will be achieved by changing the gain—by the amount shown in the Change Relative fields.
Click Change to perform the gain change.
Important: You should never make a gain change that results in a value over 100%, because this will result in digital clipping.
Normalizing Audio Files in the Sample Editor
Normalization is a process that raises the maximum level of a digital signal to a specified amount—typically to its highest possible level without introducing distortion.
Tip: The start and end points for the section being normalized should generally not fall within a continuous section of audio, as this will result in abrupt increases in volume after normalization. The start and end points should therefore be located in sections that occur just after, or before, musical gaps.
Choose Functions > Normalize (or use the corresponding key command, default assignment: Control-N).
Logic Pro locates the point with the highest volume in the selected area, and determines how far this is from the maximum possible level. The level of the selected area is then raised by this amount. The dynamic relationships of sample levels within the audio passage remain unaltered.
You can set the desired maximum level in the Function Settings window, which you can open by choosing Functions > Settings (or by clicking the Settings button in the Normalize dialog).
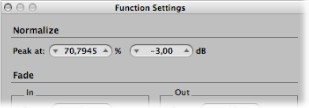
Set the desired maximum level (as a percentage or in decibels) in one of the “Peak at” fields.
Tip: You should not choose 100% (0 dB) in these fields, as this may result in clipping should you wish to increase the gain of the overall signal afterward, say with an EQ. A good rule of thumb is to leave yourself at least 3-to-6 dB of headroom, to allow for further audio processing tasks, such as mixing and effects processing.
These settings are automatically stored in Logic Pro preferences when Logic Pro is closed, and they apply to all projects.
Fading Audio Files in the Sample Editor
You can destructively fade in or out on an entire audio file, or a selected area.
- Fade In: Volume is set to 0 at the start point of the selected area, and the fade-in occurs over the length of the selection.
- Fade Out: Volume is set to 0 at the end point of the selected area, and the fade-out occurs over the length of the selection.
The fade-in or fade-out time is determined by the selected area within the audio file.
Use any of the selection techniques outlined earlier in the chapter to determine the length of the fade-in or fade-out area.
Do one of the following:
Choose Functions > Fade In (or use the corresponding key command, default assignment: Control-I) to create a fade-in.
Choose Functions > Fade Out (or use the corresponding key command, default assignment: Control-O) to fade passages out automatically.
Tip: If you use the Silence function (see Silencing an Audio File Selection in the Sample Editor) to remove unwanted background noise from silent passages, small jumps in volume can sometimes appear at the silence start and end points. If this happens, zoom in and select a small area surrounding—just before and after—the start point of the signal, and then use the fade-in function.
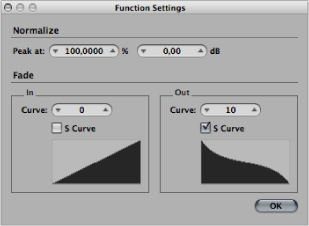
Open the Function Settings window by choosing Functions > Settings.
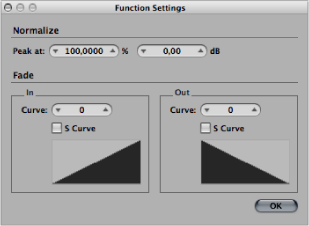
Edit the Curve value to change the shape of the fade-in or fade-out curve.
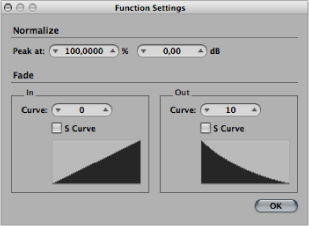
Select the S Curve checkboxes if you want to create s-shaped curves.
These settings are automatically stored in Logic Pro preferences when Logic Pro is closed, and they apply to all projects.
Tip: The Arrange window’s Fade tool offers a further, flexible, nondestructive fade option (see Creating Crossfades and Fades on Audio Regions).
Reversing an Audio File Selection in the Sample Editor
The Reverse command is most commonly used on an entire audio file—to reverse a cymbal sound, for example. It can also be used as a creative option on selected portions of audio files. For example, the reverb tail at the end of a file can be reversed, copied, and pasted to the beginning of the file.
Choose Functions > Reverse (or use the corresponding key command, default assignment: Shift-Control-R).
Reversing the Phase of an Audio File in the Sample Editor
You will find the Invert command extremely useful for correcting phase cancelation errors, or when several out-of-tune signals (or several signals processed through chorus effects) are to be mixed down to mono.
Choose Functions > Invert (or use the corresponding key command).
All negative amplitude values become positive, and vice versa.
Note: This doesn’t audibly change the file, if heard in isolation.
Tip: You can also use the Invert function to decode mono/stereo recordings, but it’s far easier to use the Direction Mixer plug-in for this task. For more information about this plug-in, see the Logic Pro Effects manual.
Removing DC Offsets in the Sample Editor
Some audio interface hardware can layer direct current (DC) over the audio signal. This results in a vertical shift in the waveform position, which can be clearly seen in the Sample Editor.
During playback, this can cause crackling sounds at the start and end of the audio region.
Choose Functions > Remove DC Offset.