Moving Regions
You can move regions horizontally on tracks, and vertically between tracks. You can also move regions between two Arrange windows, or even between different projects.
Select the regions and drag them to a new position.
Dragged regions automatically snap to increments defined by the setting in the Snap pop-up menu. (See Snapping Region Edits to Time Positions.) If dragged over other regions, the setting in the Drag pop-up menu has an impact on behavior.
Hold down the Control key while dragging regions, to move them in steps of one division (in sixteenths, for example).
Hold down the Control and Shift keys while dragging regions, to move them by single ticks or samples. (Remember that the maximum resolution depends on the zoom setting.)
Limiting Region Movements
You can limit the initial movement of regions to either the horizontal or vertical axis. To do so, select the Logic Pro > Preferences > General > Editing > Limit Dragging to One Direction In Arrange checkbox. If your first movement is to the left or right after grabbing a region, you can only move it on the horizontal plane. If you want to move it between tracks, release the mouse button, reselect the region, and drag it up or down.
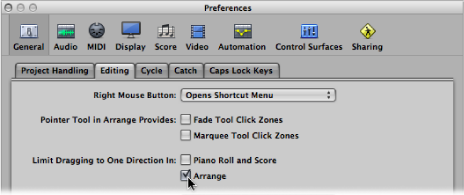
Note: You can override this direction-limiting preference by holding down the Shift key while moving regions.
Changing the Playback Position of Regions Numerically
You can edit the playback position of a region (and its length) numerically. You do this in the Event List, configured to view regions at the Arrange level. (See Changing the Event List View Level.)
Open the Event List by doing one of the following:
Choose Window > Event List in the main menu bar (or use the Open Event List key command, default assignment: Command-0).
Click the Lists button at the top-right corner of the Arrange toolbar, and click the Event tab (or use the Toggle Event List key command, default assignment: E).
Drag the Event tab, which changes to the Event List as you drag it.
Choose Options > Open Event Float (or use the Open Event Float key command). This opens a new single line Event List, set to the Arrange level view.
Click the Hierarchy button in the top-left corner of the Event List (not applicable to the Event Float window—a miniature Event List) to move up one level in the hierarchy.
Edit the region’s Position value. As you select regions in the Arrange area, the Event List (or Event Float) window updates to reflect this selection.
Tip: You can instantly move a region start point to the beginning of a bar by entering a value and pressing Return. For example, typing in 9 moves the selected region to the beginning of bar 9. Typing in 112 moves the region to bar 112. Typing in 1 space 1 space 2 moves the region to bar 1, beat 1, sub-beat 2.
You can display the start position of regions as SMPTE values in the Event List and Event Float windows. This is especially handy if you work with video or film.
Click the note icon button to the left of the first (or only, in the case of the Event Float window) region event.
The icon changes to a clock, and the SMPTE position and length of the event is shown.
Choose the View > Event Position and Length in SMPTE Units setting in the Event List (or use the corresponding key command, default assignment: Shift-R).
This setting allows you to set the required SMPTE positions when synchronizing music to picture.
You can also display, and adjust, the end points of regions as a SMPTE value.
Choose View > Length as Absolute Position in the Event List (or use the corresponding key command, default assignment: Control-A).
Moving Regions to the Current Playhead Position
You can use the Pickup Clock (Move Event to Playhead Position) key command to move the selected region (or the first of several selected regions) to the current playhead position. If more than one region is selected, all subsequent regions are moved.
Note: If you use this command on audio regions, the anchor of the region is placed at the current playhead position. (See Editing the Audio Region Anchor.)
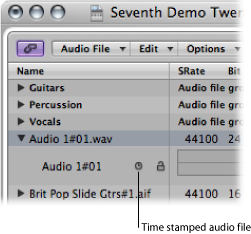
Moving Audio Regions Back to Their Original Record Positions
You can move any selected audio region back to its original recorded position by choosing Audio > Move Region to Original Record Position (or using the corresponding key command, default assignment: Shift-Command-R).
Note: This command only works if the audio file includes a timestamp. Examples of timestamped files include those recorded in the current project, and imported Broadcast Wave or SDII files. Timestamped files are indicated by a clock symbol in both the Audio Bin window and tab.
Nudging Regions with Key Commands
By predefining a nudge value, you can move selected regions according to this value. Set the nudge value using the following key commands:
Set Nudge Value to Tick
Set Nudge Value to Division
Set Nudge Value to Beat
Set Nudge Value to Bar
Set Nudge Value to SMPTE Frame
Set Nudge Value to 0.5 SMPTE Frame
Set Nudge Value to 5 SMPTE Frames
Set Nudge Value to Sample
Set Nudge Value to 1 ms
Set Nudge Value to 10 ms
Hold down the Option key and press the Left or Right Arrow key.
You can also use the following key commands to nudge (move to the right or left) selected regions by the corresponding grid amount:
Nudge Region/Event Position Right by SMPTE Frame
Nudge Region/Event Position Left by SMPTE Frame
Nudge Region/Event Position Right by 1/2 SMPTE Frame
Nudge Region/Event Position Left by 1/2 SMPTE Frame
Nudge Region/Event Position Right by 5 SMPTE Frames
Nudge Region/Event Position Left by 5 SMPTE Frames
Nudge Region/Event Position Right by SMPTE Bit
Nudge Region/Event Position Left by SMPTE Bit
Nudge Region/Event Position Right by Tick
Nudge Region/Event Position Left by Tick
Nudge Region/Event Position Right by Division
Nudge Region/Event Position Left by Division
Nudge Region/Event Position Right by Beat
Nudge Region/Event Position Left by Beat
Nudge Region/Event Position Right by Bar
Nudge Region/Event Position Left by Bar
Nudge Region/Event Position Right by Nudge Value
Nudge Region/Event Position Left by Nudge Value
Nudge Region/Event Position Right by Sample
Nudge Region/Event Position Left by Sample
Nudge Region/Event Position Right by 1 ms
Nudge Region/Event Position Left by 1 ms
Nudge Region/Event Position Right by 10 ms
Nudge Region/Event Position Left by 10 ms
The selected regions are shifted one step right (+1) or left (–1), by whatever unit is referred to in the particular command name.
Shifting the Playback Position of Regions
The Delay parameter in the Region Parameter box of the Inspector allows you to shift the playback position of regions on a track. Positive values correspond to a delay (laid-back playing style or dragging), and negative values cause a pre-delay (driving or rushing the music).
Set the Region Parameter box Delay parameter to the desired value.
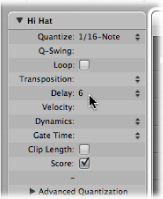
It is possible to show the delay amount in milliseconds or note values, depending on the “Delay in ms” setting.
Choose View > “Delay in ms” in the Arrange area (or use the corresponding key command).
Control-click (or right-click) the Inspector’s Region Parameter box, then choose “Delay in ms” from the shortcut menu.
The Delay parameter in the Inspector is mainly used for creative musical purposes, such as rhythmically offsetting musical parts (regions). It can also be used to fix timing problems that may occur for a variety of reasons. Some examples of these are:
The attack phase of the sound is too slow. A good musician will automatically compensate for this by playing the notes slightly early. With very slow sounds, you may need a pre-delay of over 100 ms to even them out.
The sound generator is reacting too slowly to the incoming note-on messages. Older multi-timbral sound generators often take tens of milliseconds before outputting a voice.
The delay in output is not constant, as it is dependent on the order of notes arriving at the external MIDI sound generator. You should therefore try pre-delaying rhythmically important tracks by as little as one tick—it can work wonders on timing.