Getting to Know the Event List
All functions and options are shown at the top of the Event List area. The events themselves are shown in the list area below.

Click the Lists button at the top-right corner of the Arrange toolbar, and click the Event tab (or use the Toggle Event List key command, default assignment: E).
Choose Window > Event List (or use the Open Event List key command, default assignment: Command-0).
Drag the Event tab, which changes to the Event List window as you drag it.
Changing the Event List View Level
By default, the Event List shows all events in the selected MIDI region.
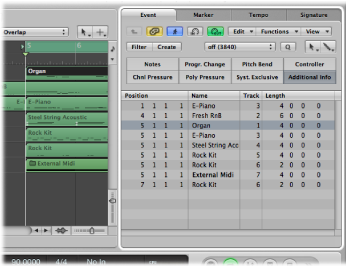
The Event List can also display a list of all regions (and folders) in the Arrange window.
Click the Hierarchy button at the top-left corner of the Event List window.
This button is only accessible when the Event List view is showing the contents of a region (it’s showing events, in other words).
Double-click the name of the region with the Pointer tool.
Its contents (the events) are shown in the list.
The Event List is not capable of showing the events of a multiple region selection. When Content Link mode is turned on, the Event List always shows the events of the last selected region (also when selecting multiple regions via Shift-click). In the case of a rectangular selection, the Event List shows the events of the first selected region.
Note: It is possible to pack folders within folders in the Arrange window. Simply use the procedures outlined above multiple times to navigate up or down through the most complex folder hierarchy.
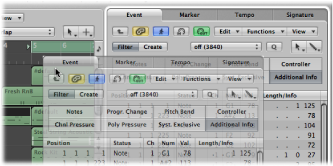
Filtering Event Types
When viewing events in the selected MIDI region, you can make use of the event type buttons to filter the display. These buttons hide specific event types from the list below, thus limiting the view to events that you want to edit.
As a practical example of where these facilities could be used: Imagine a lead synthesizer solo that spans eight bars. You went crazy with the pitch bend while recording, but have found that every pitch bend event with a value of 55 sounds out of tune with the pad sound on another track. Filter the view so that only pitch bend events are visible, select one of the events with a value of 55, and choose Edit > Select Equal Regions (or use the Select Equal Regions/Events key command, default assignment: Shift-E). All pitch bend events with a value of 55 are selected, allowing you to simultaneously change their values, or delete them.
Important: All selection and editing functions performed in the Event List only affect the displayed events, which protects any invisible events from changes you may make.
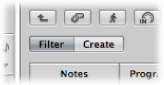
Click the Filter button to turn on Filter mode.
Click the the event type buttons you want to filter by (Notes, Pitch Bend, and so on).
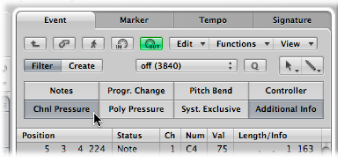
Events that match the active buttons disappear from the list display.
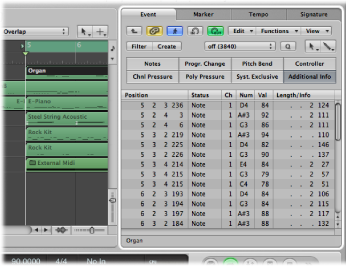
Enhancing the Display of Events
The Event List display is normally restricted to one line per event. When the Additional Info button is on, however, all information stored along with the event is also shown.
This is particularly important for editing SysEx messages. When examining note events in the Event List, you will also notice Rel Vel (release velocity or note off messages), which can be edited directly.
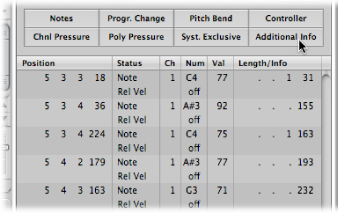
Score layout information is also included in the list when additional info is shown. You can edit this in the Event List if you like, but it is handled far more efficiently in the Score Editor.
Note: The Additional Info button is only visible when the Filter button is on. Once activated, the enhanced Event List is shown (in Filter or Create mode) until the Additional Info button is turned off.
Viewing Events Outside the Display Area
You will often find that the number of events shown in the list exceeds the amount of screen space. The list scrolls automatically when you click the Play button on the Transport bar, and the event at (or nearest to) the playhead position during playback is indicated by a white line.
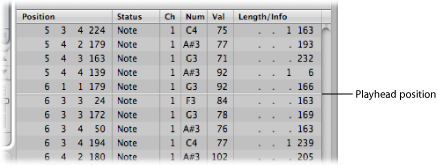
Note: The Catch button must be turned on for the Event List to automatically scroll through events during playback or recording.
Use the event type buttons to filter the list, thus reducing the number of displayed events.
Drag the scroll bar to the right of the list area.
Choose View > Scroll to Selection (or use the corresponding key command).
Note: When a marquee selection is active, using this key command moves the visible section of the edit window to mirror the marquee selection.
Using the Shortcut Menu
Many selection, editing, and other commands can be accessed by right-clicking anywhere in the Event List. Make use of this technique to accelerate your workflow.
Note: The right-click shortcut menu can only be accessed if the Right Mouse Button: Opens Shortcut Menu option is chosen in the Logic Pro > Preferences > General > Editing pane.