Handling Regions in the Audio Bin and Sample Editor
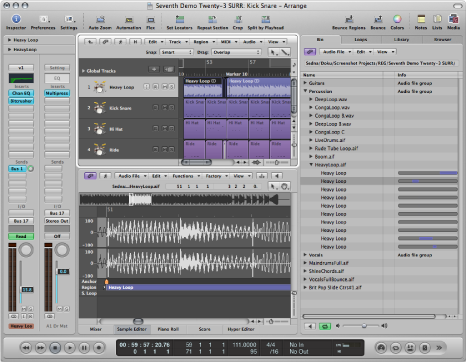
You can use the Audio Bin to manage your regions and to make rough edits to the region (or regions) associated with an audio file. The graphic display in the Audio Bin is optimized for quick and simple organization of audio files and regions.
The finest resolution for positioning the region start and end markers, or the anchor, is limited to 256 sample steps in the Audio Bin. This is usually adequate, particularly if Edit > Snap Edits to Zero Crossings is turned on.
On occasion, however, you will need to make very accurate adjustments—down to the individual sample word level. Drum loops are a good example. The Sample Editor is best-suited to these types of precision editing tasks.
Double-click the region in the Audio Bin or Arrange area.
The Sample Editor opens, with the entire region selected.
Managing Regions in the Audio Bin
The Audio Bin lists all audio files and regions that have been added to, or recorded in, your project.
This section covers region handling options available in the Audio Bin tab and the Audio Bin window.
Note: The audio file operations and options of the Audio Bin are discussed in Managing Audio Files, although some of the basics are covered here.
The Audio Bin tab is ideal for quickly adding files to the Arrange area, as it doesn’t obscure your workspace. A bar is shown for each audio file, which represents the overall length of the file. A colored area within the bar represents the region length. Tasks such as resizing or moving regions within the audio file cannot be performed in the Audio Bin tab. If you need to make these types of adjustments, use the Audio Bin window.
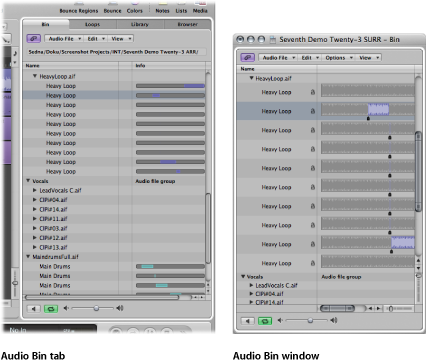
The Audio Bin window, which can be freely resized, displays audio files as waveform graphics. Regions within audio files are highlighted. Further file details, including the full file path, are shown in the Audio Bin window. Also displayed is the Options menu, which contains the Strip Silence command.
In short:
The Audio Bin tab is best-suited to tasks such as adding audio files and regions while creating your arrangement.
The Audio Bin window is your first port of call for audio file and region management tasks.
Click the Audio Bin tab in the Media area of the Arrange window (or use the Toggle Bin key command, default assignment: B).
Choose Window > Audio Bin (or use the Open Bin key command, default assignment: Command-9).
Click the disclosure triangle beside the audio filename.
All regions are listed below the parent audio filename.
Regions that are used in the Arrange area are indicated by a colored bar to the right of the region name. The bar color is derived from the Arrange region color. The length of the region (colored section) is shown proportionately against the audio file bar.
Regions that are not used in the Arrange area are gray.
Choose View > Show All Regions (or use the corresponding key command).
Option-click the disclosure triangle beside any audio file.
All regions of all audio files in the Audio Bin are displayed instantly.
Choosing View > Hide All Regions (or using the corresponding key command), or a second Option-click (on any audio file disclosure triangle) hides all regions.
Select an audio file, then choose View > Sort Regions By:
- Start Point: The regions are sorted according to their time position in the audio file.
- Length: The regions are sorted according to their respective lengths.
- Name: The regions are sorted alphabetically. This is the default setting.
Choose one of the following settings in the View > Show Length As menu:
- None: The length is not displayed.
- Min : Sec : Ms: Displays the absolute time of the region in hours, minutes, seconds, and milliseconds.
- Samples: Displays the number of sample words in the region.
- SMPTE Time: Displays the SMPTE length, which unlike absolute time, uses frames and bits in place of milliseconds.
- Bars/Beat: The region is displayed in musical units: bars : beats : divisions : ticks. If the project tempo, time signature, or division settings are altered, the display is automatically recalculated.
Choose View > Show Region Use Count.
Creating and Removing Regions
When you add an audio file to your project, Logic Pro automatically creates a region that encompasses the entire file length. You can create as many regions as you like from the same audio file. There are no length limitations to regions, as long as they don’t exceed the length of the source audio file.
Creating multiple regions from the same audio file is beneficial for many tasks, such as using different portions of a vocal take that spans the length of the project, for example.
You can create regions in the Audio Bin, the Sample Editor, and the Arrange window. This section concentrates on the Audio Bin and Sample Editor options.
Note: Full details on all Arrange window region editing options are found in Creating Your Arrangement.
Select an audio file in the Audio Bin, then choose Audio File > Add Region (or use the Add Region key command, default assignment: Control-R).
Choose Edit > Copy (Command-C) in the main menu bar, then choose Edit > Paste (Command-V).
The new region appears below the existing region(s) in the list.
Each region is assigned a unique numerical appendix. For example, organ.wav is the parent audio file. The automatically created region is simply called organ, and newly created regions are called organ.1, organ.2, and so on.
Choose Edit > Create New Region (or press Command-R).
The newly created region appears in the Audio Bin list.
Select one or more regions, and press Delete.
Removing a region does not remove the parent audio file.
Select the audio file name (not a region name) in the Audio Bin.
Choose Audio File > Delete Files (or use the corresponding key command).
This deletes the file from the project, but not from the hard disk.
Warning: If any of the deleted regions exist in the Arrange area, they are removed as well. You should therefore be careful when deleting a region (or parent audio file). The Undo function is always available, however, should you inadvertently remove a required region.
Auditioning Regions in the Audio Bin
The playback modes outlined below only apply to regions in the Audio Bin (when the window has key focus), and have no effect on project playback.
Highlight the region name in the list.
Control-click (or right-click) the Prelisten button at the bottom of the Audio Bin, and choose an option from the shortcut menu:

- Auto-select Channel Strip: The audio channel strip assigned to the selected arrange track is used for playback.
- Prelisten Channel Strip: The Environment’s Prelisten channel strip is used for playback. You can access the Prelisten channel strip in the Environment’s Mixer layer. It is located to the right of the highest numbered audio channel strip.
Click the Prelisten button (or press the Space bar) to start playback.
Click the Prelisten button (or press the Space bar) again to stop playback.
Click the Loop Playback button (featuring the circular arrow symbols) at the bottom of the Audio Bin. Click the button a second time to stop looped playback.

Click-hold the region in the region display or with the mouse.
A speaker icon replaces the mouse pointer.

Playback starts at the click point. This allows you to play specific sections. Playback stops as soon as you release the mouse button.
Note: This only works in the Audio Bin window.
Resizing a Region
You can resize regions in the Audio Bin window, the Sample Editor, and the Arrange window. This section concentrates on the Audio Bin and Sample Editor options.
Note: Full details on all Arrange window region editing options are found in Creating Your Arrangement.
Click-hold the lower third of the left or right region boundary, and drag to the left or right.

Drag the start or end points of regions in the Sample Editor, not the Audio Bin, when accuracy is required. Make sure that Edit > Snap Edits to Zero Crossings is turned off for the Sample Editor. (See Snapping Edits to Zero Crossings.)
The small markers on the lower edge of the Sample Editor’s waveform display provide direct access to the boundaries of the region.

Snapping Edits to Zero Crossings
If Edit > Snap Edits to Zero Crossings is turned on, adjustments to the start or end position of a region are snapped to the nearest point where the waveform crosses the zero axis. Put another way, there are certain crossover points in a sample (a drum loop, for example) that are closely matched in level to other points in a sample. If two closely matched points are used for the start and end points of the sample, the loop plays back without noticeable glitches in the audio.
When adjusting the start point, the area preceding the selected point is scanned for a smooth crossover point. When adjusting the end point, the area that follows the region is scanned for a smooth crossover point.
Click the title bar of either the Audio Bin or Sample Editor to give the window key focus.
Choose Edit > Snap Edits to Zero Crossings (or use the corresponding key command).
Note: The Snap Edits to Zero Crossings option can be set independently for the Sample Editor and Audio Bin.
Moving a Region Within an Audio File
You can also move an entire region within an audio file in the Audio Bin window.
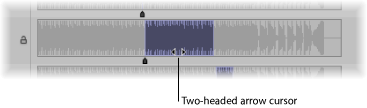
Position the pointer over the center of a region.
When the pointer turns into a two-headed arrow, drag the region to the left or right.
Note: If you want to adjust the boundaries of the region without moving the anchor, hold down the Option key during the operation. This applies to moving the start or end point, as well as moving the whole region.
Editing the Audio Region Anchor
The anchor is the temporal reference point of an audio region. When you move an audio region, it’s not the start point that is displayed in the help tag (as with MIDI regions)—it’s the anchor point.
In many cases, the anchor should be placed on the amplitude peaks, rather than at the start of the sound’s attack phase. A good example is recordings of brass instruments, which may take some time to build to a peak. Moving the anchor to these peaks forces the region to snap to the grid of your arrangement, using the anchor as the pivot point. The flexible zoom settings allow you to be as precise as needed, going right down to the level of single bits, at the highest magnification factor.
As another example, to guarantee perfect synchronization between a one-bar drum loop and MIDI regions, the anchor must be assigned to a well-defined musical point. If the loop begins with a significant level peak (say a kick drum beat), set the anchor to the point where the volume of that beat is at its precise peak.
Whenever you record audio or add an audio file, the anchor and region start points are always at the beginning of the audio file. Moving the region start point also moves the anchor, as the anchor cannot precede the region’s start position.
You can edit the anchor of a region in the Audio Bin window and Sample Editor. The anchor is represented by a black indicator (orange in the Sample Editor) below the region waveform.
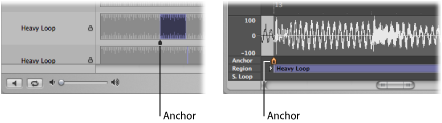
Grab the small indicator below the region, then move the anchor.
Any changes to the anchor point change the relative position of the audio region in the project. Given that the start point of a region is the default position for the anchor, you must also take care when changing the region start point.
Protecting the Anchor Point When Moving the End Position
If you move the start or end point of a region past the anchor point, the anchor point also moves. This is often not what you want to happen.
Hold down the Option key while moving the end marker to prevent the anchor from moving.
Note: The anchor can never be to the left of (before) the region start point, so it will move if you drag the region start past the anchor (to the right), even with Option pressed.
Updating the Audio Region Arrangement Position
When you change the anchor point in the Sample Editor, you can use the Compensate Region Position feature to ensure that the position of a given audio region stays at the same place in the arrangement.
Click the title bar of the Sample Editor, to make sure that it has key focus.
Choose Edit > Compensate Region Position.
If Compensate Region Position is active, moving the anchor won’t change the audible result. Moving the anchor in the Sample Editor will lead to the same result as dragging the region start point in the Arrange area.
If Compensate Region Position is not active, moving the anchor changes the position of audio regions in the Arrange area. The region will shift in relation to the time axis, while the anchor remains tied to the same bar value, and is marked by a dotted line.
Protecting Audio Regions
You can protect regions against accidental alterations to start and end points, or the anchor position, by locking them in the Audio Bin window.
In the Audio Bin window, click the padlock icon beside a region to close (lock) it. Click a second time to unlock the region.
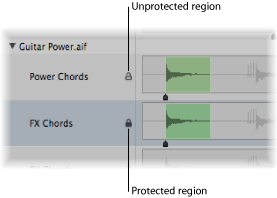
If locked, you can play the region, but can’t edit it.
Warning: Don’t confuse this function with delete protection. A protected (locked) region can still be deleted.