Learning About Effect Routings
There are two ways of sending audio to effects: via an insert, or via an aux send.
Using Insert Effects
When a plug-in is inserted directly into a channel strip, it is termed an insert effect.

All of the signal is processed, or, put another way, 100 percent of the signal flows through the effect. This behavior is suitable for equalizers or dynamic effects, such as compressors. If you have enough processing capacity, you can use up to 15 insert effects on each channel strip.
By default, only two Insert slots are shown on channel strips. An extra blank Insert slot is automatically created as soon as all of the currently displayed Insert slots are used, up to the maximum allowed. So if you insert an effect plug-in into Insert slot 2, a third slot is shown automatically. If you insert a plug-in into slot 3, a fourth is shown, and so on.
For more information about routing effect plug-ins in a series, see Routing Audio in the Mixer via Insert Effects.
Using Send Effects
When you use send effects, a controlled amount of the signal is sent to the effect. Sends are typically used for effects that you want to apply to several signals at the same time.
Send effects are also called bus effects, bus send or bus returns, auxiliary send or auxiliary returns, or simply send or returns.
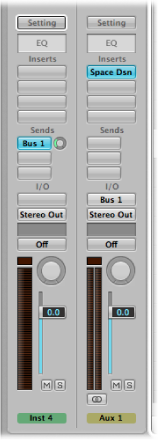
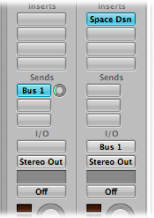
In Logic Pro, the send effect is placed in an Insert slot of an aux channel strip. The signals of the individual channel strips that you want to process are sent to this aux channel strip, using a bus. The amount of signal is controlled by a Send knob on each channel strip. The audio is processed by the effect inserted in the aux channel strip, and is mixed with the stereo output.
The primary advantage of this approach (over inserting effects on tracks) is efficiency. This method allows multiple channel strips to be processed by one inserted effect, which saves vast amounts of processing power (and your time) when compared to the alternative of inserting the same effect directly into multiple channel strips.
Another bonus is that you can quickly switch between wet and dry versions of all channel strips that are sent to an aux channel strip, by simply bypassing the effect on the aux.
Similarly, you can completely change the effects configuration for multiple sent channel strips by choosing different effects for the aux channel strip.
For computationally intensive effects such as reverb, it’s always advisable to insert them into an aux channel strip. Chorus, Flanger, and delay effects should also be inserted into an aux, if they are going to be used on more than one track.
In some cases, however, it may make musical sense to patch an effect such as a delay or chorus directly into the Insert slot of an individual channel strip. This allows you to use precise settings, and colors, on individual elements of your mix.
The golden rule is that you should use whatever sounds right in your mix. There are no restrictions as to where effects can be used in Logic Pro.
For more information about routing effect plug-ins in parallel, see Routing Audio in the Mixer via Send Effects.
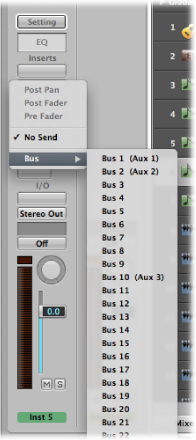
Click a Send slot (of an audio channel strip, for example), and choose a bus from the menu.
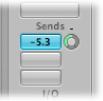
Drag the Send knob to set the amount of signal that you want to send to the aux channel strip.
As you do so, the (send amount) value is shown on the Send slot.
The send amount, when set to 100%, routes the entire signal from the audio or instrument channel strip to the aux channel. (See Using Pre Fader, Post Fader, and Post Pan Sends.)
Insert the effect plug-ins you want, and set the required level, pan, and output settings for the destination aux channel strip.
Click an active Send slot, then choose No Send from the menu.
Option-click the Send slot.
The Send slot background turns gray.
Option-click the Send knob.
This action resets the send level to 0 dB.
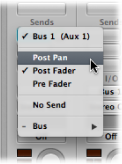
Using Pre Fader, Post Fader, and Post Pan Sends
Sends can be positioned either before (pre) or after (post) the (source) channel strip level fader.
A post fader signal level, routed to a send, changes along with Volume fader movements. If you are using the send to route a signal from the channel strip to a reverb inserted on an auxiliary channel strip, this means that the relationship between the original signal and the effect signal remains constant. When you pull the channel strip’s Volume fader all the way down, the reverb disappears as well. This setting is generally the most useful, and is the default in Logic Pro.
If a send is set to Pre Fader mode, the level of the signal routed to the send remains constant, regardless of any Volume fader movements on the source channel strip. The signal is still fed to the selected aux channel strip—even if the source channel strip’s Volume fader is completely pulled down. Pre fader sends are mainly used for monitoring tasks: headphone monitoring in the studio or foldback monitoring on stage. Pre fader sends are also useful when you want to hear the effect signal in isolation (without the original signal). The equalizer still affects the sends in Pre Fader mode (pre fader, post EQ).
If you choose Post Pan, the signal is not only post fader, but also post pan. This means that the pan position of the send signal on the aux (which needs to be stereo or multi-channel) follows the Pan/Balance or Surround Panner position of the channel strip.
Click a used Send slot, then choose Post Pan, Post Fader, or Pre Fader at the top of the menu.
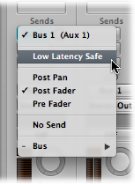
Making Sends Low Latency Safe
If you activate Low Latency mode (see Working in Low Latency Mode), the signal paths of all sends that create a latency that exceeds the set Low Latency mode limit are muted.
However, if you want to keep a particular send signal path open, you can switch it to Low Latency Safe mode.
This setting is available in each individual Send menu of audio and software instrument channel strips, and in aux channel strips that are hosting live input signals.
Click-hold the appropriate Send slot, then choose Low Latency Safe from the menu.
Note that the signal path of the send signal (beyond the send) is not subject to low latency processing, and will be delayed in accordance with the current plug-in latency compensation setting. Given this behavior, use of the Low Latency Safe setting on sends routed to effects such as distortion, modulation, or rhythmic delays is not ideal. It may, however, be of particular use for reverbs—especially in cases where the current plug-in compensation delay time falls within the range of a reverb’s pre-delay time.
When Low Latency mode is activated, it’s easy to recognize whether a send is switched to Low Latency Safe mode or not.
Sends that are low latency safe remain blue or green.
Sends that are not low latency safe turn orange.