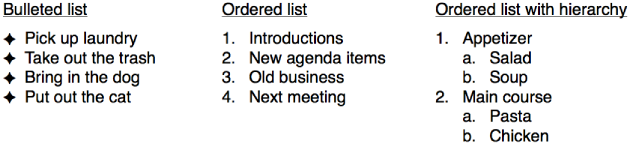
You can create lists formatted with bullets, numbers, or letters. Any list can use indents to create hierarchy. Tiered lists, such as those used in legal documents, use nested numbers or letters (for example, 3., 3.1, 3.1.1).
You can use list styles to apply uniform formatting to lists in your presentation. You can create your own list styles and rename existing styles.
When automatic list creation is turned on in Keynote preferences, Keynote detects when you’re typing a list.
Choose Keynote > Preferences (from the Keynote menu at the top of your screen).
Click General at the top of the preferences window, then select the checkbox next to “Automatically detect lists.”
Add a text box to the slide or place the insertion point in a text box where you want to add a list.
Type a bullet (Option-8), letter, or number, enter the first item in your list, then press Return.
Keynote automatically adds a bullet, letter, number, or character to every subsequent item in the list.
To use a special character for the bullet, choose Edit > Special Characters (from the Edit menu at the top of your screen), then click a character from a bullet or star menu.
To change the indent level (hierarchy) of an item in the list, click anywhere in the item, then do one of the following:
Move the item to the right: Press Tab.
Move the item to the left: Press Shift-Tab.
To end the list, press Return twice, or press Delete on your keyboard.
You can also select text that you want to format as a list, then choose an option from the Bullets & Lists pop-up menu in the sidebar on the right. For more formatting options, click the disclosure triangle next to Bullets & Lists.
Select the text that you want to format as a list.
Click the Text tab at the top of the sidebar on the right, then click the Style button near the top of the sidebar.
If you don’t see a sidebar, or the sidebar doesn’t have a Text tab, click ![]() in the toolbar.
in the toolbar.
Click the pop-up menu next to Bullets & Lists and choose a list style.
Click the disclosure triangle next to Bullets & Lists to show the list formatting controls.
When you choose Text Bullets, Image Bullets, or Numbers from the pop-up menu below the disclosure triangle, you see more controls that apply to the type of list you chose.
You can drag items in a list to a different level in the hierarchy or to a different indentation level.
Select the item you want to move by clicking its bullet, number, or letter.
Drag the item to the left or right, or drag it up or down in the list, until you see a blue triangle where you want the item.
Select the list items with the bullets you want to change.
Click the Text tab at the top of the sidebar on the right, then click the Style button near the top of the sidebar.
If you don’t see a sidebar, or the sidebar doesn’t have a Text tab, click ![]() in the toolbar.
in the toolbar.
Click the disclosure triangle next to Bullets & Lists, then click the pop-up menu below the Bullets & Lists subhead and choose a bullet style.
Do one of the following:
For text bullets: Click the Bullet pop-up menu and choose a different bullet type (scroll to see all of them).
To use your own text or character for the bullet, double-click the Bullet pop-up menu, then type your own text or character. To use a special character, choose Edit > Special Characters (from the Edit menu at the top of your screen), then choose a character.
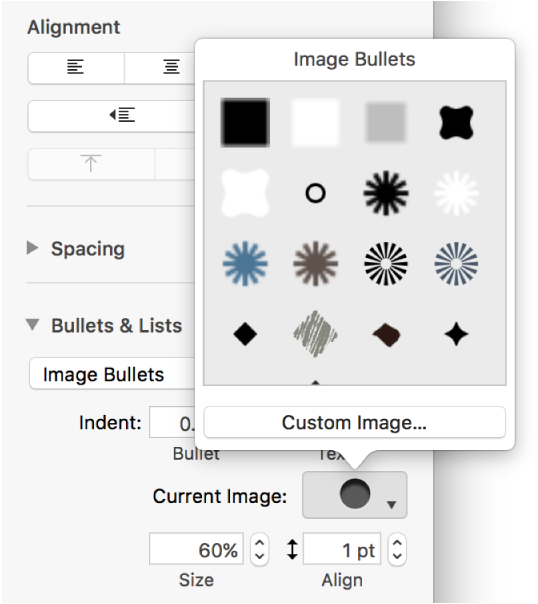
For image bullets: Click the Current Image pop-up menu and choose an image bullet style.
To use your own image, click Custom Image, then choose an image file on your computer.
Use the other controls in the Bullets & Lists section to change the size of the bullets and adjust the amount of space between text and bullets.
You can use numbers or letters in various formats to designate levels of hierarchy in an ordered list.
Select the list items with the numbering or lettering you want to change.
Click the Text tab at the top of the sidebar on the right, then click the Style button near the top of the sidebar.
If you don’t see a sidebar, or the sidebar doesn’t have a Text tab, click ![]() in the toolbar.
in the toolbar.
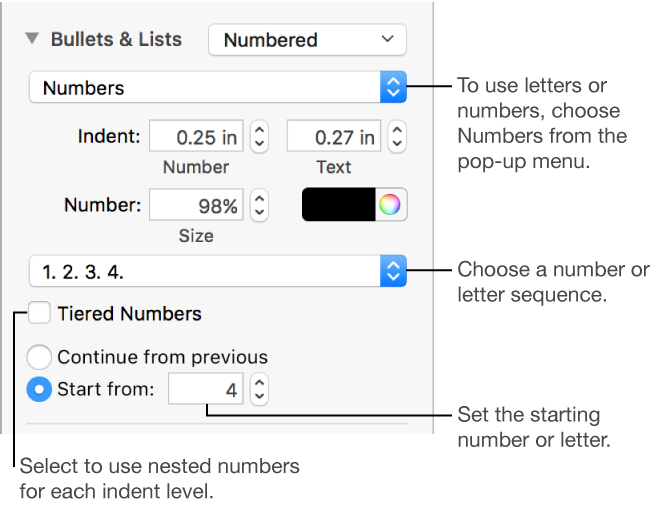
Click the disclosure triangle next to Bullets & Lists, then click the pop-up menu below Bullets & Lists and choose Numbers.
Click the pop-up menu above Tiered Numbers and choose a number or letter sequence.
To use nested numbers or letters (for example, 3., 3.1, 3.1.1), click the Tiered Numbers checkbox.
You can change the spacing, size, color, and alignment of bullets, numbers, and letters.
Select the list items with the bullets, numbers, or letters you want to change.
Click the Text tab at the top of the sidebar on the right, then click the Style button near the top of the sidebar.
If you don’t see a sidebar, or the sidebar doesn’t have a Text tab, click ![]() in the toolbar.
in the toolbar.
Click the disclosure triangle next to Bullets & Lists, then do any of the following:
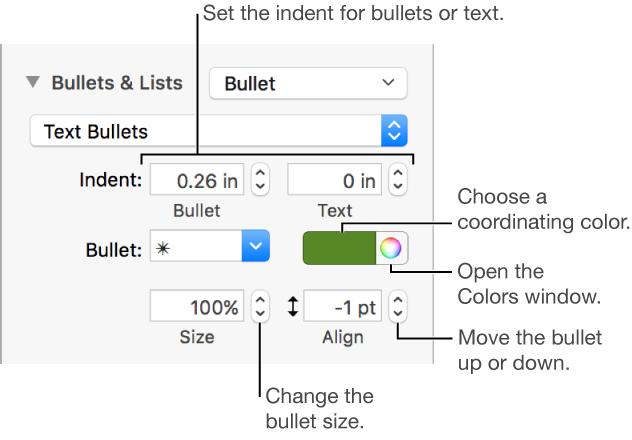
Indent: Type a number or click the arrows next to the Indent fields to set the distance from the left margin to the bullet and from the bullet text to the bullet, respectively.
Change bullet color: Choose a color from the color well (for preset colors that coordinate with the theme) or the color wheel (for any color).
You can’t change the color of image bullets, but you can choose a different image from the Current Image pop-up menu (not shown above).
Adjust bullet size: Type a percentage in the Size field, or click the up and down arrows.
Move bullets above or below the center line of the text: Click the up or down arrows in the Align field.
If you want to apply these changes to other lists in your presentation, you can create a list style, or update the list style you’re already using. Only formatting made in the Bullets & Lists section are included in the list style.
You can create a list style that you can apply to other lists. Only formatting changes made in the Bullets & Lists section are included in the list style. Changes you make using the controls in the Font section (font, font color, and character styles) aren’t included.
Select the list.
Click the Text tab at the top of the sidebar on the right, then click the Style button near the top of the sidebars.
If you don’t see a sidebar, or the sidebar doesn’t have a Text tab, click ![]() in the toolbar.
in the toolbar.
If the list is in a text box, table, or shape, first click the Text tab at the top of the sidebar, then click the Style button.
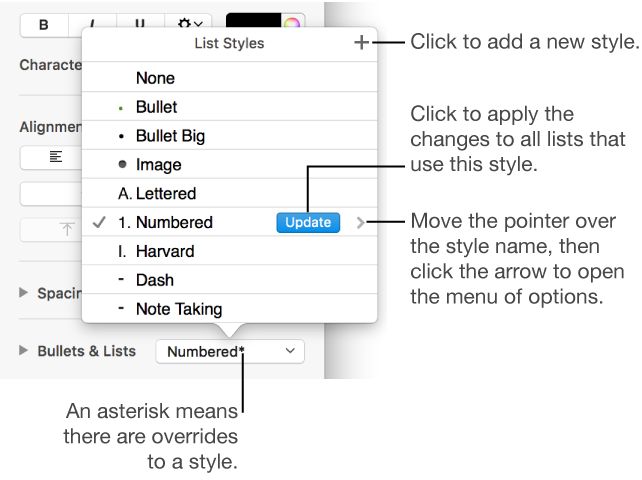
Click the pop-up menu to the right of the Bullets & Lists subhead, then click ![]() at the top of the List Styles pop-up menu then enter a name for the style.
at the top of the List Styles pop-up menu then enter a name for the style.
Type a name for the new style in the List Styles menu.
You can rename, update, or delete list styles; create keyboard shortcuts for applying them; and more.
Changing the appearance of a list—by changing the bullet or number style or the spacing of indents, for example—results in style overrides, which are indicated by an asterisk next to the list style name in the List Styles pop-up menu.
If you want to keep the overrides without updating the style, do nothing. The text retains your changes, and an asterisk appears next to the list style name whenever you select or edit the list.
You can also update the list style with your changes, or use the overrides to create a new list style. If you don’t want to keep the overrides, you can revert back to the original list style,
Select the list items with your formatting changes.
Click the Text tab at the top of the sidebar on the right, then click the Style button near the top of the sidebars.
If you don’t see a sidebar, or the sidebar doesn’t have a Text tab, click ![]() in the toolbar
in the toolbar
If the list is in a text box, table, or shape, first click the Text tab at the top of the sidebar, then click the Style button.
Click the pop-up menu to the right of the Bullets & Lists subhead, then do any of the following:
Remove the overrides and revert to the original list style: Click the style name (it has a gray checkmark next to it). The override is cleared, the text reverts to the original style, and the checkmark changes to black.
Update the style to use the overrides: Click the Update button (if there is one), or move the pointer over the style name, click the arrow that appears, then choose Redefine from Selection.
Note: List styles include only the formatting you set in the Bullets & Lists section of the sidebar. Changes you make using the controls in the Font section (font, font color, and character styles) aren’t included in the list style.
Select a list item that uses the style you want to rename or delete.
Click the Text tab at the top of the sidebar on the right, then click the Style button near the top of the sidebar.
If you don’t see a sidebar, or the sidebar doesn’t have a Text tab, click ![]() in the toolbar.
in the toolbar.
Click the pop-up menu to the right of the Bullets & Lists subhead.
Move the pointer over the style name (it has a checkmark next to it), then click the arrow that appears and choose an option:
Delete Style: If you try to delete a style that’s being used in the presentation, you see an alert and can choose a replacement style.
Rename Style: Enter a new name.