You can quickly improve a photo’s overall darkness or lightness, color saturation, and other qualities.
Important: Editing a photo changes its appearance in the photo library and in every album, slideshow, and project (such as a book, card, or calendar) that it’s used in. To edit a photo without changing it everywhere it appears, duplicate the photo and then edit the duplicate.
Open the photo in edit view.
If the Quick Fixes tab (at the top of the Edit pane) isn’t selected, click it.
Click the Enhance button.
Your changes are saved automatically unless you click Undo or “Revert to Previous.”
Open the photo in edit view.
Click the Adjust tab (at the top of the Edit pane).
Drag the controls to adjust the photo:

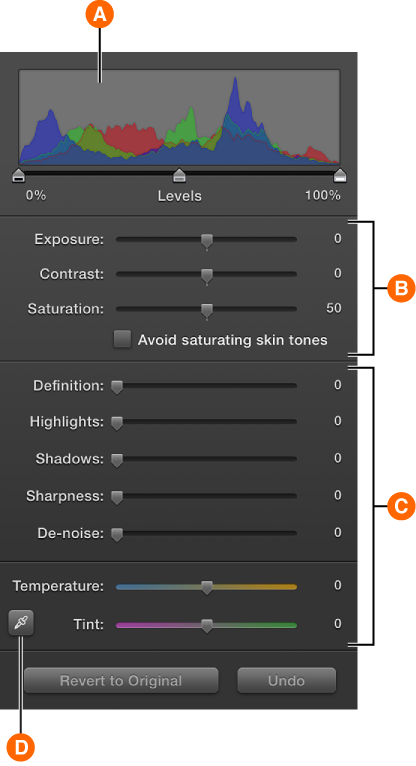
Histogram and Levels slider: Adjust the photo’s light and dark levels. | |
Exposure: Adjust the photo’s overall lightness and darkness. Contrast: Adjust the amount of difference between light and dark. Saturation: Adjust the color richness. Avoid saturating skin tones: Keep skin tones the same while you adjust color intensity. | |
Definition: Improve clarity, reduce haze, and adjust contrast in parts of the photo. Highlights: Reduce the brightness of highlights. Shadows: Brighten shadows to improve detail in shadowy areas. Sharpness: Adjust the crispness or softness. De-noise: Adjust the graininess. Temperature: Set color tone coolness and warmth. Tint: Set the photo’s overall color cast. | |
Eyedropper: Use to automatically adjust temperature and tint based on a gray or white area. |
If there’s an area in a photo that you know should be white or gray, but appears off-color, iPhoto can automatically balance the photo’s overall color.
Open the photo in edit view, and then click the Adjust tab (at the top of the Edit pane).
Click the Eyedropper button (near the bottom of the Adjust window, shown in the task above).
Position the crosshairs over the gray or white area and click.
iPhoto adjusts the Temperature and Tint sliders to make the area a neutral gray, which should improve the photo’s overall appearance.
Your changes are saved automatically, unless you click Undo or “Revert to Previous.”
You can also boost or fade color using the Effects pane.