
You can record your voice, an acoustic instrument, or any other sound using your computer’s built-in microphone or a microphone connected to your computer. You record sound from a microphone to an audio track.
Before you start recording audio, do the following:
Connect a microphone, an electric guitar, or another instrument to your computer and make sure the microphone or instrument is working.
Select the audio track you want to record to, or add an audio track. Be sure to set the input source, input volume level, and monitoring for the track.
Set the audio recording resolution. Recording at a resolution of 24 bits is recommended for most situations and is the default setting.
Tune any instruments that you are recording to ensure that your audio recordings are in tune with any software instruments, samples, and existing recordings in your project.
Select the track you want to use, then click the Smart Controls button ![]() in the control bar.
in the control bar.
Click the Inspector button ![]() in the Smart Controls menu bar to open the Smart Control inspector.
in the Smart Controls menu bar to open the Smart Control inspector.
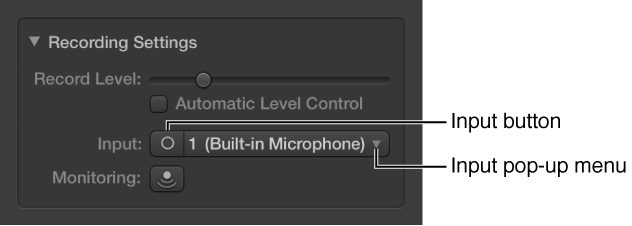
In the Recording Settings section, click the Input button to switch between a stereo input channel pair and a mono input channel, then choose the source from the Input pop-up menu.
Select the track you want to use, then click the Smart Controls button ![]() in the control bar.
in the control bar.
Click the Inspector button ![]() in the Smart Controls menu bar to open the Smart Control inspector.
in the Smart Controls menu bar to open the Smart Control inspector.
In the Recording Settings section, adjust the Record Level slider.

You can also select the Automatic Level Control checkbox to have the recording level adjusted automatically. It lowers the level to prevent feedback, and raises the level if too low.
Do one of the following:
Click the Monitoring button ![]() in the track header of the track you want to use.
in the track header of the track you want to use.
Select the track you want to use, then click the Monitoring button ![]() in the Recording Settings section of the Smart Control inspector.
in the Recording Settings section of the Smart Control inspector.

You can also select the Feedback Protection checkbox to avoid feedback while you play.