Mapping Screen Controls
After you have created your patches and learned controller assignments for the screen controls you want to use, you can map MainStage screen controls to channel strip and plug-in parameters to modify the sound of your patches while you perform, or map them to MainStage actions to control other functions.
You map screen controls to parameters in Edit mode. After you learn controller assignments (in Layout mode), the screen controls in the workspace do not respond to movements of physical controls on your MIDI hardware until you map them to channel strip parameters (in Edit mode). There are two ways to map screen controls to parameters: by visually selecting parameters on channel strips or plug-in windows or by choosing parameters in the Parameter Mapping browser. You can also create mappings in the Assignments & Mappings table. For information, refer to Working in the Assignments and Mappings tab.
Mapping Screen Controls to Channel Strip and Plug-in Parameters
After you have made your controller assignments, you can begin mapping screen controls to the parameters in your patches you will want to control while you are performing. You will likely want to map screen controls to parameters in each patch in a concert, so that you can easily access and modify the parameters you want for each patch when you are performing live. You can also map parameters at the concert level to control master volume, view master levels, or modify concert-wide effects.
You can map screen controls to channel strip and plug-in parameters in one of two ways: by mapping screen controls visually to parameters on the channel strip or in a plug-in window or by using the Parameter Mapping browser.
You map screen controls to parameters in Edit mode. The screen controls in the workspace do not respond to movements of physical controls on your MIDI hardware until you map them to channel strip parameters.
In the workspace, click the screen control you want to map.
The screen control is highlighted in blue. The Screen Control Inspector appears below the workspace, showing the parameters for the selected screen control. The Screen Control Inspector includes General and Mapping tabs as well as a tab labeled Unmapped.
Press Command-L.
The Screen Control Inspector opens to the Unmapped tab, showing the Parameter Mapping browser. The Map Parameter button lights red to indicate that mapping is active.
To map the screen control to a channel strip parameter, click the control for the parameter on the channel strip in the Channel Strips area.
To map the screen control to a plug-in parameter, double-click the plug-in in the Inserts section of the channel strip to open the plug-in window, then click the parameter in the plug-in window.

The screen control is mapped to the selected parameter, and the Unmapped tab takes the name of the parameter. You can continue mapping additional screen controls by clicking them in the workspace and then clicking the corresponding parameters in a channel strip or plug-in window.
When you are finished, press Command-L again (or click the Map Parameter button) to turn off mapping.
In the workspace, click the screen control you want to map.
The screen control is highlighted in blue. The Screen Control Inspector appears below the workspace, showing the parameters for the selected screen control. The Screen Control Inspector includes General and Mapping tabs as well as a tab labeled Unmapped.
In the Screen Control Inspector, click the Unmapped tab.
The Parameter Mapping browser appears, showing the channel strips and plug-ins available for mapping as well as the Actions folder.
In the column on the left of the Parameter Mapping browser, select the channel strip with the parameter to which you want to map the screen control.
Parameters for the selected channel strip appear in the columns on the right. Additional folders for the instruments and effects in the channel strip may appear in these columns. Click a folder to see the parameters for that instrument or effect.
Select the parameter you want to map.
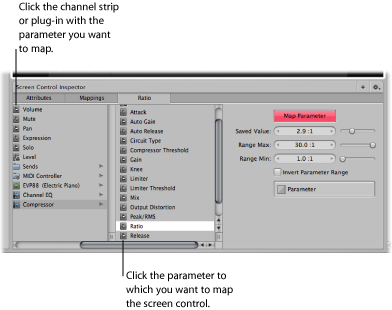
The screen control is mapped to the selected parameter, and the Unmapped tab takes the name of the parameter. You can continue mapping additional screen controls by clicking them in the workspace and then choosing parameters in the Parameter Mapping browser. Using the Parameter Mapping browser, you can map parameters that are not visible in plug-in windows.
You can also map screen controls to MainStage actions and to AppleScript scripts. For more information about mapping screen controls, see Mapping Screen Controls.
Note: If you change the channel strip setting for a channel strip to which you have mapped screen controls, you will lose any parameter mappings.
You can also edit velocity sensitivity for a channel strip, create controller transforms, and filter various MIDI messages. For information about editing channel strips, see Editing Channel Strips in MainStage.
Mapping Screen Controls to Actions
In addition to mapping screen controls to channel strip and plug-in parameters, you can map them to MainStage actions. Actions let you select patches and sets; silence MIDI notes; control the Tuner and the metronome; tap a new tempo; display information about patches, MIDI messages, and other information; and perform other functions using screen controls.
For a complete table of actions, including descriptions and usage notes, see Using MainStage Actions.
The Actions folder, which appears in the Parameter Mapping browser along with available parameters, contains actions for selecting patches and sets, showing the Tuner, activating tap tempo, Master Mute, or Panic, and others. The Actions folder also contains an AppleScript subfolder with useful scripts.
You can map button screen controls to actions for selecting different patches and use physical buttons on your MIDI device to select patches when you perform. You can also map buttons to actions for selecting different sets or selecting the concert. For information about assigning buttons, see Assigning Buttons.
In the workspace, click the screen control you want to map.
The Screen Control Inspector appears below the workspace, showing the settings for the selected screen control. If the screen control is currently mapped, a tab with the name of the mapping is visible in addition to the General and Mapping tabs. If the control is unmapped, the tab is labeled “Unmapped.”
Click the Unmapped (or name of mapping) tab.
The Parameter Mapping browser appears below the workspace. The Actions folder is available in the Parameter Mapping browser.
In the column on the left of the Parameter Mapping browser, click the Actions folder.
The available actions appear in the second column of the browser.
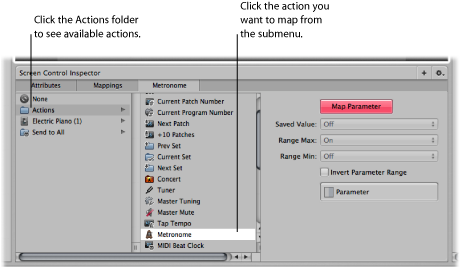
Select the action you want to map.
Note: If you map a knob screen control to an action to select a patch (such as the −10 Patches, Previous Patch, Next Patch, or +10 Patches action), the screen control jumps to the value of the hardware control, regardless of the setting of the Respond to Hardware Move parameter in the Screen Control Inspector.
Mapping a Screen Control to Multiple Parameters
You can map a single screen control to multiple parameters and control how the screen control modifies each mapped parameter. Mapping a screen control to multiple parameters is also referred to as multimapping. You map a screen control to up to eight parameters by adding mappings in the Screen Control Inspector.
Map the screen control to a parameter or action, as described in Mapping Screen Controls to Channel Strip and Plug-in Parameters and Mapping Screen Controls to Actions.
With the screen control selected, click the Add Mapping (+) button at the upper-right corner of the Screen Control Inspector.
A new Unmapped tab appears in the Inspector, showing the Parameter Mapping browser.
In the Parameter Mapping browser, choose the parameter to which you want to map the screen control.
If you add a mapping while the Learn process is active (the Map Parameter button is red), you can immediately learn the new mapping. The Command Editor also includes key commands for selecting the previous and next tab to make mapping to multiple parameters easier. For information about using key commands, see Using the Command Editor.
If you frequently map screen controls to multiple parameters, you can speed your workflow by assigning key commands to select the previous and next tab or to select a specific tab in the Screen Control Inspector. For information about assigning key commands, see Using the Command Editor.
In the Screen Control Inspector, select the Mappings tab.
The mappings appear in a list view that shows the minimum and maximum range values and patch change behavior for each mapping and includes buttons to open the Parameter graph and Invert graph values for each mapping.
If you create multiple mappings for a screen control, you can define the relationships between the first mapping and subsequent mappings. This can be especially useful when, for example, you are mapping the same control to filter cutoff and filter resonance, and you want to ensure that resonance does not exceed a certain maximum value as you increase the cutoff value. The default relationship affects all future mappings (for the same and other screen controls), but does not affect existing mappings. The default is set to Scale the first time you open MainStage.
Select a screen control you want to map to multiple parameters.
Choose “Default Relation to First Mapping” from the Action menu, located in the upper-right corner of the Screen Control Inspector.
Do one of the following:
To set subsequent mappings to be offset by a fixed value from the first mapping, choose Offset.
To set subsequent mappings to scale by a constant ratio, starting from the same minimum value, choose Scale.
To set subsequent mappings to scale by a constant ratio to the point defined for the mapping, starting from both the same minimum value and maximum value, choose Pivot.
Editing the Saved Value for a Parameter
If you have set the default behavior for saving parameter values to “Reset to saved value” in MainStage General preferences, or in the Attributes tab of the Screen Control Inspector, the parameter values for a patch are returned to their last saved value when you change patches. You can view and edit the saved value in the tab for the parameter mapping in the Screen Control Inspector.
In the Screen Control Inspector, click the tab for the mapping.
You can view the current saved value for the parameter in the Saved Value value slider.
To edit the value, do one of the following:
Change the value in the Saved Value value slider.
Drag the slider to the right of the value slider left or right.
Note: The value in the Screen Control Inspector is mapped automatically to the screen control. However, making a change to the screen control is only reflected in the Screen Control Inspector after you save the concert with that patch selected in the patch list.
Using Parameter Mapping Graphs
Each parameter mapping has a Parameter graph. You can edit the graph to remap input values to different output values for the parameter.
In the tab for the mapping or in the Mappings tab, double-click the Graph button for the mapping you want to edit.
The Parameter graph window opens. The title of the graph window shows the parameter name.
For information about editing graphs, see Working with Graphs.
Mapping Screen Controls to All Channel Strips in a Patch
When you map a screen control to a channel strip parameter such as volume or pan, you can map it to control the same parameter in all of the channel strips in the patch. This is particularly useful when you want to control the overall volume of a layered sound, even if the different layers are played across multiple keyboards.
Map the screen control following the instructions in the preceding sections.
In the column on the left of the Parameter Mapping browser, select the Send to All folder.
Select the destination from the second column.
Select the parameter to map the screen control to from the third column.
You can map the screen control to actions for transposing software instrument channel strips, channel strip parameters, and MIDI control message types from the Destinations folder. When you map a screen control to all channel strips in a patch, the parameter to which the screen control is mapped changes to the same value for all channel strips in the patch when you move the screen control.
Note: When you map a drum map using Send to All, the Send to All folder contains MIDI notes, not controllers.
Undoing Parameter Mapping
You can undo parameter mapping if you decide you don’t want to keep the mapping. When you undo parameter mapping, all mappings created in the current Learn mode (either by pressing Command-L or clicking the Map Parameter button) session are undone.
Choose Edit > Undo (or press Command-Z).
Press the Escape key.
Removing Screen Control Mappings
If you want a screen control to be free of any mappings, you can remove its existing mapping. This can be useful with controls that pass through MIDI messages (for example, for pitch bend and modulation wheels, or expression pedals) when you do not want them to send MIDI messages for their pass-through control type. You do not need to remove the mapping for a screen control when you remap it.
In the workspace, click the screen control you want to map.
In the column on the left of the Parameter Mapping browser, click None.