Creating Tracks and Channel Strips
If you want to record or play back MIDI, software instrument, or audio data in Logic Pro, you must first create a track. Corresponding channel strips are automatically created in the Mixer.
If channel strips of a particular type (audio channel strips, for example) already exist in the Mixer, newly created tracks are assigned to those matching channel strips.
Important: Some of the track creation options create new channel strips, and others do not. Each is used for a different type of task. These commands are separated by a line in the Track menu of the application.
To explain a little further:
Suppose you create 8 new audio tracks in the Arrange area of a project that has 24 audio channel strips already set up in the Mixer. These new audio tracks are assigned to audio channel strips 1 to 8 in the Mixer. You create 16 more audio tracks as your project develops. These are assigned to audio channel strips 9 to 24 in the Mixer.
If there are no, or not enough, channel strips of the matching type in the Mixer, they are automatically created when you create new tracks. For example, suppose you need a further 8 audio tracks to complete your project, but have used all 24 Mixer audio channel strips. Simply create the extra 8 audio tracks, and Logic Pro automatically generates the corresponding audio channel strips in the Mixer. These tracks (25 to 32) are automatically assigned to audio channel strips 25 to 32.
The automatic creation of corresponding channel strips applies to all track types, up to the maximum allowable number of channel strips. This restriction is in the hundreds for audio and instrument channel strips, and in the thousands for MIDI channel strips. Your computer is likely to run out of processing power well before you reach this limit for each channel strip type.
Tip: Given the simplicity and speed of creating new channel strips—by creating tracks—there’s no need to create hundreds of channel strips of each type in the Mixer before you start making music.
Do one of the following:
Choose Track > New in the Arrange area’s local menu bar (or use the New Tracks key command, default assignment: Option-Command-N).
Click the Create Track button above the track list in the Arrange area.

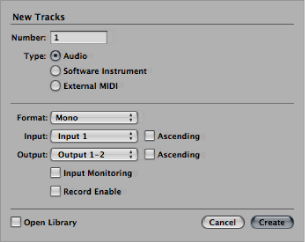
In the New Tracks dialog, enter the number of tracks you want to create, then choose the type.
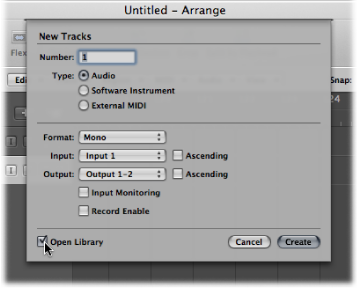
Select the Open Library checkbox (if not already selected) to automatically open the Library tab in the Media area. This allows you to immediately select settings for your chosen track type.
Click Create.
The new track is created at the currently selected track position, and all ensuing tracks (below it) are moved down the track list.
Tip: By double-clicking the empty space below the track header of the last track, you can quickly create a new track matching the type chosen in the New Tracks dialog.
Using the New Tracks Dialog
The options in the New Tracks dialog vary, depending on the type of track that is being generated.
You can modify the following parameters in the New Tracks dialog when creating new audio tracks:
- Driver pop-up menu: This pop-up menu allows you to select the audio hardware driver to use for your newly created tracks. If you use only one hardware playback device, this pop-up menu won’t appear.
- Format pop-up menu: Choose Mono, Stereo, or Surround in this pop-up menu, to create multiple mono, stereo, or surround audio tracks.
- Input pop-up menu: Choose the input or input pair. Choose Surround if you want to record in one of the available surround formats.
- Ascending checkbox: Select this checkbox to assign these inputs—in order, from lowest to highest—to each track, when multiple tracks are created. This option has no effect when a single track is created. If you create more tracks than you have inputs—creating 8 tracks, when using a 4-input device, for example—tracks 1 and 5 are assigned to Input 1, tracks 2 and 6 are assigned to Input 2, tracks 3 and 7 are assigned to Input 3, and tracks 4 and 8 are assigned to Input 4.
- Output pop-up menu: Choose the output or output pair. Choose Surround if you want to set the output to the project’s surround format.
- Input Monitoring and Record Enable checkboxes: Select to turn on the track’s Input Monitoring and Record Enable buttons. This is handy if you intend to start recording immediately after creating the track.
- Open Library checkbox: Select to automatically open the Library tab in the Media area. This allows you to immediately select settings for your chosen track type.
You can modify the following parameters in the New Tracks dialog when creating new software instrument tracks:
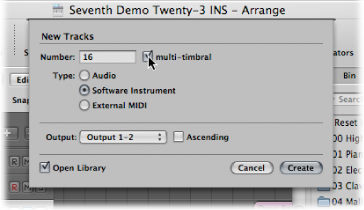
- Multi-timbral checkbox: Select to create up to 16 tracks with ascending MIDI channel settings (starting from MIDI channel 1, on the first track, MIDI channel 2 on the second track, and so on).
These tracks are independent of the first track, and can be individually automated, have different regions, and so on, but all tracks are associated with (and routed through) the same instrument channel strip in the Mixer.
As such, the software instrument inserted into the instrument channel strip must be multi-timbral (capable of playing different sounds on different MIDI channels) for this option to be useful. None of the included Logic Pro instruments are multi-timbral.
- Output pop-up menu: Choose the output or output pair. Choose Surround if you want to set the output to the project’s surround format.
The New Tracks dialog offers no additional options if External MIDI is chosen, but the following applies:
A new MIDI multi-instrument object will be created in the Environment for the first track, and the track will be assigned to sub-channel 1.
Subsequent tracks will be assigned to sub-channels of the MIDI multi-instrument object (up to the maximum of 16).
If more than 16 External MIDI tracks are created, they will automatically roll around to channels 1, 2, 3, and so on. These can be freely reassigned to any sub-channel. If you have more than one MIDI port available on your system, you can reassign additional tracks (above the first 16) to a second MIDI multi-instrument object.
A channel strip is automatically generated in the Mixer for each sub-channel of each MIDI multi-instrument object.
Tip: Once tracks are created, you can quickly reassign them to the sub-channels of any MIDI multi-instrument object with the Library, or by Control-clicking (or right-clicking) the track list, and making your choice from the Reassign Track shortcut menu.
Full details on setting up external MIDI sound modules and keyboards are found in Setting Up External MIDI Instruments.
Transferring a Channel Strip Setting to a New Track
You can create a new track that uses the same channel strip assignment and settings as the selected track. This is a quick and easy way to create a duplicate of an existing track and channel strip, without replicating the data on the track.
Select the source track (the one with the channel strip and settings that you want to duplicate).
Do one of the following:
Choose Track > New with Duplicate Setting in the Arrange area’s local menu bar (or use the New Track with Duplicate Setting key command, default assignment: Command-D).
Click the Duplicate Track button above the track list in the Arrange area.

Logic Pro creates a new track that uses the same channel strip assignments and settings directly below the source track. The data on the track (if any exists) is not duplicated.
If you want to copy a track, inclusive of any data, but do not want to copy the channel strip, see Copying Tracks and Moving Regions.
Creating Tracks by Adding Apple Loops
You can create tracks by dragging Apple Loops from the Loop Browser directly into the blank Arrange area. A track and corresponding channel strip are automatically created, and the Apple Loops file is loaded. For more details on adding Apple Loops, see Finding Apple Loops in the Loop Browser.
Creating Tracks by Adding Audio Files
You can create tracks by dragging audio files from the Media Browser directly into the blank Arrange area. A track and corresponding channel strip are automatically created, and a region (that is the full length of the audio file) is added to the new arrange track. The audio file (and corresponding region) is also automatically added to the Audio Bin.