Finding Apple Loops in the Loop Browser
The Loop Browser only displays Apple Loops format files. You can search for Apple Loops, using keywords for instrument, genre, mood, and other descriptors. You can also browse for Apple Loops in the Loop Browser.
In comparison with standard audio loops, Apple Loops have a significant advantage: they can contain additional information that Logic Pro uses for a variety of purposes, including automatic time and pitch shifting, indexing, and searching.
Two important data types that Apple Loops may include are metadata tags and transient markers. Logic Pro uses metadata tags to help locate files when using the Search features of the Loop Browser. Transient markers indicate where beats occur in the file. Logic Pro uses this information, in conjunction with the metadata tags, to match the file’s tempo and key to the project tempo and key, thus ensuring the best possible playback quality. This functionality allows you to play back several Apple Loops simultaneously, and have them sound good, even if they have different tempos and keys.
Click the Media button in the Arrange toolbar, then click the Loop tab (or use the Toggle Loop Browser key command, default assignment: O).
Understanding Green and Blue Apple Loops
The Loop Browser contains two types of Apple Loops: those featuring a blue sound wave icon and those with a green note icon.
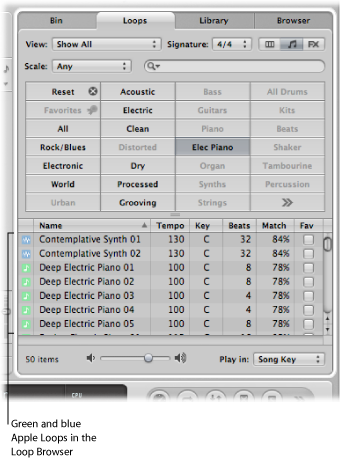
Both contain audio data, and both can contain additional information for time stretching, transposition, indexing, and searching.
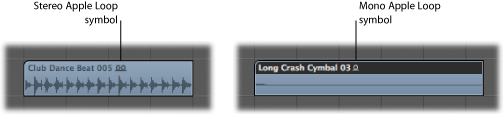
Green and blue Apple Loops can be added to audio tracks, or directly to an empty Arrange area or track. In the Arrange area, they look like normal audio regions, but can be easily identified by the Apple Loops symbol in the upper-right corner. They differ from standard audio regions in that they follow the project key and tempo.
You can drag blue (audio) Apple Loops directly into a blank Arrange window (with no tracks), or to a blank area below existing tracks. An audio track and corresponding channel strip are automatically created, and the Apple Loops region (that is the full length of the file) is placed on the track. In addition, the Apple Loops file is added to the Audio Bin, and a corresponding region is automatically created.
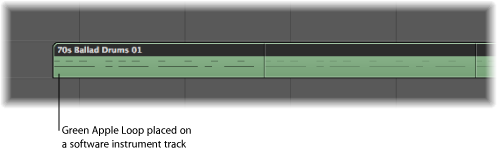
Green Apple Loops are known as Software Instrument Apple Loops (SIALs). They differ from the blue (audio) Apple Loops in that they also contain a MIDI region plus software instrument and effect settings.
When Software Instrument Apple Loops are placed on instrument tracks, the region shown in the Arrange area can be edited just like other MIDI regions, including individual note editing.
If dragged onto a blank instrument track (one with an empty channel strip), the corresponding instrument and effect(s) settings are automatically inserted.
You can also drag Software Instrument Apple Loops directly into a blank Arrange window (with no tracks), or to a blank area below existing tracks. An instrument track and corresponding channel strip are automatically created, and the Apple Loops file is loaded (the instrument is inserted into the instrument channel, along with any effects, and the Apple Loops region is placed on the track).
When you place Software Instrument Apple Loops on audio tracks, they are imported as audio regions (and behave like blue Apple Loops). The processing load is reduced when green Apple Loops are added to audio tracks.
Note: Blue Apple Loops will not play if placed on instrument tracks.
Setting Limitations Before Browsing for Apple Loops
When thousands of loops are installed on your hard disks, finding a particular Apple Loops file can be a rather daunting prospect. Fortunately, a number of options allow you to restrict your searching or browsing results with a number of key criteria.
These can be used in conjunction with each other, and directly affect the results of the browsing and search features available in the Loop Browser.
Choose a setting from the View menu. You can choose between:
- Show All: Choose this default option to display all Apple Loops on your system. This option is handy if you are unable to locate a loop that you know is installed and indexed on your system, but do not know what Jam Pack it belongs to.
- My Loops: Choose this option to display all Apple Loops in the ~/Library/Audio/Apple Loops/User Loops/Single Files folder (~ denotes the username).
- Shared Loops on my Mac: Choose this option to display all Apple Loops in the /Library/Audio/Apple Loops/User Loops/Single Files folders. This setting is only visible if Apple Loops are shared with GarageBand on your system.
- GarageBand: Choose this option to display all Apple Loops installed with GarageBand.
- Jam Pack x: Choose this option to display all Apple Loops from a specific Jam Pack. Jam Packs are professionally created genre or instrument-specific Apple Loops collections, available from Apple.
- Vendor x: Choose this option to display all Apple Loops from a specific third-party vendor.
- Other: Choose this option to display all loops that you manually added to the loop library by dragging them into the Loop Browser.
Open the Scale pop-up menu, and choose from Any, Minor, Major, Neither, and Good for Both.
Use of these options limits the search for Apple Loops to the selected scale type, within the chosen category. For example, if Country, Acoustic, and Relaxed categories were selected, you would be presented with 20 or so files that matched your choices. Selection of the Minor Scale setting would reduce this list to ten possible Apple Loops, making the task of auditioning and selecting the most appropriate material faster.
Choose a time signature from the Signature pop-up menu.
Browsing for Apple Loops
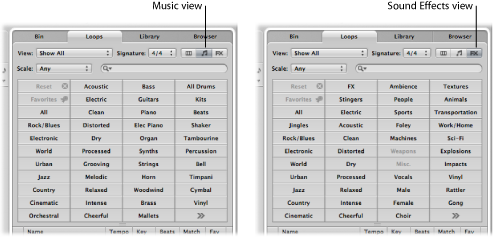
There are three browsing views available in the Loop Browser: Column view, Music view, and Sound Effects view.
Click one of the view buttons at the top-right corner of the Loop Browser.
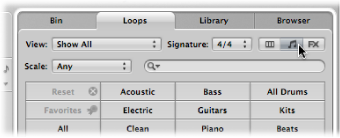
The left button activates Column view, the middle button activates Music view, and the third button Sound Effects view.
Music view displays a matrix of 54 buttons, each featuring a musically related category. Sound Effects view offers effect-related category buttons such as Explosions, Foley, or People.
Column view offers a standard Mac OS X column file directory that is hierarchically separated into All, By Genres, By Instruments, By Moods, and Favorites search criteria.
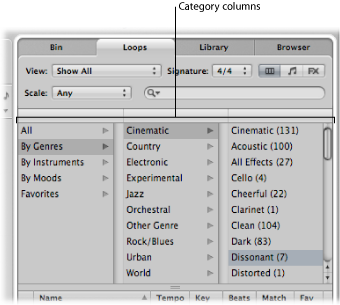
Click any of the category folders shown in the left column.
In this example, By Genres is chosen.
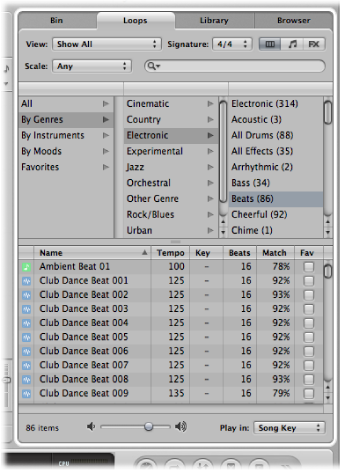
Click Electronic in the second column.
Click Beats in the third column.
The value in brackets indicates the number of files that fall into this subcategory (Beats). The files are shown in the file list below.
Click any of the category buttons.
The file list displays all Apple Loops that fall into the chosen category. The number of matching files is shown at the bottom of the Loop Browser.
Click another category button.
The file list updates to display all Apple Loops that fall into both categories.
Click another category button to further refine categorization.
The number of files that match all three criteria (Guitars, Acoustic, and Country) is further reduced.
Note: A second click on any chosen category button deselects it.
As you can see from this example, the use of multiple category buttons makes it easy to restrict the number of Apple Loops that are shown in the file list. This, in turn, makes the task of finding an Apple Loops file that has a particular vibe or flavor much simpler.
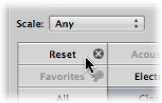
Click the Reset button to clear all selected category buttons.
You can replace a displayed category via the shortcut menu that opens when you Control-click (or right-click) any category button.
Control-click (or right click) any category button, then choose from:
- Genre: This submenu offers musical categories, such as Rock/Blues and Electronic.
- Instruments: Bass, FX, Vocals, and the Textures and Jingles settings are available, among others.
- Descriptors: The items in this submenu cover the mood of Apple Loops, and include Dark, Relaxed, Grooving, and others.
Auditioning Apple Loops
Regardless of the browsing (or searching) method used to find Apple Loops, you can preview the results in the Loop Browser.
Click any filename in the Search Results list.
It starts playing automatically in a continuous loop.
Click another filename, and it starts playback.
The Apple Loops file that was playing stops. Only one Apple Loops file can be auditioned at a time.
Drag the level fader at the bottom of the file view area.
Open the “Play in” pop-up menu to the right of the level fader at the bottom of the file view area, and choose a key.
This defaults to the project key, but you can also choose to audition the loop in its original key or any key from C to B.
Click the speaker icon to the left of the selected Apple Loops filename.
Sorting Apple Loops
You can sort the results of your Apple Loops search or browsing using the following categories:
- Name column: Displays Apple Loops by name.
- Tempo column: Displays Apple Loops by tempo.
- Key column: Displays Apple Loops by key.
- Beats column: Displays Apple Loops by beats.
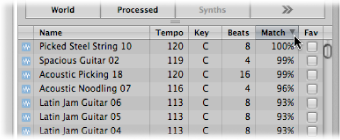
- Match column: Displays Apple Loops as a percentage match between the project tempo and the Apple Loops original tempo. For example, an Apple Loops file with an original tempo of 100 bpm offers a match of 94% for a project tempo of 104 bpm.
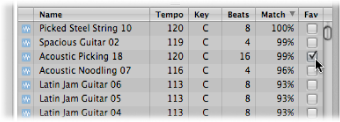
- Fav column: Displays an active checkbox for those Apple Loops that are marked as Favorites, and therefore part of your Favorites category.
Click any of the column titles to sort the list of results by that column type.
Click the arrow in any selected column title to sort the list in ascending or descending order (alphabetical, tempo, key, beat, match percentage, or favorite).
Tip: You can freely swap column positions by dragging the column name field, and moving it left or right. Column widths can be resized by dragging the vertical lines that separate the column name fields.
Creating a Collection of Your Favorite Apple Loops
The Fav (Favorites) column offers a checkbox for every displayed loop. Simply select this box to add the loop to the Favorites category.
This feature is ideal for compiling a collection of Apple Loops that you use regularly. As a producer of dance floor music, you may often construct projects by starting with drum loops. You could conceivably have a basic four on the floor kick pattern, eighth and sixteenth note hi-hats, two or four beat snare or clap patterns, and so on, and use these favorite loops as a groove construction kit—at least while creating your shell arrangement.
These loops can be replaced or added to easily as your project advances, but the use of favorites may form a great starting point for many of your songs.
Searching for Apple Loops
The search field is used to find Apple Loops by name or partial name. It works in conjunction with the options discussed in Setting Limitations Before Browsing for Apple Loops.

Enter a search term into the search field, and press the Return key.
The search term can be alphabetical or numerical. Any files that match your search term are displayed in the file list.
The Cancel button to the right (which appears as soon as any text is entered) clears any entered text. It also clears the search history.
The Search menu to the left (the magnifying glass) retains a history of recently used search terms. Click it to select a previous search term.