Using Oscillator 2 in Ultrabeat
Oscillator 2 can also be switched between three different types of synthesis engines: phase oscillator, sample, and model. Each mode offers different parameters and features.

Click the appropriate button on the lower edge of the Oscillator 2 section to enable each mode.
Using Oscillator 2’s Phase Oscillator Mode in Ultrabeat
Oscillator 2’s phase oscillator operates in a nearly identical fashion to the phase oscillator of Oscillator 1. The key difference is that Saturation can be modulated in Oscillator 2, rather than Asymmetry (in Oscillator 1). This means that when both oscillators are in phase oscillator mode, they can produce different sounds.
For details on parameters, see Using Oscillator 1’s Phase Oscillator Mode in Ultrabeat.
Using Ultrabeat’s Sample Mode
In Sample mode, Oscillator 2 uses an audio file as a sound source.

- Sample Name display: Used to load and unload samples or to display the loaded sample in the Finder. Click the arrow in the upper-left corner of the waveform display to open. See Loading Samples into Ultrabeat Oscillator 2.
- Max/Min sliders: Determine the start point of the sample—depending on the dynamics (incoming velocity level) of the performance. To adjust, drag the max/min labels to the left or right.
- Min: Determines the start point of the sample at the minimum velocity level (velocity = 1).
- Max: Determines the start point of the sample at the maximum velocity level (velocity = 127).
Note: If Min and Max are set to the same value, velocity has no effect on the sample start point.
- Playback Direction button: Changes the playback direction of the sample (forward or backward).
- Layer sliders: Both factory Ultrabeat samples and sounds imported from EXS instruments often consist of different layers that are dynamically switched by incoming MIDI note velocities. The precise sample layer that incoming velocity values switch to is determined by the green Layer slider on the right (min), or the blue slider on the left (max).
The green Min slider on the right determines which layer is triggered at a MIDI note velocity = 1.
The blue Max slider on the left determines which layer is triggered at a MIDI note velocity = 127.
Note: If you have loaded a single sample that does not have multiple layers, the Vel Layer slider has no effect.
Loading Samples into Ultrabeat Oscillator 2
A selection of multilayer drum and percussion samples is included on your installation discs. These were especially created for Ultrabeat and its function set. You can also load your own samples in AIFF, WAV, CAF, or SDII stereo interleaved format.
Note: The velocity layering function is not available for user-loaded samples.
Click the arrow in the upper-left corner of the waveform display, then choose Load Sample from the pop-up menu.

In the Load Sample window, browse to the desired audio file, and do one of the following:
Click Open to load the chosen file into Oscillator 2.
Click Cancel to retain the current state.
Using Ultrabeat’s Load Sample Preview Function
You can audition samples before importing them into Ultrabeat.
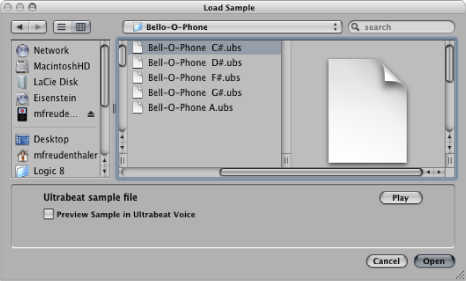
- Play button: Allows you to preview audio files (AIFF, WAV, SD2, CAF, UBS) before loading.
Click the Play button to loop playback of the currently selected sample file. The sample is played directly from the hard disk, with no manipulation: filters, EQ, envelopes, and other synthesizer parameters are ignored.
Click the button again to stop playback.
You can audition multiple files by clicking Play once, and then stepping through the files by pressing the Up Arrow and Down Arrow keys or by clicking each file.
Note: Independent auditioning of all layers is not possible. In multilayer UBS files, the audition function plays the sample at a fixed velocity of 75%. Only the layer addressed by this velocity value will be played.
- “Preview Sample in Ultrabeat Voice” checkbox: Temporarily replaces the sample files in the currently selected drum sound, in the Assignment section. The drum sound can be triggered as usual (played notes, MIDI region events, or Ultrabeat sequencer events) while the Load Sample window is open and different files are being selected. The selected sample can be heard as part of the current drum sound, inclusive of all synthesizer processing.
Important: Any effects inserted into the Ultrabeat instrument channel strip are heard when you preview samples.
Using Ultrabeat’s Model Mode
This mode employs a method of synthesis known as component modeling. This tone generation technique emulates the physical properties of an object, such as a guitar string. Further objects are used to stimulate the string—in essence, emulating the way that it is played: plucked, bowed, and so on. Although the termstring is used, Model mode enables you to create sounds that have little in common with traditional stringed instruments.
The string is the element that is responsible for the basic tone. Ultrabeat offers parameters that allow you to adjust its material—what it’s made of, in other words.
One of the two available exciters make the string vibrate (move) in different ways. The string itself doesn’t make a sound unless it is stimulated, or excited.
The signal of the vibrating string is sent to the filter, amplifier, and so on in the Ultrabeat Synthesizer section.
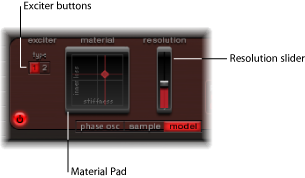
- Exciter buttons: Choose one of the two contrasting exciters. Each offers different sound characteristics (Type 1 and Type 2).
Note: In this context, an exciter is the agent or triggering device used to initiate the vibration of the string. Don’t confuse it with the effect plug-in of the same name.
- Material Pad: Determines the basic tone of the string with the string Stiffness and damping (Inner Loss) parameters. See Using the Ultrabeat Material Pad.
- Resolution slider: Determines the precision of the calculation.
Higher values produce additional harmonics.
Lower values produce fewer harmonics or inharmonic spectra.
Note: The higher the resolution (the more precise the calculation), the more CPU resources are required.
Using the Ultrabeat Material Pad
The combination of the Inner Loss and Stiffness parameter positions determine the string material and, therefore, the general timbre of your sound. Both parameters are simultaneously controlled by dragging the ball (which correlates to the x and y coordinates) within theMaterial Pad. The default pitch of the string is C3 (middle C).
In general synthesizer terms, this could be viewed as being similar to the waveform selector/generator in the oscillator section.
Note: Option-click the ball to reset all string parameters to their default values.
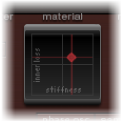
- Inner Loss: Emulates damping of the string, as caused by the string material—steel, glass, nylon, or wood. These are frequency-dependent losses that cause the sound to become more mellow during the decay phase.
- Stiffness: Sets the rigidity of the string. In reality, this is determined by the string material and diameter—or, to be more precise, by its geometrical moment of inertia.
Stiffer strings exhibit an inharmonic vibration, where overtones are not integer multiples of the base frequency. Rather, they have higher frequencies, which can make upper or lower notes sound somewhat out of tune with each other.