
The workflow for developing Apple Developer Enterprise Program apps is similar to the workflow used by any organization that develops multiple apps for the App Store. During development, let Xcode manage your assets for you and use your developer account only as needed. Xcode will create your App ID and provisioning profiles for you. Xcode configures your project correctly to use the app services you enable.
Note: Members of the Apple Developer Enterprise Program can also distribute macOS apps outside the Mac App Store.
To join the Apple Developer Enterprise Program, go to Apple Developer Enterprise Program.
If you are the Account Holder (the person who joined the Apple Developer Enterprise Program), invite team members using your developer account.
Assign the Admin role to people who help you manage your team. Assign the Developer role to persons who develop your app but don’t have permission to distribute it. The Account Holder and Admin roles share the responsibility of exporting your app for distribution outside of the App Store. Initially, the Account Holder is the only member on the team.
You can also remove persons from your team. For example, if you hire contractors to develop your app, remove them when their contract ends.
If you have the Account Holder or Admin role, perform these steps to enable your development team:
In Xcode, assign the target to a team and add capabilities to the target.
Select the Apple Developer Enterprise Program team from the Team pop-up menu. If you use automatic signing, Xcode creates an App ID, with the specified entitlements whitelisted, and creates a team provisioning profile for you.
WARNING: Don’t add capabilities that require configuration in App Store Connect, such as Apple Pay, Game Center, and In-App Purchase.
In your developer account, register development and test devices.
When a team member launches an app on a device, Xcode automatically registers the device. If you want finer control over the team devices, register multiple devices and disable or enable a device using your developer account. If necessary, ask team members to locate their device IDs and send them to you.
Perform these steps to get started:
In Xcode, add your Apple ID account to the Accounts preferences.
To create your development certificate and register your device, launch the app on a device.
Select your Apple Developer Enterprise Program team from the Team pop-up menu. Xcode will create your development certificate, register your device, and then regenerate and download the Xcode-managed team provisioning profile as needed.
Important: Each team member should have his or her own Apple ID and signing certificate. Don’t share signing certificates between team members.
If you have the Account Holder or Admin role, you can use an ad hoc provisioning profile to distribute your app to registered devices for testing.
Note: As a member of the Apple Developer Enterprise Program, you don’t have an App Store Connect account and consequently, the ability to distribute an app using TestFlight.
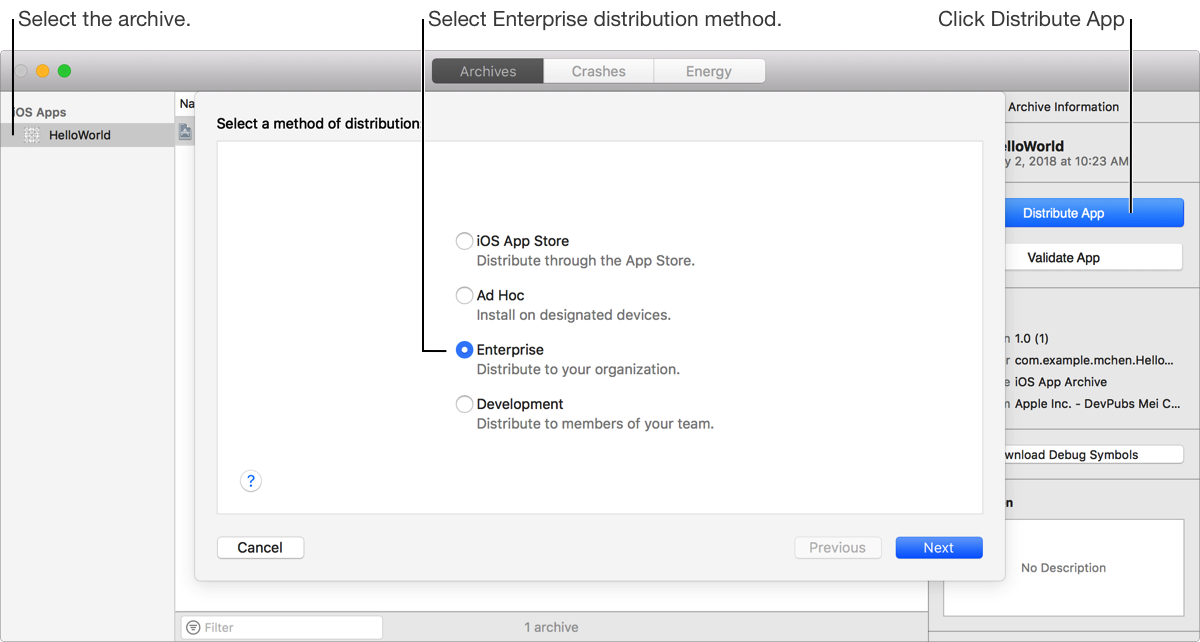
If you have the Account Holder or Admin role, follow the same steps to distribute to registered devices except you don’t need to register devices before you export your app. When you export the app, select the Enterprise distribution method. Note that you can’t distribute an enterprise app using a wildcard App ID.
Use Mobile Device Management (MDM) to deploy business and education apps. For details, go to Business Support and in the left column, click Mobile Device Management.
Note: If you don’t distribute your app using a MDM system, users can install your app using the iOS App (IPA) file but then they will need to manually trust your organization to launch the app.
Use continuous integration with Xcode Server to automate building, analyzing, testing, and archiving your app.