Submitting Batches for Apple Qmaster Processing
Jobs are submitted in the form of a batch, and a batch can include one or more jobs. Batches can be submitted from any computer that:
Has Compressor software installed
Is on the same network as the cluster to which you are submitting the batch
Submitting Batches with the Apple Qmaster Application
Apple Qmaster includes a plug-in for Shake that automates and customizes the process by which Shake batches are submitted with Apple Qmaster. Because of this, the process for submitting Shake batches is more automated than is the process for submitting batches for other applications that do not have such plug-ins. A plug-in is included for Autodesk Maya, as well as a generic Render Command plug-in for other frame-based rendering applications, and a Shell Command plug-in that works with any application that can be executed from the UNIX command line.
The plug-ins automatically set some default parameters for the job. They also provide a dialog for you to adjust these parameters to your needs and to add more command-line options to each job.
- To submit batches for Shake: See Submitting Shake Batches.
- To submit batches for Maya: See Submitting Maya Batches.
- To submit batches for other frame-based rendering applications: See Submitting Batches with the Generic Render Command.
- To submit batches for any application that can be executed from the UNIX command line: See Using Apple Qmaster to Submit UNIX Commands.
Submitting Shake Batches
Using Apple Qmaster, you can quickly create and submit a batch of Shake jobs.
Note: You can also submit Shake batches as described in Using Apple Qmaster to Submit UNIX Commands, but the following method is the easiest way to submit Shake batches with Apple Qmaster.
Open Compressor and choose Apple Qmaster > Create Rendering Jobs.
Apple Qmaster opens.
Enter a name for the batch in the “Batch name” field. (This is the name that appears in Share Monitor after you submit the batch.)
Do one of the following:
Drag the Shake (.shk) file to the Batch table (the middle area of the Apple Qmaster window).
Choose Shake from the pop-up menu, then click the Add (+) button to add a job.
In the dialog that appears, do the following:
In the Script field, enter the location of the Shake file if it isn’t already shown. (If you dragged the file to the window, the file location is already there.)
Note: The Shake field shows the default location of Shake on your computer. If it is not correct, be sure to update it.
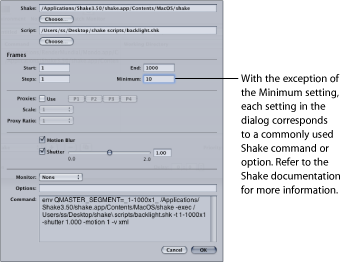
If you wish, edit the available values and settings to customize the command. For more information, see About the Shake Plug-in Dialog.
Each setting corresponds to a commonly used Shake command, with the exception of the Minimum setting. See the Shake documentation for further information about the Shake settings in this dialog. See About the Shake Plug-in Dialog for more information about the the Minimum setting.
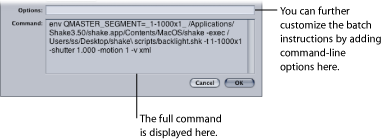
If you wish, add other command-line options to the Options field.
Click OK when you have finished with this dialog.
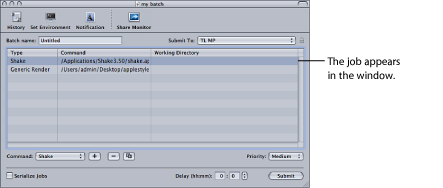
The Shake job appears in the window.
To add more jobs to this batch, repeat steps 3 and 4.
As needed, make any final changes to the batch, such as either of the following:
- To edit a command in the list: Double-click the job. The command dialog in step 4 appears.
- To delete a job from this batch (before you submit the batch): Select the job you want to delete and click the Remove (–) button.
As needed, set the following options for this batch.
- Submit To: Choose a cluster to process this batch.
- Working Directory: If relevant, enter the working directory (from which you want the command to be executed).
- Priority: Choose the priority level from the pop-up menu. The higher the priority, the sooner and faster this batch will be processed relative to other batches.
- Delay: Specify how long you would like the system to wait before processing this batch.
Click Submit to send the batch out for processing.
Any output files for the batch are placed in the destination specified in the script file or command.
Note: If you are using Apple Qmaster to render Shake jobs as QuickTime movie output, every service node in the Apple Qmaster cluster must have Mac OS X v10.6 or later.
About the Shake Plug-in Dialog
The Shake Plug-in dialog contains the following settings.
- Ignore script failures checkbox: This checkbox allows you to determine whether Apple Qmaster should continue rendering all the frames of the script in the event that Shake returns a non-zero UNIX command result. (In Apple Qmaster 2 and previous versions, a job would always fail if any segment returned non-zero.) By default, this checkbox is not selected. Select the checkbox if Apple Qmaster should ignore non-zero UNIX command results.
- Minimum field: You can change the value in the Minimum field to change the minimum number of frames in each Apple Qmaster segment. For example, with a minimum value of 10 (the default), Apple Qmaster would divide a 100-frame job into at least 10 segments of 10 frames each. If you changed the minimum value to 5, Apple Qmaster would divide a 100-frame job into at least 20 segments of 5 frames each. (When you set a minimum, keep in mind that although smaller segments allow a job to be distributed to more nodes at once, smaller segments can also mean that more processing effort is spent on opening and closing Shake on each node.)
- Proxy buttons: Although the four default proxy settings are identical in both Shake and Apple Qmaster, they have slightly different names in each application. The list below indicates the corresponding names. The Apple Qmaster name is in italics, followed by the corresponding Shake name:
- P1: Base
- P2: P1
- P3: P2
- P4: P3
Refer to the Shake documentation for more information.
- Monitor pop-up menu: Though the Monitor pop-up menu corresponds to a Shake command option, it requires some explanation in the context of this dialog. The pop-up menu lets you choose whether or not to display each frame as it renders. If you don’t want to see the frames as they render, choose None. To see the frames as they render, choose a display from the Monitor pop-up menu, then specify the FileOut node in the Options field. For example: -node nodename. (If the script has only one FileOut node, there is no need to specify it.)
Submitting Maya Batches
There is a special dialog within Apple Qmaster for specifying commands for the distributed processing of Maya files. Apple Qmaster can utilize separate clusters for Shake and Maya, or draw from a single pool of processing resources for both applications.
Open Compressor and choose Apple Qmaster > Create Rendering Jobs.
Apple Qmaster opens.
Choose Maya from the Command pop-up menu, then click the Add (+) button to add a job.
In the dialog that appears, enter the relevant information in the required and optional fields.
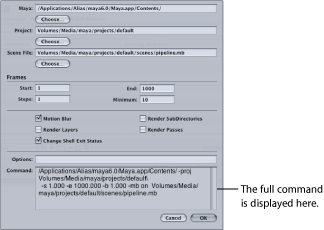
Some fields and settings in this dialog are optional, but the following are required:
The Maya field displays the default location for the Maya application—make sure it is correct.
Use the Choose buttons to navigate to and choose the location of the Maya project and scene files for this job.
In the Frames section, enter a Start and End frame for the job.
The available settings correspond to commonly used Maya command options. You can also type additional command options in the Options field. See the Maya documentation for more information about all the Maya command settings.
Click OK when you have finished creating the full command.
To add more jobs to this batch, repeat steps 2 through 4.
As needed, set the following options for the batch in the Apple Qmaster window:
- Submit To: Choose a cluster to process this batch.
- Working Directory: If relevant, enter the working directory (from which you want the command to be executed) in the Working Directory column.
- Priority: Choose the priority level from the pop-up menu. The higher the priority, the sooner and faster this batch will be processed relative to other batches.
Click Submit to send the batch out for processing.
Important: By default, Apple Qmaster ignores Maya plug-in error messages. If you use Maya plug-ins, you can change this by removing or renaming /Library/Application\ Support/Apple\ Qmaster/MayaCommandPlugin.commandPlugin/Contents/Resources/mayascript. Advanced users can customize MayaScript to suit their environment and workflow.
Media Management in Maya Projects
Most Maya assets are contained in the project directory. If your project uses external files, you will need to relink them when the project is moved to the shared volume.
It may be necessary to retarget your assets once you move your project to the shared volume. This varies depending on the types of files and plug-ins used. If you are handing this project to a cluster administrator, you should save the file in Maya ASCII (.ma) as well. This way, it can be edited to fix path problems without advanced knowledge of using Maya.
Mental Ray for Maya Submissions and Other Options
To use the Mental Ray for Maya renderer, add -r mr to the Options field. You must have a licensed copy of Maya on each node in the cluster to use the Mental Ray renderer. Apple Qmaster does not use Maya Satellite, so in this regard, there is no difference in Maya Complete versus Maya Unlimited, except for the plug-ins that ship with Unlimited. If the node in question has only one processor, the number of satellite processors does not apply to Apple Qmaster.
Another option is -rt. This specifies the number of rendering threads. By default, the number of rendering threads is 2. You might want to change this value depending on the type of computers in your cluster. In a homogeneous cluster environment, say of Mac Pro or Power Mac G5 quad systems, you would change this value to 4, as there are four processors per node, and some Maya operations might be faster with more threads. This option is passed to all the nodes in the cluster. So, if you have nodes that vary in the number of processors, you will have to be careful with the number of threads you use. Too many threads can result in lower performance for those nodes.
If you want to selectively enable the number of threads a node uses, you must use a wrapper.
Remove or rename the following file:
/Library/Application\ Support/Apple\ Qmaster/MayaCommandPlugin.commandPlugin/Contents/Resources/mayascript
Submitting Batches with the Generic Render Command
You can use the Generic Render command in Apple Qmaster for the distributed processing of projects from other frame-based rendering applications (such as After Effects and LightWave). The plug-in dialog allows you to adjust parameters and to add more command-line options to each job.
Open Compressor and choose Apple Qmaster > Create Rendering Jobs.
Apple Qmaster opens.
Choose Generic Render from the Command pop-up menu, then click the Add (+) button to add a job.
In the dialog that appears, enter the relevant information in the required and optional fields.
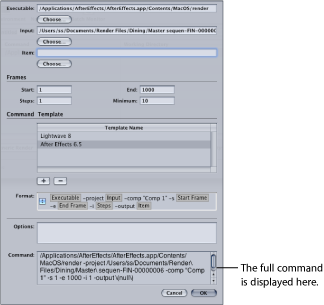
Some fields and settings in this dialog are optional, but the following are required:
The Executable field requires the location of the frame-based rendering application—make sure it is correct.
Use the Choose buttons to navigate to and choose the location of the project and scene files for this job.
In the Frames section, enter a Start and End frame for the job.
In the Command Template section, do one of the following:
Use the Default Template as is, or adjust it by adding additional command elements from the pop-up menu.
Click the Add (+) button to create an additional template, and adjust it by adding additional command elements from the pop-up menu.
Note: You can change the order of the command elements by dragging them left or right.
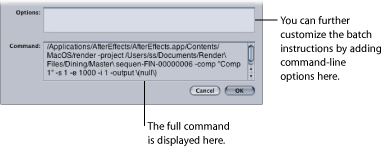
If necessary, add command-line instructions in the Options field. Any text entered here will be appended at the end of the command.
Verify the full command in the Command text box and click OK.
To add more jobs to this batch, repeat steps 2 through 6.
As needed, set the following options for the batch in the Apple Qmaster window:
- Submit To: Choose a cluster to process this batch.
- Working Directory: If relevant, enter the working directory (from which you want the command to be executed) in the Working Directory column.
- Priority: Choose the priority level from the pop-up menu. The higher the priority, the sooner and faster this batch will be processed relative to other batches.
Click Submit to send the batch out for processing.
Important: If you output from the Generic Render plug-in to single files containing all the frames, such as a QuickTime movie, all the nodes of a cluster may try to write to the same file at the same time. To avoid this problem, choose a different output file format or use a different render command.
Generic Render Command and Non-Zero Exit Status
The “Treat non-zero exit status as failure” checkbox in the Generic Render dialog allows you to use Apple Qmaster with rendering applications that return non-zero results that are not intended to indicate failure. By default, this checkbox is selected. If your rendering application issues non-zero results that are not intended to indicate failure, deselect the checkbox.
Submitting After Effects Batches with the Generic Render Command
The following template is a good starting point for using the Generic Render plug-in to render After Effects projects:
Where:
In the example above, “Comp 1” is the name of the composition in your After Effects project and “test[####].psd” is the output filename. Since you cannot select an output filename in the template’s Item field before the output has been rendered, first select the output directory, then add the filename to the Item field.
Note: In the example, /SHARED_VOLUME/Projects/ is the shared volume. If you created the project on a computer that is not using the shared volume, copy the project to the shared volume, open After Effects, and relink any missing media.
Here are additional tips for using the Generic Render plug-in to render After Effects projects:
After Effects makes good use of multiprocessor systems, but on projects that are not processor-bound, two rendering services per node give you better results.
After Effects custom template information is stored in Users/username/Library/Preferences/Adobe After Effects 6.5 Prefs/. If you would like to use custom Render Setting and Output Module templates in an Apple Qmaster cluster, copy this file to the same location on each node in the cluster. Then you can specify your templates when using the -RStemplate or -OMtemplate options.
The above example includes many additions to the shipping After Effects template. In order to render After Effects in a distributed environment, you must render an image sequence. User-specific sections must be edited every time. These include the comp name (Comp 1), output filename (test[####].psd), and possibly output module and render settings.
After Effects provides Render Setting and Output Module templates specifically for this environment. You can use custom After Effects render and output templates if you wish, but the output must be an image sequence. After Effects stores its custom template information in ~/Library/Preferences/Adobe After Effects 6.5 Prefs/. If you would like to use your custom Render Setting and Output Module templates in the cluster, copy this file to the same location on each node in the cluster. Then you can specify your templates when using the -RStemplate or -OMtemplate options.
Optionally, you can use Notification and Set Environment before you submit. Notification is email notification: Enter an email address and SMTP server, and you will be notified about the completion of your batch and its status. Use Set Environment to define variables on a per-batch basis. For more information, see Setting Environment Variables in Apple Qmaster.
Note: Apple Qmaster does not currently support SMTP servers that require authentication.
Using Apple Qmaster to Submit UNIX Commands
You can use Apple Qmaster for distributed processing of any UNIX commands, including any application that can be operated from the command line. Apple Qmaster provides a convenient way to issue commands, shortening the amount of typing you need to do by providing an interface for the global parts of the command.
Open Compressor and choose Apple Qmaster > Create Rendering Jobs.
Apple Qmaster opens.
Enter a name for the batch in the “Batch name” field. (This is the name that appears in Share Monitor.)
Choose Shell from the Command pop-up menu.
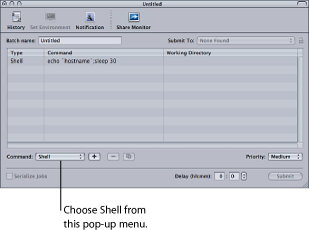
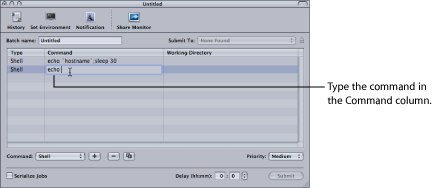
For each job you want to add to the batch, click the Add (+) button, then type the UNIX command in the Command column.
The UNIX command might specify, for example, the application, an output destination, and a couple of command-line options.
Note: If you need to delete a job from this batch (before you submit the batch), select the job you want to delete and click the Remove (–) button.
As needed, set the following options for this batch.
- Submit To: Choose a cluster to process this batch.
- Working Directory: If relevant, enter the working directory (from which you want the command to be executed).
- Priority: Choose the priority level from the pop-up menu. The higher the priority, the sooner and faster this batch will be processed relative to other batches.
- Delay: Specify how long you would like the system to wait before processing this batch.
Click Submit to submit the batch for processing.