
There are a number of ways to add text to a document. You can replace placeholder text in a template; add text in a text box outside the main document body, such as in a sidebar; and add text inside a shape.
In a page layout document, all text is contained in one or more text boxes. In a word-processing document, you can have text in the main body of the document, then add text boxes for things like sidebars and captions.
For body text in a blank template: Just start typing.
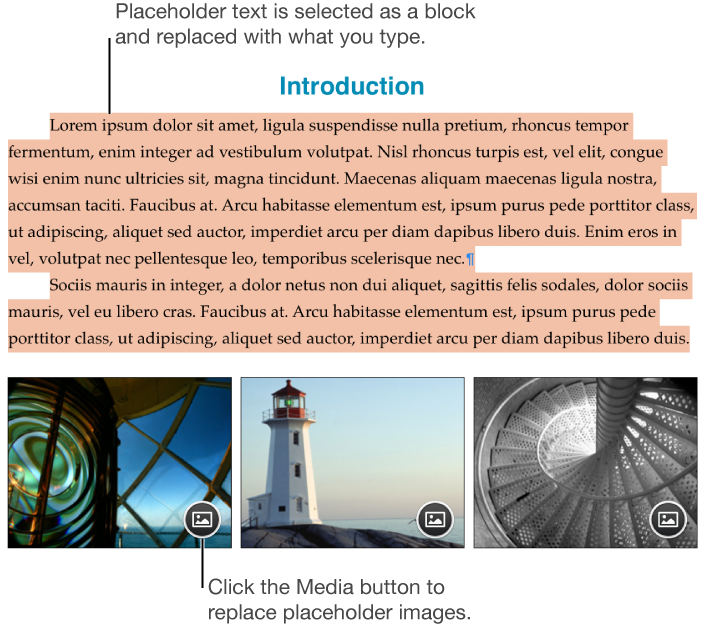
For body text in a template with placeholder text: Click the placeholder text to select it, then start typing. To remove placeholder text completely, click it, then press Delete on your keyboard.
Some placeholder text is written in scrambled Latin words. The text you type will appear in the language you use for your computer.
In word-processing documents, a new page is added automatically when you reach the end of the page, or you can add a page break anywhere to start the next line on a new page. In a page layout document, you can add a blank page anywhere in your document. For more information, see Add, delete, and rearrange pages.
Click ![]() in the toolbar.
in the toolbar.
A text box appears on the page (you can change how the text looks later).
Drag the text box to where you want it.
If you can’t move the box, click outside the box to deselect the text, then click the text once to select its text box.
Type to replace the placeholder text.
To resize the text box, do one of the following:
If the box is too small for the text: Select the text box, then drag the clipping indicator ![]() until all text is showing. You can also drag a selection handle.
until all text is showing. You can also drag a selection handle.
If the box is too large for the text: Select the text box, then drag a selection handle to resize the text box.
To delete a text box, click the text in the box, then press Delete on your keyboard.
You can also link a text box to another text box to accommodate overflow text. See Link text boxes.
A text box is an object that can be modified like most other objects; you can rotate it, change its border, fill it with a color, layer it with other objects, and more. You can also change the appearance of text within the box—including its font, color, size, and alignment.
Every Pages template comes with a default text box style, so when you add a text box to a document and type text in it, the box and the text use this style. You can modify this default style—change the font, font color, color fill, and so on—then make it the new default style for the document. Your default text box style applies only to the document where you create it.
Add a text box to your document and change it however you want.
For example, you can change the font and font size, add a border to the box, and so on.
Select the text box.
Choose Format > Advanced > Set as Default Text Box Appearance (from the Format menu at the top of your screen).
You can change the default text box style whenever you want, and it won’t affect any text boxes already in the document.
If you want to apply the same design changes to other text boxes that already exist in the document, you can save the default text box style as an object style, then apply the object style to other text boxes.
Double-click the shape to make the insertion point appear, then type your text.
If there’s too much text to display in the shape, a clipping indicator ![]() appears. To resize the shape, select it, then drag any selection handle until all the text is showing.
appears. To resize the shape, select it, then drag any selection handle until all the text is showing.
You can change the look of text inside the shape just like any other text.
Use a text box to add a caption or label to an image, table, shape, or other object.
Click near where you want the caption to appear, then click ![]() in the toolbar.
in the toolbar.
A text box appears on the page.
Drag the text box to where you want it.
Type your caption, then resize the text box by dragging any selection handle.
If you don’t see selection handles, click outside the box, then click the text once.
Select the text or text box, then in the Format ![]() sidebar, do one of the following:
sidebar, do one of the following:
Change the look of the text: Use the font controls to choose a different font, change the font size, and more.
Change the look of the text box: Click the Style tab, then click one of the text box styles at the top of the sidebar. You can use the other controls to change the color of the box, add a shadow to it, and make other adjustments.
To group the caption with the object so they stay together, select the caption and the object, click the Arrange tab at the top of the sidebar, then click Group at the bottom of the sidebar.
To set how text wraps around the object and caption, click the Text Wrap pop-up menu near the top of the sidebar and choose an option.
If you want to use the same formatting for all captions in your document, you can create a paragraph style for captions so you can easily apply the style to all of the captions in your document.
Note: To learn how to add captions to an image gallery, see Add an image gallery.