
You can add photos and graphics to a document from a photo library, or drag photos and graphics from a website or from the Finder. You can crop an image by masking out parts you don’t want, and make adjustments to its background and exposure.
Do any of the following:
Drag an image from your computer or a webpage to a media placeholder or anywhere else on the page.
Click ![]() in the bottom-right corner of a media placeholder, then select an image from a photo library.
in the bottom-right corner of a media placeholder, then select an image from a photo library.
Click ![]() in the toolbar, choose Photos, then drag an image from a photo library to the page or to a media placeholder.
in the toolbar, choose Photos, then drag an image from a photo library to the page or to a media placeholder.
To search for an image, click the magnifying glass in the upper-right corner of the media window.
Select the image you want to replace, then in the Format ![]() sidebar, click the Image tab. Click Replace, then choose an image. The new image retains the dimensions of the original.
sidebar, click the Image tab. Click Replace, then choose an image. The new image retains the dimensions of the original.
If you can’t replace an image on a page, the image may be locked or grouped, or it may be a master object.
With an image gallery, you can add several images to a slide in one place, so only one shows at a time.
Click ![]() in the toolbar, then choose Image Gallery.
in the toolbar, then choose Image Gallery.
Drag the image gallery to reposition it on the page, and drag any selection handle to resize it.
To add images, drag them from your computer to the image gallery.
To customize the image gallery, select it, then do any of the following:
Adjust the position or zoom level of an image: Double-click the image on the page, then drag it to move it in the frame. Drag the slider to zoom.
Reorder images: In the Format ![]() sidebar, click the Gallery tab, then drag image thumbnails to reorder them.
sidebar, click the Gallery tab, then drag image thumbnails to reorder them.
Add an image caption: Double-click the text box below the image on the page, then enter your text.
To use the same caption for all images, in the Format ![]() sidebar, click the Gallery tab, then select “Same caption for all images.” Double-click the text box below any image and enter your text.
sidebar, click the Gallery tab, then select “Same caption for all images.” Double-click the text box below any image and enter your text.
To turn off captions, deselect Caption.
Add an image description: To add a description that is used by assistive technology (for example, VoiceOver), in the Format ![]() sidebar, click the Gallery tab, click the Image Description text box, then enter your text. The image description isn’t visible anywhere in your document.
sidebar, click the Gallery tab, click the Image Description text box, then enter your text. The image description isn’t visible anywhere in your document.
To view the image gallery, click ![]() or
or ![]() .
.
To remove an image from the gallery, in the Format ![]() sidebar, click the Gallery tab, click the image thumbnail, then press Delete.
sidebar, click the Gallery tab, click the image thumbnail, then press Delete.
You can add a media placeholder (to which you can add an image, video, or audio file) to a document. Using a media placeholder lets you easily replace media without disturbing other elements on the page.
Add an image to the document, then format it how you want images to appear in the document.
You can add a mask, add a border, rotate the image, change its size, and more.
Select the image, then choose Format > Advanced > Define as Media Placeholder (from the Format menu at the top of your screen).
If you can’t replace an object on a template, the object may be locked or it may be a master object. To make it editable, do one of the following:
Select the object; in the Format ![]() sidebar, click the Arrange tab; then click Unlock.
sidebar, click the Arrange tab; then click Unlock.
Select the object, then choose Arrange > Section Masters > Make Master Objects Selectable (from the Arrange menu at the top of your screen).
You can hide unwanted portions of an image without modifying the image file.
Double-click the image.
The mask controls appear. The default mask is the same size as your image.
Tip: To display the mask controls on a Mac with a Force Touch trackpad, force click the image (press firmly on the trackpad until you feel a deeper click).
Use the controls to frame just the parts of the image you want to be visible.
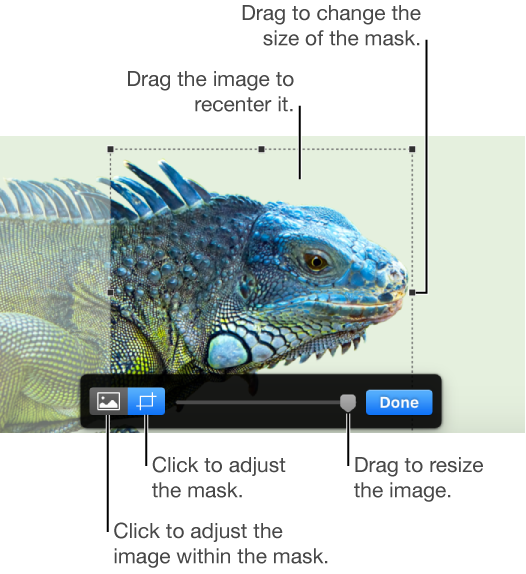
Click Done.
To mask an image with a shape, select the image, choose Format > Image > Mask With Shape, then choose a shape. Drag the handles on the shape to adjust its dimensions.
Use the Instant Alpha tool to make parts of an image transparent. This feature is useful for removing an unwanted background or color from an image.
Select the image.
In the Format ![]() sidebar, click the Image tab.
sidebar, click the Image tab.
Click Instant Alpha.
On the image, click the color you want to remove, then drag slowly over it.
As you drag, the selection grows to include areas that use similar colors. Click and drag multiple times to remove multiple colors.
Remove all of the color (even in other parts of the image): Press the Option key on the keyboard as you drag.
Add a color back to the image: Press the Shift key on the keyboard as you drag.
Click Done, or click Reset to undo all your changes and restore the image to its original state.
Select the image.
In the Format ![]() sidebar, click the Image tab.
sidebar, click the Image tab.
Use the controls to make adjustments:
Exposure: Changes the overall lightness or darkness of the image.
Saturation: Changes the richness of color in the image. Dragging to the right makes the colors richer or more vibrant.
Enhance: Automatically adjusts the image by spreading the red, green, and blue tones evenly across the histogram.
To see the image histogram and adjust more advanced features like contrast, highlights, shadows, sharpness, de-noise, temperature, and tint, click ![]() .
.
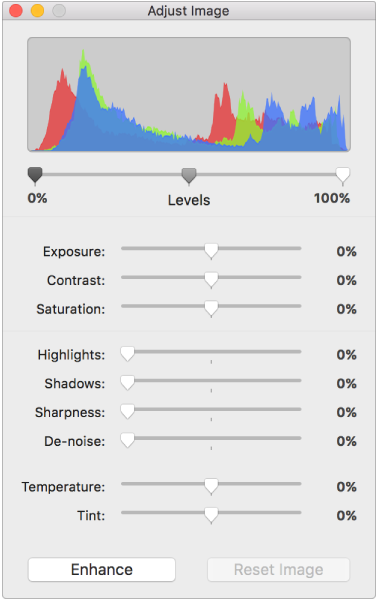
To restore the original settings, click Reset, or click Reset Image in the Adjust Image window.
You can open the Adjust Image controls in a separate window that you can move anywhere. Choose View > Show Adjust Image (from the View menu at the top of your screen).
You can add an image description that is read by assistive technology (for example, VoiceOver) when somebody uses that technology to access your document.
Select the image, in the Format ![]() sidebar, click the Image tab, click the Description text box, then enter your text.
sidebar, click the Image tab, click the Description text box, then enter your text.
The image description isn’t visible anywhere in your document. To learn about adding a caption to your image, see Add a caption.
Tip: You can add these buttons to the toolbar: Adjust Image, Instant Alpha, and Mask.