After you add a shape to a page, you can customize the shape in a number of ways. For example, you can change the standard five-point star into a twenty-point starburst, adjust how rounded the corners of a square are, add text inside a shape, and more.
Click ![]() in the toolbar.
in the toolbar.
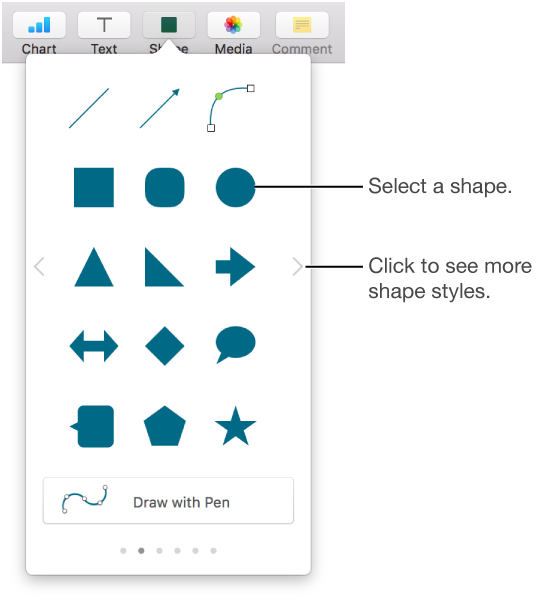
Select a shape to add it to the page.
Click the arrows to see more shape styles.
Drag the shape to where you want it.
Select a shape.
Choose Format > Shapes and Lines > Make Editable (from the Format menu at the top of your screen).
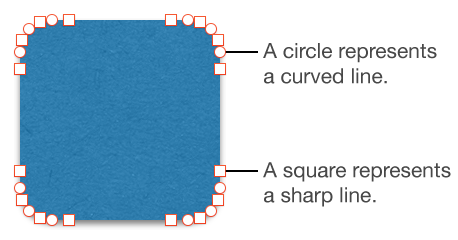
Double-click a white handle to change a line from curved to straight.
Handles represent different types of lines:
Square with red outline: Indicates a sharp line. Lines that connect to this point are straight.
Circle with red outline: Indicates a curved line. Lines that connect to this point are curved.
Click outside the shape when you’re done editing it.
To change the default curves to Bézier, choose Pages > Preferences (from the Pages menu at the top of your screen), then in the General tab, select “Curves default to Bézier.” When you edit a shape that uses Bézier curves, you adjust the curve using handles on the point.
You can change the features of any predrawn shape in specific ways.
Select a shape.
Do any of the following:
Reshape the corners of a rounded square: Drag the green dot toward a corner to sharpen it, or away from a corner to make it more round.
Change the number of points on a star: Drag the outer green dot clockwise or counterclockwise to add or remove points. A star can have between three and twenty points.
Change the shape of the points on a star: Drag the inner green dot toward the center of the star to make the points longer and narrower, or drag away from the center to make the points shorter and wider.
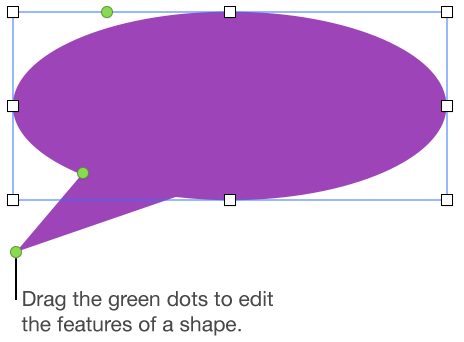
Change the shape of a callout or speech bubble: Drag the green dot on the body of the bubble to reshape it. Drag the green dot at the tip of the point to change its length and position. Drag the green dot at the base of the point to change its width.
Change the number of sides in a polygon: Drag the green dot clockwise or counterclockwise to adjust the number of sides.
Adjust the proportions of arrows: Drag the green dot toward the tip of the arrow to make the arrowhead shallower, or drag the dot toward the side point of the arrow to make the arrow’s trunk thicker.
See more editing handles to make a shape freeform or abstract: Choose Format > Shapes and Lines > Make Editable (from the Format menu at the top of your screen). Move your pointer between any two existing points until you see a handle, then drag. Drag as many handles as you want, then click away from the shape when you’re done.
You can create your own freehand shapes.
Click ![]() in the toolbar, then click Draw With Pen.
in the toolbar, then click Draw With Pen.
Click anywhere on the page to create the first point of the custom shape.
Move the pointer, then click to create another point; continue adding as many points as you want.
To create a curved segment, click, drag, then click again to finish the segment.
To delete a segment you just created, select a point, then press Delete on your keyboard.
To complete the shape, do one of the following:
Close the shape (add a solid line between the last and first points): Click the first point.
Leave the shape open (no line between the last and first points): Press Esc (Escape).
To modify the points or line contours of the shape, select the shape, then choose Format > Shapes and Lines > Make Editable (from the Format menu at the top of your screen).
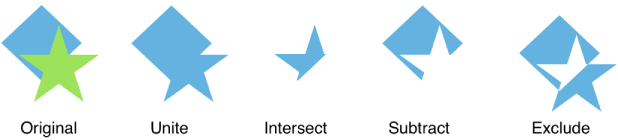
You can create a new shape by combining one shape with another shape. For example, if you want to create a shape that looks like a heart, you can use three shapes—a diamond and two circles—and unite them into a single shape. You can also subtract shapes from other shapes, or remove the overlapping area between two shapes.
Shift-click to select at least two shapes that are touching or overlapping.
Tip: Overlap shapes for a more interesting effect.
Click the Arrange tab in the sidebar on the right.
If you don’t see a sidebar, or the sidebar doesn’t have an Arrange tab, click ![]() in the toolbar.
in the toolbar.
Click an arrangement button at the bottom of the sidebar:
Unite: Combines the selected shapes into a single shape.
Intersect: Creates a shape from the overlapping area.
Subtract: Removes the shape that’s layered on top of another shape. If necessary, move the shape you want to be removed to the topmost layer. To learn more about how to change layers, see Layer, group, and lock objects.
Exclude: Creates a shape that excludes the overlapping area between the shapes.
Add a new shape and begin typing, or select an existing shape, then type.
If a clipping indicator (+) appears, which signifies there’s too much text to display in the shape, click the shape and drag any white square until all the text is showing.
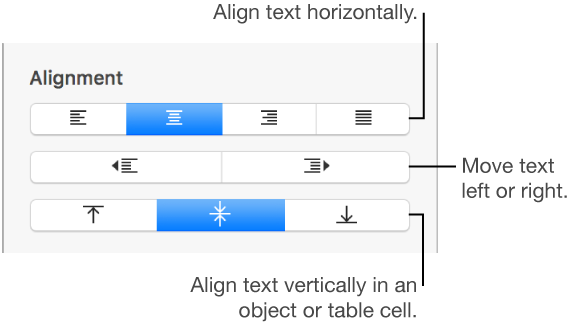
To align the text in the shape, select the shape, click the Text tab at the top of the sidebar on the right, click the Style button near the top of the sidebar, then click any of the buttons in the Alignment section.
If you don’t see the sidebar, or the sidebar doesn’t have a Text tab, click ![]() in the toolbar.
in the toolbar.