
You can fill shapes and text boxes with an image, a solid color, or a gradient (two or more colors that blend into one another).
Select a shape or text box, then click the Style tab at the top of the sidebar on the right.
If you don’t see a sidebar, or the sidebar doesn’t have a Style tab, click ![]() in the toolbar.
in the toolbar.
Click the disclosure triangle next to Fill, then use the controls to do one of the following:
Use a color or gradient designed to go with the template: Click the color well next to Fill, then choose a color or gradient.
Use a two-color gradient fill: Click the disclosure triangle next to Fill, click the pop-up menu and choose Gradient Fill, then choose colors. The left color well shows colors that match the template; the color wheel opens the Colors window, where you can choose any color.
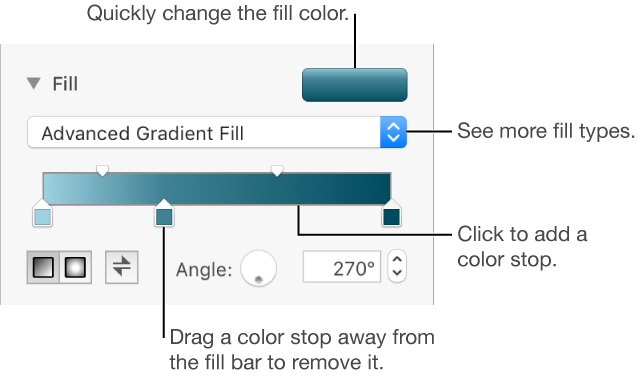
Use a custom gradient: Click the disclosure triangle next to Fill, click the pop-up menu and choose Advanced Gradient Fill, then click the square color wells below the slider to choose colors. You can slide the color wells and use the other controls to change the blend, angle, and direction of the gradient.
You can fill shapes and text boxes with an image.
Select a shape or text box, then click the Style tab at the top of the sidebar on the right.
If you don’t see a sidebar, or the sidebar doesn’t have a Style tab, click ![]() in the toolbar.
in the toolbar.
Click the disclosure triangle next to Fill, then click the Fill pop-up menu and choose Image Fill, or Advanced Image Fill if you want to add a tint to the image.
Click Choose, navigate to your photos, then double-click the image to add it.
If you chose Advanced Image Fill, click the color wheel (to the right of the Choose button) to select a tint color.
To make the tint more or less transparent, drag the Opacity slider in the Colors window.
To change how the image fills the object, click the pop-up menu above the Choose button and choose an option:
Original Size: Places the image inside the object without altering the image’s original dimensions.
Stretch: Sizes the image to fit the object’s dimensions.
Tile: Repeats the image inside the object.
Scale to Fill: Makes the image larger or smaller to leave no space around the image.
Scale to Fit: Resizes the image to fit the object’s dimensions as well as possible.
You can save a custom fill to use it again.
Select the shape or text box with the fill you want to save.
Click the Style tab at the top of the sidebar on the right.
If you don’t see a sidebar, or the sidebar doesn’t have a Style tab, click ![]() in the toolbar.
in the toolbar.
Click the color well next to Fill, then drag the fill in the Current Fill well to another well to replace its fill.
You can drag only to a well of the same type. For example, if the custom fill is a gradient, drag the fill in the Current Fill well to a well in the Gradient Fills section.
To change which types of fills you can replace, click the Fill Type pop-up menu, then select a different option. For example, if you want to save a gradient fill, click the pop-up menu, select Gradient Fill, then drag the fill in the Current Fill well to a well in the Gradient Fills section.