You can add headers and footers—which can include page numbers, page counts, and the date and time—to your document and set them to appear on every page, or on every page except the first page of a section.
You can also insert page numbers, page counts, and the date and time on any page of your document outside of the header and footer. When you do so, the information appears only on that page.
Move the pointer over the top or bottom of the page until you see the header or footer area, then click any of the three text fields (you can use any combination of the fields for your header or footer).
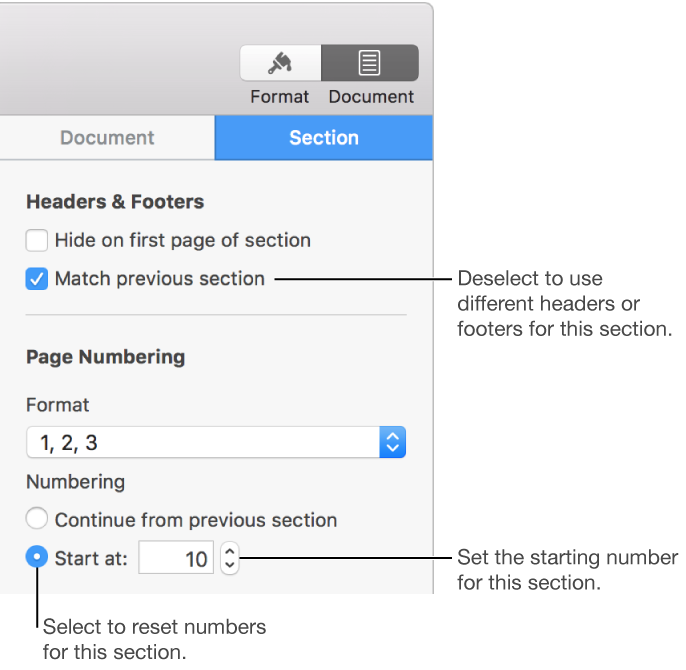
If you have more than one section in your document, you may see an option to start a new header or footer.
Type the header or footer text.
To see formatting controls, click the Style button in the sidebar on the right.
If you don’t see a sidebar, or the sidebar doesn’t have a Style button, click
in the toolbar.
Select the text, then do any of the following:
Change the font, font size, or color: Use the controls in the Font section.
Change the alignment: Use any of the available buttons in the Alignment section.
If a button is dimmed, it isn’t available for the text you selected.
Important: Turning headers or footers off removes all content in headers and footers throughout your document.
Click
in the toolbar.
Click the Document tab at the top of the sidebar on the right.
Deselect the Header or Footer checkbox.
Important: If you change your mind, press Command-Z on your keyboard to add the deleted text back. Simply selecting the checkbox again won’t retrieve the deleted text.
You can hide the header and footer on the first page of a section (every document has at least one section).
Click in the section you want to edit.
Click the Section tab at the top of the sidebar on the right.
If you don’t see a sidebar, or the sidebar doesn’t have a Section tab, click
in the toolbar.
In the Headers & Footers section, select the checkbox next to “Hide on first page of section.”
Pages doesn’t have a setting to show a header or footer on the first page only. To do this, you need to make the first page its own document section with the header or footer showing. Then you need to hide the header or footer in all other sections. To learn about creating sections, see Format sections.
You can add a page count to a header, footer, or any other place on a page. The page count updates as you add or remove pages and is visible in the printed document.
Click where you want the page count to appear.
Click
in the toolbar, then choose Page Count.
If your document has more than one section and the page number isn’t set to continue from one section to the next, the page count reflects only the pages in the current section (or any sections that continue its numbering).
If you want to show the page, word, paragraph, or character count but don’t want it to be visible on the printed document, see Show word count and other document statistics.
You can add the date and time to a header, footer, or any other place on a page.
Click on the page where you want to add the date and time.
To add the date and time to the header or footer, move the pointer over the top or bottom of the page until you see the header or footer area, then click any of the three text fields (you can use any combination of the fields for your header or footer).
Click
in the toolbar, then choose Date & Time.
Click the date and time that was inserted, then use the controls in the pop-up to choose a format.

If you later want to change the date format or update the date, just click the date in the document to open the controls pop-up.
You can add page numbers to the header, footer, or anywhere else on the page.
Do one of the following:
Click the page where you want to add the page number, click
in the toolbar, then type a number.
Click in the header or footer, click Insert Page Number, then choose a numbering style.

If you don’t see the header or footer, move the pointer over the top or bottom of the page until you see the gray boxes. After you add a page number, you won’t see the Insert Page Number button again unless you delete the previously added page number.
The number you see is based on the page you’re currently on and whether there are other sections in the document with number settings that impact it. You can change the page number and set the numbering to Roman numerals or letters in the following steps.
To change the number format, set a starting number, and change how page numbers update, click
in the toolbar, then click the Section tab at the top of the sidebar.
Select the page number you want to change.
In the Page Numbering section of the sidebar, do any of the following:

Change the number format to roman numerals or letters: Click the Format pop-up menu, then choose a format.
Set a new starting number for this section: Select the “Start at” button, then click the up or down arrow to set a starting number.
Set page numbers for this section to continue from the previous section: Select the “Continue from previous section” button.
If you typed a page number on the page outside the header or footer, you don’t see the Format pop-up menu or any of the above settings. Click the only available pop-up menu below Page Numbering (Insert page number), then choose a number format.

The controls appear after you insert a page number.
Tip: If you’re having difficulty locating the header or footer area of your document, Choose View > Show Layout (from the View menu at the top of your screen). If you still don’t see the header or footer area, click
in the toolbar, click the Document tab at the top of the sidebar, then make sure the Header and Footer checkboxes are selected.