Most Pages templates are created for standard paper sizes in portrait (vertical) orientation. You can change these settings in the sidebar on the right.
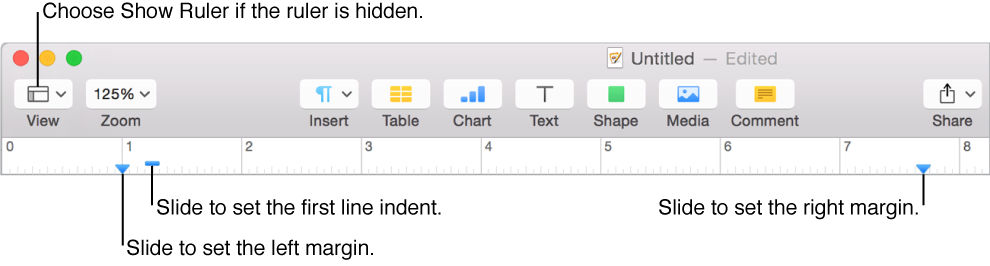
You can set margins for documents and paragraphs using the ruler and the controls in the sidebar on the right.
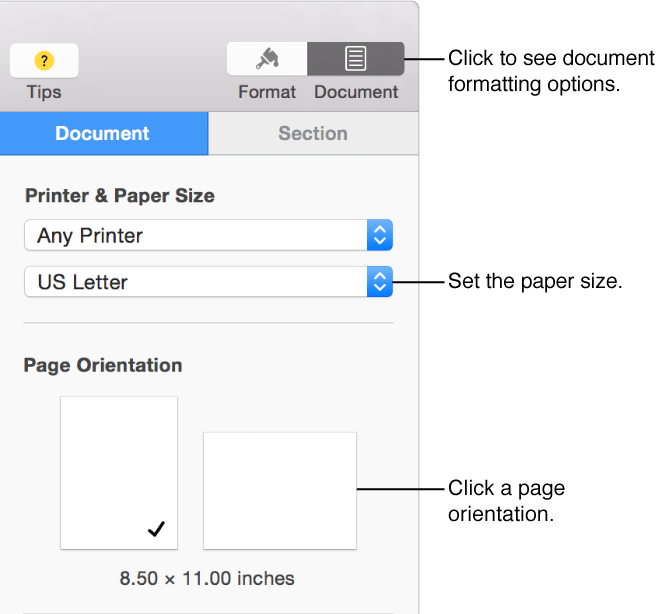
Set paper size or orientation
Click on the right side of the Pages toolbar.
Click the Document tab at the top of the sidebar, then use the controls to set the paper size or orientation.
You can change the orientation for a document at any time, then adjust the document elements to fit the new orientation.
Set top and bottom margins
Click the Document tab at the top of the sidebar on the right.
If you don’t see a sidebar, or it doesn’t have a Document tab, click in the toolbar.
In the Document Margins section, click the arrows next to Top and Bottom, or enter values in the Top and Bottom fields.
Set a margin of less than 1 inch
Click the Document tab at the top of the sidebar on the right side of the Pages window, then use the controls to set the paper size or orientation.
If you don’t see a sidebar, or it doesn’t have a Document tab, click in the toolbar.
In the Document Margins section, click the down arrow for the margin you want to set.
If you want to use different margins for part of the document, create a separate section with its own settings.
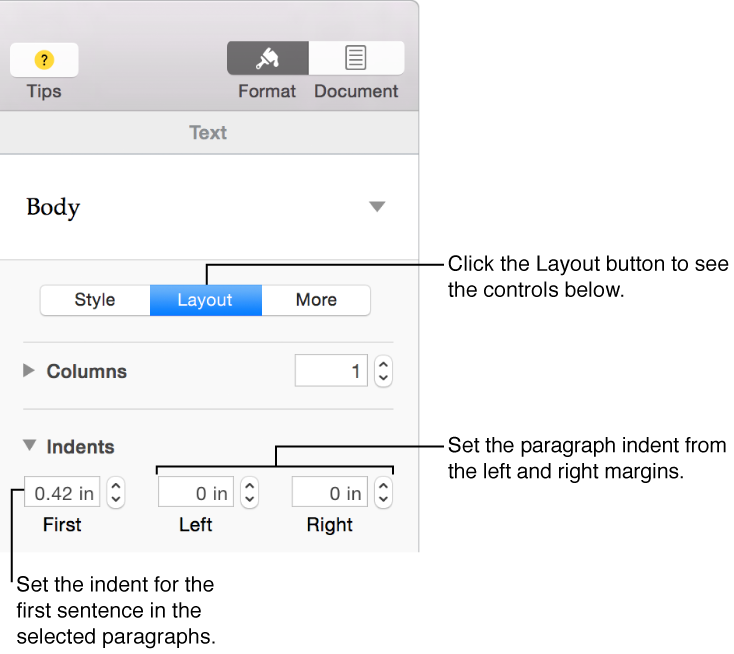
Indent the first line in a paragraph
You can indent the first line of text in a paragraph to create a visual break in the document that helps readers scan paragraphs.
Click anywhere in a paragraph, or select multiple paragraphs.
Your settings apply only to the paragraphs you select, and not to the whole document.
Click the Layout button near the top of the sidebar on the right.
If you don’t see a sidebar, or it doesn’t have a Layout button, click in the toolbar. If the text is in a text box, table, or shape, first click the Text tab at the top of the sidebar, then click the Layout button.
In the Indents section of the sidebar, click the up or down arrows to set the indent for the first sentence in the paragraph and the distance from the left and right margins.
If the ruler is showing at the top of the page, you can also change the first-line indent by dragging the blue indent marker on the ruler (it looks like a rectangle).
If you want to apply these changes to all of the paragraphs in your document that use this paragraph style, click the Update button next to the paragraph style name at the top of the sidebar.
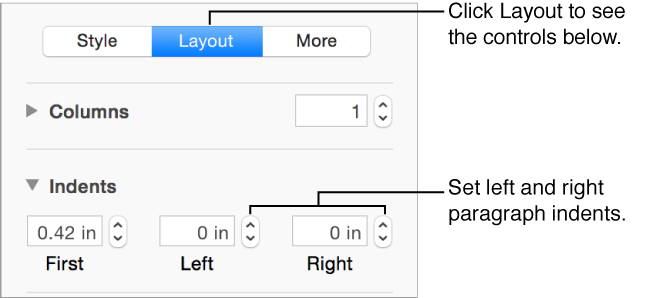
Change paragraph margins
Click anywhere in a paragraph, or select multiple paragraphs.
Your settings only apply to the paragraphs you select, and not to the whole document.
Do any of the following:
If the ruler is showing, drag the margin marker (the blue triangle) to where you want it.
The rectangle marker above or near the margin marker sets the indent for the first line in the paragraph. If you want to set a first-line indent, make sure to click the rectangle and not the triangle if it’s directly above the triangle left margin marker.
Click the Layout button at the top of the sidebar on the right. In the Indents section, click the arrows next to Left and Right.
If you don’t see a sidebar, or it doesn’t have a Layout button, click in the toolbar. If the text is in a text box, table, or shape, first click the Text tab at the top of the sidebar, then click the Layout button.
Click the Style button near the top of the sidebar, then click one of the default indent buttons in the Alignment section to increase or decrease the indent of an entire paragraph.
If you want to apply these changes to all of the paragraphs in your document that use this paragraph style, click the Update button next to the paragraph style name at the top of the sidebar.
 on the right side of the Pages toolbar.