
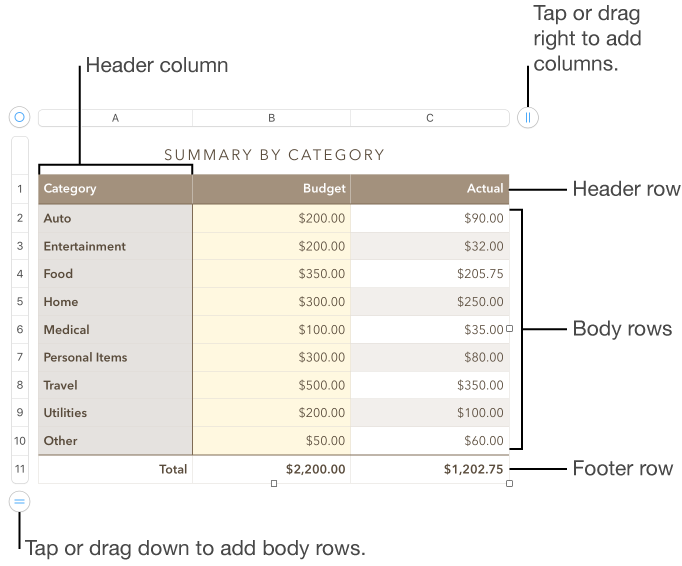
You can add, delete, and rearrange rows and columns in a table. There are three types of rows and columns:
Body rows and columns contain the table data.
Header rows and columns (if any) appear at the top and left side of the table. They usually have a different background color from the body rows, and they’re typically used to identify what the row or column contains. Data in header cells isn’t used in calculations, but the text in a header cell can be used in formulas to refer to the entire row or column. A table can have up to five header rows and five header columns.
You can freeze (or lock) header rows and columns so that they’re always visible when you scroll the spreadsheet.
Footer rows (if any) appear at the bottom of a table. A table can have up to five footer rows.
Click the table, then do any of the following:
Add or delete a row or column at the edge of the table: Click ![]() in the lower-left corner of the table to add a row, or drag it to add or delete multiple rows. Click
in the lower-left corner of the table to add a row, or drag it to add or delete multiple rows. Click ![]() in the upper-right corner of the table to add a column, or drag it to add or delete multiple columns. You can delete a row or column only if all of its cells are empty.
in the upper-right corner of the table to add a column, or drag it to add or delete multiple columns. You can delete a row or column only if all of its cells are empty.
Add or delete both rows and columns at the edge of the table: Drag ![]() in the bottom-right corner of the table. This deletes rows and columns only if their cells are empty. To delete rows and columns that have data, option-drag
in the bottom-right corner of the table. This deletes rows and columns only if their cells are empty. To delete rows and columns that have data, option-drag ![]() .
.
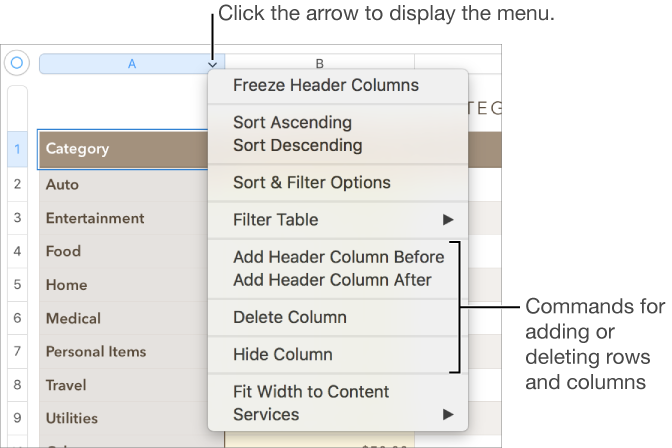
Insert or delete a row or column within the table: Move the pointer over a row number or column letter, click the arrow, then choose a command from the menu that appears.
Insert multiple rows or columns at once: Anywhere in the table, select a number of rows or columns equal to the number of rows or columns you want to insert, click the arrow next to one of the selected row numbers or column letters, then choose Add Rows Above or Add Rows Below (or Add Columns Before or Add Columns After).
Delete multiple rows or columns at once: Command-click the rows or columns, click the arrow, then choose Delete Selected Rows or Delete Selected Columns.
Adding header rows, header columns, or footer rows converts existing rows or columns into headers or footers. For example, if you have data in the first row of a table and you add a header row, the first row is converted to a header row that contains the same data.
You can freeze header rows or columns so they’re always visible as you scroll the spreadsheet.
Click the table.
Do any of the following:
Add or delete headers and footers: Click the Table tab at the top of the sidebar on the right, then click the Headers & Footer pop-up menus in the sidebar and choose a number. To remove all headers or footers, set the number to zero.
If you don’t see a sidebar, or the sidebar doesn’t have a Table tab, click ![]() in the toolbar.
in the toolbar.
Freeze header rows and columns: Click the Table tab at the top of the sidebar on the right, click the pop-up menus below Headers & Footer, then choose Freeze Header Rows or Freeze Header Columns. To unfreeze, deselect Freeze Header Rows or Freeze Header Columns so that the checkmark disappears.

To learn how to show table headers on every page of a printed spreadsheet, see Print a spreadsheet.
Hiding rows or columns is useful if, for example, you need to use their data for formulas, but you don’t want the data to be visible.
Select the rows or columns you want to hide.
Move the pointer over a row number or column letter, then click the down arrow that appears and choose Hide Selected Rows or Hide Selected Columns.
To show hidden rows or columns, select a row or column adjacent to the hidden ones. Move the pointer over the column letter or row number, click the down arrow, then choose an Unhide option.
To unhide all rows or columns, click the table, then choose Table > Unhide All Rows or Unhide All Columns (from the Table menu at the top of your screen).