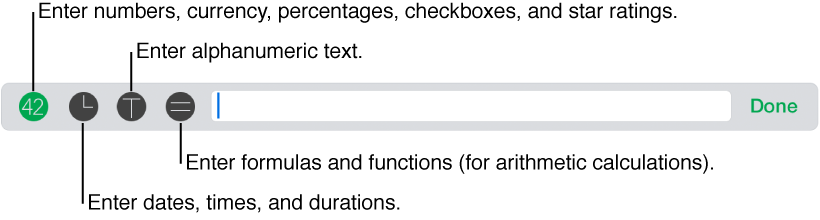

When you double-tap a cell, a keyboard appears. The input bar above the keyboard is where you type. Buttons in the input bar allow you to switch between keyboards to enter the type of data you want: numbers, text, currency, percentages, dates and times, durations denoting a span of time (for example, “3 weeks 4 days 2 hours”), formulas and functions, checkboxes, and star ratings.
Do the following:
Select a cell: Tap it.
Select a range of cells: Tap a cell, then drag a blue selection handle (a blue dot) to encompass the range of cells you want to select.
If you don’t see the selection handles, first tap Done to close the keyboard.
Select a cell to edit its contents: Double-tap the cell.
Double-tap the cell you want to edit, then tap the keyboard symbol for the type of data you want to enter:
Numerical data: Tap ![]() , then type values. You can add data in more specific formats by first tapping a symbol on the keyboard:
, then type values. You can add data in more specific formats by first tapping a symbol on the keyboard:
Currency: ![]() .
.
Percentage: ![]() .
.
Star ratings: ![]() . Slide your finger along the dots in the input bar to indicate the number of stars you want.
. Slide your finger along the dots in the input bar to indicate the number of stars you want.
Checkboxes: ![]() . To mark the checkbox as selected, tap the checkbox in the input bar so that it reads “true,” or tap the checkbox in the table.
. To mark the checkbox as selected, tap the checkbox in the input bar so that it reads “true,” or tap the checkbox in the table.
Date and time: Tap ![]() , then tap Date & Time. Tap a token in the input bar, then tap the value you want to give it in the keyboard.
, then tap Date & Time. Tap a token in the input bar, then tap the value you want to give it in the keyboard.
Duration: Tap ![]() , then tap Duration. Tap a token in the input bar, then tap the value you want to give it in the keyboard.
, then tap Duration. Tap a token in the input bar, then tap the value you want to give it in the keyboard.
Alphanumeric data (text): Tap ![]() . To include digits or punctuation, tap
. To include digits or punctuation, tap ![]() . To return to the alphabetic keyboard, tap
. To return to the alphabetic keyboard, tap ![]() .
.
Move to another cell by tapping ![]() or
or ![]() in the keyboard, or by tapping a cell if you’re entering text.
in the keyboard, or by tapping a cell if you’re entering text.
Tap Done to dismiss the keyboard.
For information about keyboard layouts, see Keyboard for entering numerical values, Keyboards for entering time-related data, Keyboards for entering text, and Keyboards for entering formulas and functions.
Select cells, then tap Delete.
Deleting removes the content from the cells but preserves the cells’ data format, text style, and cell style.
A systematic and quick way to enter data into a large table, row-by-row, is to display the table as a “form.” A form lets you edit all the data within a single table row at once, and quickly move between rows. Forms can speed up your workflow, for example, if you’re entering similar data on a large sample population and you want to move quickly between individual records.
You can use forms for entering data in a table only if the table includes a header row and doesn’t include any merged cells. A header column is optional.
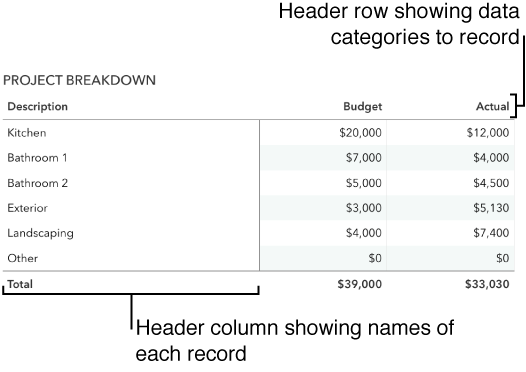
Create a table with a header column listing the record names, and a header row listing the data categories you want to enter in each record.
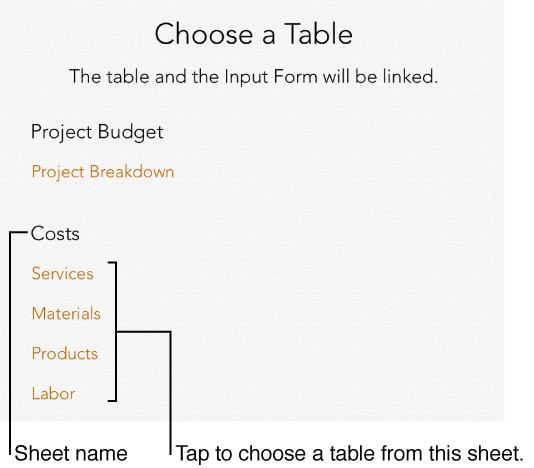
Tap ![]() in the upper-left corner of the sheet, then tap New Form. If your spreadsheet includes several tables, a list of tables appears.
in the upper-left corner of the sheet, then tap New Form. If your spreadsheet includes several tables, a list of tables appears.
Tap the name of the table for which you want to create a form.
In the form that appears, tap a field in the right column to edit it.
Tap Next in the keyboard to move to the next field in the form. You can also scroll the form to see all the fields, and tap the one you want to edit.
If you can’t place the insertion point in a field, it means that field contains the result of a calculation and can’t be edited from the form.
Tap ![]() to go to the next record in the table, or tap
to go to the next record in the table, or tap ![]() to return to the previous record.
to return to the previous record.
To jump between non-consecutive records, tap a dot along the right side of the screen.
Tap ![]() to add a new record or tap
to add a new record or tap ![]() to delete the current record.
to delete the current record.
Tap another tab to exit the form.
You can quickly add the content from selected cells to adjacent cells without typing it. You can also fill a row or column with a logical sequence of data—for example, a series of digits, dates, or letters.
Do any of the following:
Autofill the content from one or more cells into adjacent cells: Select the cells with the content you want to copy, tap Fill, then drag a yellow autofill handle over the cells where you want to paste the content.
Any data, cell format, formula, cell border, or fill associated with the selected cells is added, but comments aren’t. Autofilling overwrites existing data with the value you’re adding.
Autofill sequential content or patterns into adjacent cells: Type the first two items in the series in the first two body cells of the row or column you want to fill; for example, type A and B. Select the cells, tap Fill, then drag the handles over the cells you want to fill.
You can also autofill cells using a pattern of values. For example, if two selected cells contain 1 and 4, the values 7 and 10 are added when you drag over the adjacent two cells (values are incremented by 3).
Autofilling doesn’t set up an ongoing relationship among cells in the group. After autofilling, you can change the cells independently of each other.
When you autofill cells, any formulas that refer to those cells are updated automatically to use the new value.
When you copy a cell, or move a cell’s data to a new location in the table, all of the cell’s properties are also copied, including its data format, fill, border, and comments.
Select the cells you want to copy or move, then do one of the following:
Paste and overwrite existing content: Tap Copy, select the top-left cell where you want to paste the data, then tap Paste.
If your data range contains formulas, tap Paste Formulas or Paste Values. The data overwrites any existing data.
Move the data: Touch and hold the selection until it rises off the table, then drag it to another location in the table. Existing data is replaced by the new data.
Paste outside of an existing table: Touch and hold anywhere on the sheet until you see a menu of options, then tap Paste. A new table is created with the pasted cells.
If you copy a range of cells that include hidden data (either hidden or filtered), the hidden data is also copied. If you paste to a range of cells with a matching arrangement of hidden cells, the hidden data is also pasted. Otherwise, the hidden content isn’t pasted.