Adding Objects to the Timeline Layers List
You can add images and clips to your project by dragging them into the Timeline layers list. When you drag an image or clip from the File Browser or Media list into the Timeline layers list, you can choose whether to add the item to an existing group, add it to a new group, or have it replace an existing layer. When you add a layer to the Timeline layers list, a corresponding timebar appears in the track area. The new layer can appear above or below an existing layer; where you release the mouse button determines placement of the new layer.
Library effects (behaviors, filters, and so on) can also be dragged into the Timeline layers list. However, because effects objects are applied to media layers (images, video, audio, and so on), they cannot be grouped by themselves.
Note: You can also drag images and clips to the Timeline track area. For more information, see Adding Layers to the Track Area.
Drag an item from the File Browser, Library, or Media list, and position the pointer over the Timeline layers list.
If you position the pointer over a group, the track is highlighted with a white border.
If you position the pointer between layers in a group, the position indicator appears.
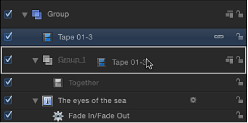
If you position the pointer over an existing layer, the pointer becomes a curved arrow, indicating that you are about to replace the existing layer with the new media item.
Release the mouse button to add the layer to the group.
The new layer is placed in the group below the other layers in the list, or between the layers where you dragged it. If you dragged onto an existing layer, a new layer replaces the previous one.
Note: If the media item is a clip with multiple audio tracks, a drop menu will appear, allowing you to choose between mixing down the multiple tracks to stereo or importing audio tracks individually.
Drag an item from the File Browser, Library, or Media list into the Timeline layers list, at the upper edge of the top group.
When the position indicator appears, release the mouse button.
A new group is created above other existing groups in the hierarchy or “stack” of groups and layers.
Drag an item from the File Browser, Library, or Media list into the Timeline layers list, below the lower edge of the bottom layer.
Release the mouse button.
A new group is created above the other existing groups in the hierarchy or “stack” of groups and layers.
Note: Objects such as cameras and lights that are saved to the Library can also be dragged to the Timeline.
Managing Track Order
The Timeline layers list provides you with the tools to control layer order. In 2D groups, the topmost track in the list appears on top of other layers in the Canvas. You might need to rearrange the order of objects in your project to get the effects you want.
In the Timeline layers list, drag the layer icon you want to move to a new position between the other tracks.
When the position indicator appears in the location you want, release the mouse button.
The tracks are reordered.
Drag the layer icon in the Timeline layers list over another group.
A white border highlights the group.
Release the mouse button.
The layer moves into the selected group and is placed above any existing layers in that group.
You can also move a layer to a specific place in the new group by dragging it between existing tracks in the new group. Motion’s groups and layers are “spring-loaded,” which means that when they are collapsed, dragging an object onto them and pausing causes them to temporarily expand, like folders in the Finder.
Drag the layer onto the collapsed group in the Timeline layers list.
Position the pointer over the name of the group until the group expands.
Drag the layer to the desired location in the group, then release the mouse button.
Nesting Groups and Layers
To help organize large groups of layers or to create some kinds of special effects, you can place one group inside of another. This gives you the flexibility to create a group containing multiple layers and effects, and then treat that entire group as a single layer in another group. You could go further and take that “parent” group, combine it with some other groups, and treat that group as a single element, and so on. This is called nesting or grouping.
There are many reasons to nest layers or groups. Doing so allows you to simplify your composite, grouping layers and effects objects (behaviors, filters, masks, and so on) into fewer containers. Nesting also allows you to manipulate a group of layers and effects objects as one. For example, you can take the individual letters of your title (each animated on its own) and use nesting to animate the group of them across the screen. You can also use nesting to create complex particle systems. You can nest multiple layers and effects objects into a group, then use the entire group as the emitter cell. For more information on particle systems, see Working with Particles.
Note: You cannot use the Group command with layers that are in different groups.
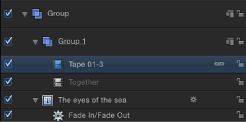
In the Timeline layers list, drag one group on top of another group.
A white border highlights the destination group.
Release the mouse button.
The first group is now nested inside the second group.
You can also select the layers you want and choose Object > Group (or press Command-Shift-G).
Note: There is no limit to the number of groups you can nest.
Select the nested group, then choose Object > Ungroup (or press Command-Option-G).
The nested group is restored into individual layers. Any group in another group can be ungrouped.
Drag the group out of the existing parent group to the area beneath all existing groups.
The outline of the Timeline layers list area becomes highlighted.
Release the mouse button.
The group is restored to primary group status.
Select the group, layer, or effects object in the Timeline layers list.
Press Delete.
You can also Control-click an object, then choose Delete from the shortcut menu.
All of the operations just described can also be performed with multiple tracks. For example, rather than just moving one object from Group 1 to Group 3, you can select two or three objects in Group 1 and move them all at once.
Command-click to select tracks in the Layers list.