Toolbar
The toolbar, located in the center of the Motion workspace, provides access to the tools for manipulating objects in the Canvas, as well as controls for adding objects to a project. There are tools that transform objects in 2D or 3D space; tools that create text, shapes, and masks; buttons that add cameras, lights, and generators; pop-up menus that apply filters and behaviors to objects; and buttons that create particle systems and replicators.
Tool Groups
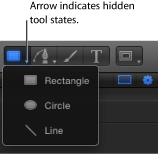
Tools that have multiple modes or options are available in pop-up menus in the toolbar. For instance, a shape tools pop-up menu contains the Rectangle, Circle, and Line tools. Pop-up tool menus have a tiny downward arrow in the lower-right corner of the visible tool.
The left side of the toolbar contains tools grouped into categories of use. The three tools on the far left let you modify the view and manipulation method in the Canvas. The next four tools are used to add content to a project, including text, shapes, and paint strokes. Next are the mask tools, which are contained in a pop-up menu.
At the center of the toolbar is the timing display. For more information, see Timing Display.
To the right of the timing display is the Show/Hide HUD button.
The rest of the controls on the right side of the toolbar are used to add content and other objects to your project. The first set are object controls, used to add cameras, lights, or generator objects to a project. The group farthest to the right are effects controls to add filters, behaviors, particles, or replicators to your project.
The following tables itemize each tool and control (by group) in the toolbar, from left to right.
Note: After you select an object in the Canvas and select a tool, you can switch between tools by pressing Tab. Tabbing cycles the tools from the Select/Transform tool (the default) to the 3D Transform tool, to the remaining 2D transform tools (Anchor Point tool, Drop Shadow tool, and so on). Press Shift-Tab to cycle through the tools in the reverse order.
2D Transform Tools
Choose a 2D transform tool from the pop-up menu at the far-left side of the toolbar to adjust and manipulate objects in the Canvas. Click and hold the tool to select a different mode from the pop-up menu. When you choose a 2D transform tool in the toolbar and then select an object in the Canvas, onscreen controls appear. Manipulate the onscreen controls to move or transform an object in the Canvas.
Icon | Name | Keyboard shortcut | Description |
|---|---|---|---|
Select/Transform tool (arrow) | S (Press Tab to cycle through tools. An object must be selected before you can tab through the tools.) | Selects and moves objects in the Canvas. Also scales objects (by dragging a corner point) and rotates objects (by dragging the center point). This is the default tool in the 2D transform tools pop-up menu. | |
Anchor Point tool | S (Press Tab to cycle through tools.) | Changes the point around which an object scales or rotates (by dragging the current anchor point to a new position). | |
Drop Shadow tool | S (Press Tab to cycle through tools.) | Changes the direction and offset of an object’s drop shadow. This tool doesn’t move the object. | |
Distort tool | S (Press Tab to cycle through tools.) | Shears or distorts an object in one of two ways: by moving two adjacent corners at the same time, leaving the other two corners locked into place; or by moving a corner point, leaving the other three corners locked into place. | |
Crop tool | S (Press Tab to cycle through tools.) | Hides portions of an object (by dragging the edge or corner of the object). | |
Edit Points tool | S (Press Tab to cycle through tools.) | Modifies points and Bezier handles for masks, shapes, and motion paths. | |
Transform Glyph tool | S (Press Tab to cycle through tools.) | Modifies the position and X, Y, or Z rotation for characters (glyphs). Becomes available when a text object is selected. | |
Adjust Item tool | S (Press Tab to cycle through tools.) | Modifies parameters such as the amount or angle of a Directional Blur, the shape of a particle emitter, or the start and end points of a gradient. Becomes available when a specific objects are selected. |
3D Transform Tool
Select the 3D tool to adjust and manipulate objects in the Canvas in 3D space.
Icon | Name | Keyboard shortcut | Description |
|---|---|---|---|
3D Transform tool | Q | Manipulates objects in 3D space (by dragging the 3D transform and rotation controls). To display rotation controls in the Canvas, press the Command key. |
View Tools
Choose a view tool from the pop-up menu to pan and zoom in the Canvas.
Icon | Name | Keyboard shortcut | Description |
|---|---|---|---|
Pan tool | H | Drags the Canvas view in different directions (but never moves individual objects). To reset the pan, double-click the Pan tool (in the toolbar). To pan the Canvas without selecting the Pan tool, press the Space bar and drag in the Canvas. | |
Zoom tool | Z | Zooms in and out in the Canvas. Click the point in the Canvas to zoom toward or away from and drag right or left. To zoom in 50 percent increments, click in the Canvas. To zoom out in 50 percent increments, press Option and click in the Canvas. To reset the zoom, double-click the Zoom tool (in the toolbar). | |
Walk 3D View tool | None | Navigates through a 3D scene from the camera’s POV. After you select the Walk 3D View tool, use the Up Arrow, Down Arrow, Right Arrow, and Left Arrow keys to navigate. |
Shape Tools
Choose a shape tool from the pop-up menu to create rectangles, circles, and lines.
Icon | Name | Keyboard shortcut | Description |
|---|---|---|---|
Rectangle tool | R | Creates a rectangle shape (by dragging in the Canvas). Pressing Shift while you drag constrains the layer to a square. | |
Circle tool | C | Creates a circle shape (click and drag in the Canvas). Pressing Shift while you drag constrains the shape to a circle. | |
Line tool | None | Creates a new line shape (by dragging in the Canvas). Pressing the Shift key while you drag constrains the line to specific angles. |
Path Shape Tools
Choose a path shape tool from the pop-up menu to create Bezier or B-Spline shapes.
Icon | Name | Keyboard shortcut | Description |
|---|---|---|---|
Bezier tool | B (Switches Bezier/B-Spline tool.) | Creates a freeform shape with Bezier point vertices. Click repeatedly in the Canvas to create a shape. To close the shape, click the first point of the shape or press the C key. To create an open-ended shape, double-click the last point. (The resulting shape, although open, is filled by default.) | |
B-Spline tool | B (Switches Bezier/B-Spline tool.) | Creates a freeform shape with B-Spline vertices. Click repeatedly in the Canvas to create a shape. To close the shape, click the first point of the shape or press C. To create an open-ended shape, double-click the last point. (The resulting shape, although open, is filled by default.) |
Paint Stroke Tool
Select the Paint Stroke tool to create paint strokes.
Icon | Name | Keyboard shortcut | Description |
|---|---|---|---|
Paint Stroke tool | P | Creates shape-based paint strokes. Click and drag in the Canvas to draw strokes. Command-drag to adjust the size of the brush stroke before you create the stroke. |
Text Tool
Select the Text tool to add text to a project.
Icon | Name | Keyboard shortcut | Description |
|---|---|---|---|
Text tool | T | Creates text and lets you edit the text of existing text layers. Click in the Canvas and begin typing. Choose the Select/Transform tool (or press Esc) to grab or move the new text layer. To change existing text, select the Text tool (in the toolbar), then click the text in the Canvas. |
Mask Tools
Choose a mask tool from the pop-up menu to hide portions of a selected layer. Mask tools can only be accessed when a layer (a visible object in the Canvas, such as an image, replicator, or flattened text) or 2D group is selected. By default, the area inside the mask remains visible. For more information about masks, see Using Shapes, Masks, and Paint Strokes.
Icon | Name | Keyboard shortcut | Description |
|---|---|---|---|
Rectangle Mask tool | Option-R | Creates a rectangular mask (by dragging in the Canvas). Pressing the Shift key while you drag constrains the mask to a square. | |
Circle Mask tool | Option-C | Creates a circular mask (by dragging in the Canvas). Pressing the Shift key while dragging constrains the mask to a circle. | |
Freehand Mask tool | None | Creates a freeform mask in the shape you draw in the Canvas. The shape closes the mask between the first and last points. | |
Bezier Mask tool | Option-B (switches Bezier/B-Spline Mask tools) | Creates a freeform mask with Bezier point vertices. Click repeatedly in the Canvas to create a mask shape. To close the mask, click the first point of the mask or press C. To create an open-ended mask, double-click the last point. | |
B-Spline Mask tool | Option-B (switches Bezier/B-Spline Mask tools) | Creates a freeform mask with B-Spline vertices. Click repeatedly in the Canvas to create a mask shape. To close the mask, click the first point of the shape or press C. To create an open-ended shape, double-click the last point. |
HUD Button
Click the HUD button (the first button to the right of the timing display) to show and hide the heads-up display (HUD).
Icon | Name | Description |
|---|---|---|
Show/Hide HUD | Shows or hides the HUD, a small floating window that contains the most commonly used parameter controls of the selected object. |
Object Controls
Use the three object controls (to the right of the HUD button) to add cameras, lights, and generators to a project.
Icon | Name | Description |
|---|---|---|
New Camera | Adds a camera to the project. When you add a camera to a 2D project, a dialog appears asking if you want to convert 2D groups to 3D groups. Although a camera can be added to a 2D project, the camera has no effect on a 2D group. | |
New Light | Adds a light to the project. When you add a light to a 2D project, a dialog appears asking if you want to convert 2D groups to 3D groups. Although a light can be added to a 2D project, the light has no effect on a 2D group. | |
Add a Generator | Activates a pop-up menu of generators. Choosing an item from the menu adds that generator to the project. |
Effects Controls
Use the last four controls on the right side of the toolbar to apply the most common effects: filters, behaviors, particle emitters, and replicators. Because these controls apply effects to objects, they are not available unless an object is selected.
Icon | Name | Description |
|---|---|---|
Add Filter | Activates a pop-up menu of filters. Choosing an item from the menu applies that filter to the object. Filters can only be applied to groups or layers (images, text, shapes, particle emitters, masks, replicators, generators, and so on). Filters cannot be applied to cameras, lights, behaviors, or other filters. | |
Add Behavior | Activates a pop-up menu of behaviors. Choosing an item from the menu applies that behavior to the object. Behaviors can be applied to layers (images, particle emitters, and so on), groups, cameras, and lights. | |
Make Particles | Uses the selected layer (shape, text, image, and so on) as the source for a particle cell. | |
Replicate | Uses the selected layer (shape, text, image, and so on) as a source cell for a new replicator. |