Retiming Audio
Motion allows you to retime audio clips or channels to speed them up, slow them down, or play them at a different speed.
Note: When retiming video, audio attached to the footage is retimed with it. You can unlink video and audio to retime them separately. For more information on retiming footage, see Retiming.
Timing Controls in the Inspector
Each audio object has timing parameters in the Properties Inspector.
- Speed: Sets the speed of the audio clip as a percentage. The default is 100%. Values lower than 100 play the audio clip more slowly than its original speed, and also extend the Duration of the audio clip. Values higher than 100 play the audio clip faster than its original speed, and shorten the Duration of the audio clip.
- End Condition: Sets how playback continues when the end of the audio clip is reached. This pop-up menu has four options:
- None: This is the default setting. The audio clip’s duration in your project is equal to the duration of its source media file.
- Loop: When the last frame of the audio clip is reached, it loops back to the first frame and plays again. This can cause a jump in the audio clip’s apparent playback unless it is designed to loop seamlessly. The End Duration value must be greater than 0 for this parameter to have any effect.
- Ping-Pong: When the last frame of the audio clip is reached, the next iteration of clip playback is reversed. The End Duration value must be greater than 0 for this parameter to have any effect.
Note: The Ping-Pong option is mainly for reference—the reversed section of the audio track sounds noisy, because Motion does not support true reverse playback.
- Hold: With this selected, the audio stops at the loop point.
Adjusting a Track’s Speed in the Audio Timeline
Motion allows you to change the timing of audio tracks in the Audio Timeline.
Important: To affect all channels of a multichannel audio file, select all tracks in the Audio list (press Command-A) before making adjustments in the Audio Timeline.
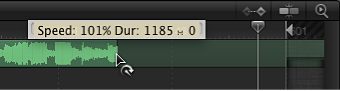
In the Audio Timeline, position the pointer over the end of the green bar.
Holding down the Option key so the retiming pointer appears, drag the end of the green bar to the left.
As you drag, a tooltip displays the clip’s duration and speed.
In the Audio Timeline, position the pointer over the end of the green bar.
Holding down the Option key so the retiming pointer appears, drag the end of the green bar to the right.
As you drag, a tooltip displays the clip’s duration and speed.
Looping an Audio Clip
Another way of extending a clip’s duration is by looping it. You can easily loop a clip by adjusting it in the Audio Timeline. When a looped audio clip reaches its last frame, the audio starts playing from its first frame.
Position the pointer close to the end of the clip in the Audio Timeline.
Holding down the Option and Shift keys so the loop pointer appears, drag the end of the green bar to the left.
As you drag, a tooltip displays the clip’s In and Out points, duration, and loop duration.
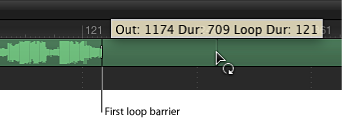
The Audio Timeline displays looped clips with barriers to indicate where loops begin and end.
The first loop barrier in a clip’s bar is interactive. Moving the barrier changes the point where the clip loops.
Drag the first loop barrier left or right.
The end point of the clip’s loop moves as you drag.