Animating on the Fly
Another powerful feature that Motion offers is the ability to create animations while your project is playing back. This is similar to how audio engineers adjust sliders for each audio channel while listening to the mix. The next time the project is played back, all changes are incorporated.
Because so many of Motion’s effects are displayed in real time, you can perform a sort of “visual mix” and modify the parameters of your effects while the project is playing back.
For example, it is not until you see the elements in your project as a whole that you can know whether each part is behaving as it should. One object might be fading too slowly and making another element hard to see, or a text element can come and go so quickly that it’s impossible to read. With keyframing on the fly, you can make adjustments to any slider or parameter in the program while your project is playing. You can also interactively manipulate objects in the Canvas. Then, if you don’t like what you did, rewind and do it again. Each time you alter a parameter, you replace keyframes previously assigned.
Click the Record button (or press A) or choose Mark > Record Animation to turn on keyframe recording.
Click the Play button or press the Space bar to begin playback.
As your project plays, adjust a parameter slider.
Disable Record.
The changes you made during playback are recorded as keyframes for that parameter. You can view them in the Keyframe Editor.
Note: You can also animate on the fly using the initial keyframe method. For more information on the initial keyframe method, see Using the Initial Keyframe Method.
If you don’t like the animation you made, you can delete the keyframes and try again. You can choose Edit > Undo (or press Command-Z) to revert to the state before you began recording your animation, or you can manually delete the keyframes to replace.
Select a keyframe, then press Delete.
Control-click a keyframe, then choose Delete from the shortcut menu.
Select a keyframe, then choose Delete from the Animation menu for that parameter.
Note: To delete all keyframes for a parameter, choose Reset Parameter from the Animation menu in the Keyframe Editor parameter list or Inspector.
Handmade Motion in the Canvas
A common use for animating on the fly is to create handmade animation paths. Although you can choose various curve types, it is very difficult to simulate semirandom movement except by sketching with a mouse or pen.
Enable Record (press A).
Click the Play button to begin playback.
Select the object to manipulate and drag it in the pattern of your choice.
The position and speed of your movement are recorded and applied to the position keyframes for that object.
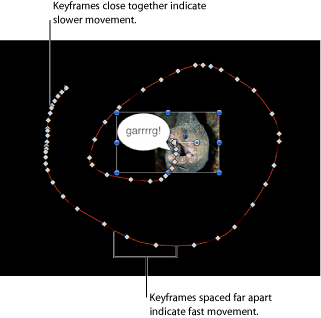
You can further manipulate the path by dragging individual keyframes, or re-recording a new animation path for that object.