Working in the Assignments and Mappings tab
You can view and edit assignments and mappings for the selected patch, set, or concert in the Assignments & Mappings table. The left column of the Assignments & Mappings table lists the assignments in the patch by device and MIDI channel. The middle column shows the screen control to which the hardware control is assigned (if one exists). The right column shows the mapping for each control, following the same order that appears in the Screen Control Inspector. The Assignments & Mappings table allows you to create and edit assignments and mappings without leaving Edit mode.
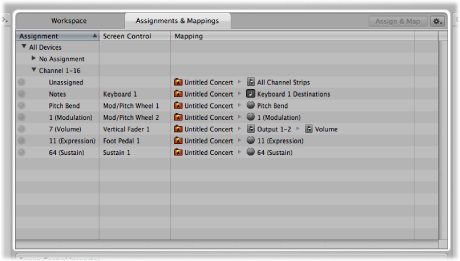
You can quickly see whether a hardware control is assigned, and see the parameter or action to which it is mapped. When you manipulate a hardware control, the row showing its assignment and mapping is highlighted. If it is unassigned, a new row is created.
The Assignments & Mappings tab also includes an Action menu, with items for creating assignments and for selecting a mapping row when it receives MIDI input.
Click the Assignments & Mappings tab at the top of the workspace (or press Command-Shift-M).
Click the Workspace tab at the top of the window (or press Command-Shift-W).
Creating and Deleting Assignments and Mappings
The Assignments & Mappings tab includes an Assign & Map button so you can quickly create new assignments and mappings. You can also create assignments and mappings independent of any screen control, allowing you to use a hardware control to adjust the value of a parameter or action for which there is no screen control in the workspace.
In the Action menu, choose New Assignment.
A new, blank row appears in the table.
Click the Assign & Map button.
Manipulate the hardware control you want to assign.
The row is updated to show the new assignment.
To create a mapping, do one of the following:
Select a mapping parameter or action in the Screen Control Inspector.
Click a parameter on a channel strip or a plug-in window.
The table is updated to show the new mapping.
You can delete assignments and mappings in the Assignments & Mappings table. When you select a row in the table with both an assignment and a mapping, only the mapping is deleted. When you select a row containing only an assignment, an alert appears. If the assignment has a screen control, the assignment is deleted but the screen control remains in the table. If the assignment has no screen control, the entire row is deleted.
In the table, select the row with the assignment, then press the Delete key.
In the alert that appears, click Delete.
In the table, select the row with the mapping, then press the Delete key.
Editing Assignments and Mappings
Using the Assign & Map button, you can also edit existing assignments and mappings in the Assignments & Mappings table.
In the Assignments & Mappings table, select the assignment you want to edit.
Click the Assign & Map button.
To change the assignment, manipulate the hardware control you want to assign.
The table is updated to show the new assignment.
To change the mapping, do one of the following:
Select a new mapping parameter or action in the Screen Control Inspector.
Click a parameter on a channel strip or a plug-in window.
The table is updated to show the new mapping.
Editing Hardware Input Parameters
You can view and edit the Hardware Input parameters for an assignment in the Assignments & Mappings table, allowing you to quickly modify the assignment without leaving Edit mode. For detailed information about particular Hardware Input parameters, refer to Working with Screen Controls.
Click the assignment you want to edit.
A dialog showing the current hardware input settings for the assignment appears.
Using the pop-up menus in the dialog, choose new Hardware Input parameters for the assignment.
When you are finished, click Done, or click anywhere outside the dialog.