Working with Screen Controls
Screen controls are objects in a MainStage concert that correspond to the physical controls on your music hardware. Screen controls can also display patch numbers, parameters values, and other information and update the displayed information in real time.
You can add screen controls to the workspace of your concert, where you can move and resize them, group them together, and edit their appearance in different ways.
After you have arranged the screen controls for your concert, you make connections between your MIDI hardware and the concert by assigning physical controls on your hardware to the screen controls in the workspace. You only need to make hardware assignments for a concert once, as long as you are using the same music hardware.
After you make controller assignments, you can map screen controls to channel strip parameters in your patches or to actions. You map parameters in Edit mode. For information about mapping parameters, see Mapping Screen Controls.
Screen Control Types
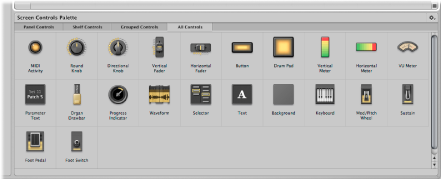
There are three types of screen controls you can use in a MainStage layout: panel controls, shelf controls, and grouped controls. In the Screen Controls palette, located below the workspace in Layout mode, each type has its own tab; in addition, there is a tab for all controls. You can add screen controls to the workspace by dragging them from the palette to the workspace.
Additionally, if you create and add a grouped control to the Screen Controls palette, a tab for My Grouped Controls appears in the palette. You can add your custom grouped controls to the palette, so they will be available in every concert.
Panel Controls
Panel controls appear on a two-dimensional plane (or panel) in the workspace. You can move a panel control to any position in the workspace, except onto the shelf of a shelf control. Panel controls include:
MIDI Activity light (displays MIDI note activity, and can be used as a substitute “keyboard”)
Round and directional knobs
Vertical and horizontal faders
Button
Drum pad
Vertical and horizontal level meters (used to visually display volume level or another parameter)
VU meter (used to visually display volume level or another parameter)
Parameter text (used to dynamically display parameter names and values)
Organ drawbar
Progress indicator (used with the Playback plug-in)
Waveform (used with the Playback plug-in)
Selector (used to select patches while you are performing, or to select markers for use with the Playback plug-in)
Text (used to display song lyrics, performance notes, and other static information)
Background (used to group a series of controls)
Shelf Controls
When you add a shelf control, it appears on a three-dimensional shelf. You can move the shelf, adjust the angle of the shelf, and place multiple shelf controls on the same shelf. For example, if you have a keyboard screen control in your layout, you can add pitch bend wheel and modulation wheel screen controls to the same shelf as the keyboard screen control. Shelf controls include:
Keyboard
Modulation or pitch bend wheel
Sustain pedal
Foot pedal
Foot switch
Grouped Controls
Grouped controls consist of individual controls that are grouped together to make them easier to work with as a single unit. Grouped controls include:
Selector grouped with increment and decrement buttons
Keyboard grouped with mod wheel, pitch bend wheel, and sustain pedal
Sustain and expression pedals
Organ drawbars
Guitar amp controls
Guitar pedal controls
Arrays of knobs and faders with uniform size and spacing
Effects and tone control knobs
Arrays of level meters and VU meters
Arrays of parameter text displays
Master output fader grouped with stereo level meter
Arrays of drum pads
Transport controls for use with Playback plug-in
Channel strip controls
My Grouped Controls
The first time you add a custom grouped control to the Screen Controls palette, the My Grouped Controls tab appears in the palette. You can add custom grouped controls and name them so they will be accessible from every concert. For information about adding custom grouped controls to the Screen Controls palette, see Grouping Screen Controls.
Adding Screen Controls to a Layout
In Layout mode you can quickly add screen controls to your layout and arrange them in the workspace.
Drag the screen control from the Screen Controls palette to the workspace.
As you drag the screen control to the workspace, a white outline appears, showing where it will be added. You can use the alignment guides to align the screen control with other items in the workspace.
You can drag screen controls into the workspace in any order. If you plan to perform with a keyboard controller, you might want to first drag a keyboard screen control into the workspace, position it near the center, and then drag screen controls for the faders, knobs, wheels, buttons, and other physical controls on the keyboard controller.
When you drag a screen control into the workspace, the control is selected, and the available hardware assignments and other parameters for the screen control appear in the Screen Control Inspector to the left of the workspace. Different types of screen controls have different parameters, which are described in Editing Screen Control Parameters.
Adding Mod/Pitch Wheel Screen Controls
When you add mod/pitch wheels to a layout, by default they are configured to receive the following MIDI message types:
The first mod/pitch wheel is configured to receive modulation messages.
The second mod/pitch wheel is configured to receive pitch bend messages.
The third mod/pitch wheel is configured to receive aftertouch messages.
By default, modulation and pitch bend screen controls pass through the MIDI messages for their common use—that is, mod wheels pass through MIDI modulation messages, and pitch bend wheels pass through MIDI pitch bend messages. In most cases this is desirable so that you can use them for their standard functions without any additional setup. If you want to use these screen controls to control other parameters, choose “Do not pass thru” from the MIDI Thru pop-up menu in the Screen Control Inspector.
Adding Foot Pedal Screen Controls
When you add a foot pedal to a layout, by default the first foot pedal you add is configured to receive expression messages, and the second foot pedal you add is configured to receive volume messages.
By default, expression pedal screen controls pass through the MIDI messages for their common functions (expression or volume). If you want to use an expression pedal screen control to control another parameter, choose “Don’t pass thru” from the MIDI thru pop-up menu in the Screen Control Inspector.
Copying and Pasting Screen Controls
You can copy and paste screen controls using the standard Mac OS X menu items and key commands.
Press Command-C to copy the selected screen control, then press Command-V to paste a copy.
Option-drag the screen control to a new location in the workspace.
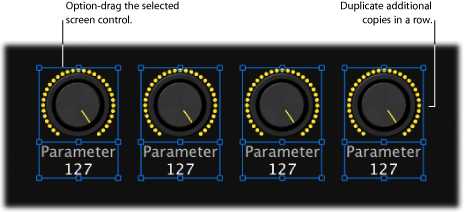
Option-drag the screen control to create the first copy.
Choose Edit > Duplicate to create as many additional copies of the screen control as you want.
The duplicated screen controls appear offset by the same amount as the first copy.
Note: You can’t copy a panel control and a shelf control at the same time.
Moving Screen Controls
You can move screen controls to a new position whenever you are in Layout mode. You can use the alignment guides to help align and position screen controls in an orderly arrangement. You can move multiple controls together by selecting them (either by Shift-clicking or “rubber-banding” them) and then dragging them to a new position. If the panels for the screen controls are merged, rubber-banding selects the entire panel.
Drag the screen control to a new position in the workspace.
Select the screen control, then press the arrow keys to move it in the workspace.
Shift-click the screen controls, then drag them to a new position.
Hold down the Shift key as you drag around the controls, then drag them to a new position.
You can constrain the movement of screen controls to either horizontal or vertical by pressing Shift while dragging them.
If a screen control overlaps another screen control in the workspace when you switch from Layout mode to another mode, an alert appears, asking if you want the overlapped controls to be highlighted so you can adjust them before leaving Layout mode.
Resizing Screen Controls
You can resize screen controls to make them more easily visible or to fit them into a smaller area. When you select a screen control, blue resize guides appear over it that you can drag to resize the control.
Select the screen control in the workspace.
Blue resize guides appear over the screen control.
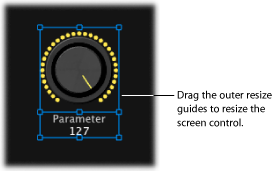
Drag the resize guides to resize the screen control.
For screen controls with a text display area, such as a knob or fader, you can resize the text display area independently from the control or resize them together.
Select the screen control in the workspace.
Drag the inner resize guide to increase the area of the text display.
Drag the outer resize guide to increase the overall size of the control.
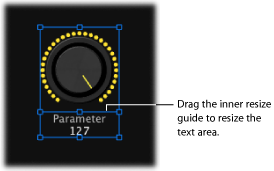
Notice that when you resize the text display area, the rest of the screen control becomes smaller. You can first resize the overall control, and then resize the text display area using the inner resize guide.
Aligning and Distributing Screen Controls
MainStage includes controls for centering, aligning, and distributing screen controls in the workspace.
Select the screen controls in the workspace.
Do one of the following:
To align the top edges of the screen controls, click the Align Top button.
To vertically align the centers of the screen controls, click the Align Vertical Centers button.
To align the bottom edges of the screen controls, click the Align Bottom button.
To align the left edges of the screen controls, click the Align Left button.
To horizontally align the centers of the screen controls, click the Align Horizontal Centers button.
To align the right edges of the screen controls, click the Align Right button.
Select the screen controls in the workspace.
Do one of the following:
To vertically distribute the screen controls, click the Distribute Vertically button.
To horizontally distribute the screen controls, click the Distribute Horizontally button.
You can also align and distribute screen controls by Control-clicking the selected screen controls and choosing commands from the Align and Distribute submenus in the shortcut menu. The Distribute shortcut menu contains additional controls for distributing the space between screen controls.
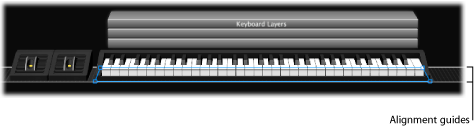
Adjusting the Shelf for a Shelf Control
When you add a shelf control such as a keyboard to the workspace, it appears at a default angle, creating a three-dimensional appearance. You can adjust the angle of the shelf control so that it appears more or less three-dimensional. This can be useful, for example, if you want to see more of the keys on the keyboard or minimize the amount of space it occupies onscreen.
In the workspace, select the shelf control.
White alignment guides for the control’s shelf appear.
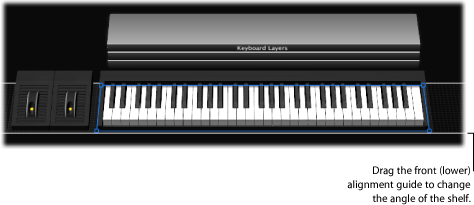
Drag the lower alignment guide (the one aligned with the front of the shelf control).
Drag the lower alignment guide down to make the angle steeper (as though you are looking down on the shelf control from above), or drag it up to make the angle less steep (as though you are looking at it from the front).
Moving the Shelf Vertically
You can also move the shelf vertically to change its position in the workspace. When you move the shelf vertically, all screen controls on the shelf (for example, a modulation or pitch bend wheel and a keyboard) move with the shelf.
Select one of the screen controls on the shelf.
The alignment guides for the shelf appear.
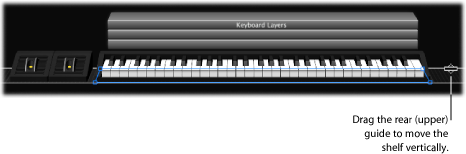
Place the pointer over the upper alignment guide (the one aligned with the rear of the shelf control).
The pointer becomes a move pointer (a horizontal bar with up and down arrows).
Drag the upper alignment guide to move the shelf to a new position.
Grouping Screen Controls
You can group screen controls together, creating a grouped control. You can move and resize the grouped control as a single unit. Grouping screen controls has no effect on how they work in performance, but makes it easier to quickly create a layout. You can group screen controls using the Group button, using the shortcut menu, or using a background screen control.
Select the screen controls you want to group together.
The Group button is highlighted, indicating that the selected controls can be grouped.
Click the Group button, located below the align and distribute buttons on the left edge of the workspace (or press Command-Shift-G).
The screen controls are grouped into a single, grouped control. If there is no background around the screen controls, one is added to encompass them. Selecting any member of the group selects the entire group so you can move and resize them together.
When you group screen controls, the edges of the background appear “dotted” to indicate that the controls are grouped. When grouped controls are selected, the Ungroup button is highlighted, indicating that the controls are grouped.
Select the screen controls you want to group together.
Control-click the selected controls, then choose Group from the shortcut menu.
Drag a background screen control to the workspace.
Size and position the background screen control.
Drag the screen controls you want to include in the grouped control so they are within the borders of the background screen control.
If you want to move one of the grouped controls separately, you can ungroup the controls.
Select the grouped control.
Click the Group button again (or press Command-Shift-Option-G).
You can quickly add one or more screen controls to a group.
Drag the screen control into the group.
You can also move and resize individual controls in a group without ungrouping them.
Select the individual screen control you want to move or resize.
The handles of the screen control appear so you can move or resize it independently from the group.
Hold down the Command key as you move or resize the screen control.
You can add a panel or an image to the background of a grouped control to re-create the look of a hardware panel and visually distinguish the grouped control in the workspace.
Select the background.
The Screen Control Inspector appears to the left of the workspace.
In the Appearance section of the Screen Control Inspector, click the Panel well, and choose a panel from the menu.
If an image has been previously selected for the background, select the Panel button before choosing a texture for the background.
Select the background.
The Screen Control Inspector appears to the left of the workspace.
In the Appearance section of the Screen Control Inspector, select the Image button.
Do one of the following:
Drag an image to the Image well.
Click the Select button, then navigate to the location containing the image you want to use, and select the image.
You can add custom grouped controls to the Screen Controls palette, and use them in the same concert or another concert. Grouped screen controls you add to the palette appear in the My Grouped Controls tab.
Control-click the grouped control, then choose Add to Palette from the shortcut menu.
Select the grouped control, then choose Add to Palette from the Action menu at the upper-right corner of the workspace.
After you add the first grouped control to the Screen Controls palette, the My Grouped Controls tab appears. Select this tab (or the All tab) to see the custom grouped controls you have added to the Screen Controls palette.
Deleting Screen Controls
If you decide you no longer want a screen control in your layout, you can delete it from the workspace.
Select the screen control you want to delete.
Choose Edit > Delete (or press the Delete key).
When you delete a screen control, any assignments or mappings for the screen control are deleted as well.