Advanced Sculpture Tutorial: Programming Synthesized Sounds
The Advanced Sculpture Tutorial: Programming Electric Basses section covers programming of natural bass sounds by authentically reproducing the real physical interaction that occurs between a string and the exciting agent that acts upon it. While producing such lifelike models is undoubtedly a forte of Sculpture’s architecture, its sonic capabilities extend to the creation of very different sounds as well.
Sculpture contains a number of functions you can use to create new and novel synthesized sounds. This includes the Morph Pad, which can be automated, as well as recordable and programmable envelopes that can be used in a rhythmic context.
Such features are usually unnecessary when reproducing natural bass sounds, because no electric bass that exists can alter the tonal characteristics of the string during the decay phase of a note—perhaps from wood to metal—and rhythmically synchronize this change to the tempo of the project. These functions are very useful, however, when creating sustained, atmospheric sounds where slow and interesting modulations help it to come alive.
In the following sections, Sculpture’s ability to create somewhat spacy and less organic sounds, using several pad settings as examples, will be demonstrated. As you experiment, you’ll discover a wide variety of interesting and animated sounds.
Within the framework of these short experiments, it is of course impossible to comprehensively cover all of Sculpture’s possibilities. You are encouraged to use the suggested settings initially, and closely observe the results of the changes you make. In this way you can learn a lot about the instrument, and perhaps be inspired to create new sounds and variations.
Note: To see the settings for these tutorials in the Sculpture window, open the Settings menu and choose Tutorial Settings.
Creating a Sustained Sound with Sculpture
First, load Sculpture’s default setting again—the very simple sound consisting of a plucked string that vibrates and fades away. Obviously, this sound needs some drastic changes in that you’re going for a sustained or extended sound for pads, rather than one that dies away.
Examine the three objects. Notice that only Object 1 is active, and acts on the string with an Impulse. As in the pick example in the bass section, the string is briefly excited when the note is played, and then the sound decays. A sustained pad sound requires an exciting agent that constantly acts upon the string. The appropriate object types are Bow or “Bow wide” (the string is played with either short bow strokes or long, extended bow strokes), Noise (excited by a random noise signal), or Blow (excited by being blown—much like a clarinet or flute).
Test the above mentioned object types one after the other, and drag the Object 1 Pickup slider, responsible for the exact position of the exciting agent, up and down the string while you’re playing. You will come to two conclusions: First, the sound is now sustained for as long as you hold the key down. Second, dragging the Object 1 slider with the Bow type selected results in the most pronounced sonic changes. This setting promises the most rewarding possibilities for varying the sound, and that’s why this type has been chosen.
Recording an Envelope in Sculpture
The sonic variations created by the Bow type are very appealing when the virtual bow stroke is moved along the string. You can control this movement by using an envelope, thus creating the foundation of your pad sound.
It makes more sense and is more convenient to record the envelope rather than programming it, even if it is easy to program it with the graphic display.
Make sure you have loaded the default setting, then drag the Object 1 slider all the way to the left. Starting from this position, where it generates only an overtone-rich scratch, start animating it by using the envelope.
Locate the Envelope section in the lower-right corner of the Sculpture window. Select the first of the two envelopes by clicking the envelope 1 button to select it. In the left part of the Envelope section, notice the two routing possibilities that allow you to assign a modulation target to the envelope.
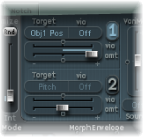
Click the 1 button to activate the first routing link, and choose Object1 Position from the Target pop-up menu as the modulation target. Drag the “amt” slider all the way to the right to set the modulation intensity to its maximum value.
The envelope can now be recorded. It is assumed that your MIDI keyboard has a modulation wheel that outputs the corresponding MIDI controller message (CC number 1) and that option 1 ModWhl is selected for control of Envelope 1 (choose 1 ModWhl from the CtrlEnv 1 pop-up menu in the dark bottom edge of the Sculpture window).
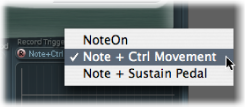
Click the R button near the top of the Envelope section below Record Trigger, to prepare the envelope for recording. Choose Note+Ctrl Movement from the Record Trigger pop-up menu. This option specifies that the recording of the controller messages from the modulation wheel will begin the instant the first note is played.
Play a note when you want to start the recording, and move the modulation wheel slowly upward while keeping the key on the keyboard depressed. Notice the sound variations you create while moving the modulation wheel.
At the end of the recording, return the wheel to its initial starting position and, after you release the depressed note, click the R button to deactivate the recording mode.
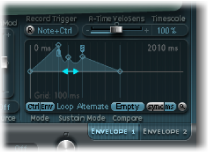
When following the example above, you can see the curve you recorded in the graphic display. Note that the curve arches exclusively above the 0 axis because the modulation wheel sends only unipolar values (between 0 and a positive maximum value). Because the Object 1 slider has already been moved to the far left of the string, it can be shifted to the far right by the envelope only when the maximum modulation intensity is reached.
Play a note or chord and listen to the modulation you recorded. If you’re not satisfied, repeat the procedure described above until you’re happy. The maximum available recording time is 40 seconds, which makes it possible to control parameters and create modulations that extend far beyond the capabilities of a simple ADSR envelope.
Note: By moving the junction points, you can edit the shape of the envelope when the need arises. By clicking in the empty part of the graphic display and dragging to the right or left, you can zoom in and out of the display. When you activate the small Sync button, the junction points snap to a rhythmic grid.
Choose Loop Alternate from the Sustain Mode pop-up menu below the Envelope graphic display. As the Sustain point is found at the end of the envelope, the envelope repeatedly travels from the beginning to the end and then backward from the end to the beginning, creating a continuous flux within the sound.
To sum up, you now have a rudimentary but appealing and organic-sounding pad, which will be used as the foundation for further shaping and refinement. Save this rough version of the sound as0001 raw pad, to be used as a basis for further experiments.
Increasing Stereo Breadth and Chorus in Sculpture
Follow the steps outlined in Recording an Envelope in Sculpture, if you have not already done so. To give the very dry-sounding0001 raw pad setting a little more stereo breadth and chorus effect, modulate the Pickup positions, and assign them to the left and right channels.
Load the0001 raw pad setting.
Click-hold the Spread Pickup semicircle, and drag upward until the light blue dots come to rest near the line that separates both semicircles. This separates the stereo pan positions of the Pickups.

Click the 1 and 2 buttons to activate both of the modulation links in LFO1.
For the first link, choose PickupA Position from the Target pop-up menu, and then drag the “amt” slider to a small positive value of about 0.03 Hz to modulate the position of Pickup A.
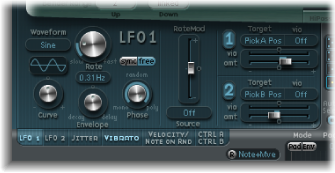
For the second link, choose PickupB Position from the Target pop-up menu, and then drag the “amt” slider to a small negative value of about −0.03 Hz to modulate the position of Pickup B.
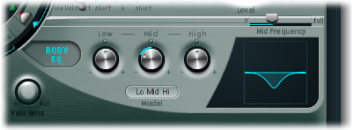
You will hear a pleasant beating or chorus effect in the sound, which makes it broader and more full, alleviating the unpleasant, dry character. Another unpleasant aspect is that the sound is too strong in the mid frequency range and could use some equalization. You can use the Body EQ to correct this.
Activate the Body EQ, and experiment with the Lo Mid Hi model—the standard setting. Try reducing Mid to −0.5 and dragging the Mid Frequency slider to 0.37.
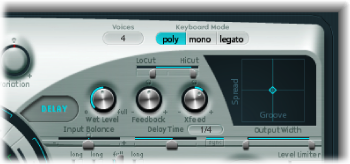
To give the pad a little depth, activate the Delay. Set the Delay Time to 1/4 and adjust the Xfeed knob to 30%. The pad now has a pleasant and unobtrusive ambience; you can leave the other Delay parameters at their original values.
Finally, you will want to optimize the sound so that it is a little more animated. The end result you should be aiming for is subtle, which makes the jitter modulators the perfect tool for the job. The jitter modulators are basically LFOs that use a random waveform.
Click the Jitter button below the LFO section to activate the display for both of the jitter modulators.
Click the 1 button to turn on the first link in Jitter 1, and choose Object1 Timbre from the Target pop-up menu.
Drag the slider below the Target pop-up menu to −0.40 to adjust the Intensity, and reduce the Rate parameter to 1 Hz. There should be subtle inconsistencies in the pressure applied by the bow to the string. To better recognize this effect, temporarily increase the Intensity level.
You can use the second jitter modulator for random position deviations with the modulation target Pickup Pos A+B (pickup position A and B).
Activate Jitter 2 and choose the Pickup Pos A+B setting from the Target pop-up menu.
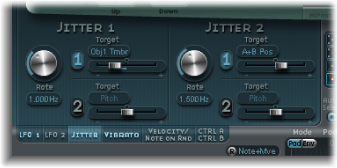
Drag the slider below the Target pop-up menu to an Intensity of about 0.2, and adjust the Rate knob to 1.5 Hz. As you increase the Intensity, the sound develops a distinct clinking or rattling—adjust this effect to taste.
You now have a satisfactory pad sound, which you should leave alone at this point, even though a few Sculpture features such as the Filter and the Waveshaper lie idle—not to mention the two additional Objects—but sometimes it’s smart to quit while you’re ahead.
The last function, morphing, has been saved for the end. To bend and twist your pad sound, a little or a lot, see the section Morphing Sounds in Sculpture.
Morphing Sounds in Sculpture
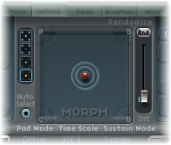
The Morph Pad is In the middle of the lower part of Sculpture’s window. Each corner of the Morph Pad can contain a different setting for a diverse number of parameters. You can cross-fade between these settings and morph the sound by dragging the red ball that you see in the center of the Morph Pad.
Control-click in the Morph Pad and then choose “Paste to all Points” from the shortcut menu to copy the current setting into all four corners of the Morph Pad. (If “Paste to all Points” is dimmed, first choose “Copy selected Point.”) If you drag the ball in the Morph Pad now, you won’t hear any changes in the sound because the settings in each corner are all the same. Not for long …
Drag the ball to one corner to select the corresponding partial sound, indicated by highlighted arches that appear in the corner. Drag the ball to each of the four corners, and vary the sound in each corner by altering several parameters.
Carefully drag the ball around the Material Pad to find a position where your pad sound takes on a new and interesting character. Also try the extreme corners, for example. Using the Material Pad allows you to achieve an especially noticeable variation.
After you choose different settings for the Morph Pad corners, moving the morph ball will create marked sound variations—even though the intermediate stages do not all exhibit a tonal character. You can automate the morphing process by assigning two MIDI controllers to the MorphX and MorphY pop-up menus at Sculpture’s bottom edge. You can also automate the Morph Pad using a recorded envelope (for more information, see Recording Morph Envelopes in Sculpture).
On each side of the Morph Pad there is a randomizing feature that randomly varies sounds to a chosen intensity level, or amount of randomization. This is especially useful for subtle changes to natural sounds, but it can also provide for rewarding variations to synthesized sounds as well.
Select one of the squares on the left side of the Morph Pad to determine the number of corners that are to be varied.
Drag the slider on the right side of the Morph Pad to adjust the intensity of the random deviations.
Click the Rnd button at the top of the slider to perform the randomization. When you next move the morph ball, you’ll hear the variations you just created.