Understanding Common Elements of Logic Pro Windows
All Logic Pro windows, including the Arrange area, feature a number of common elements. This consistent approach between windows makes your life easier, as you’ll find these elements in the same place throughout the application.
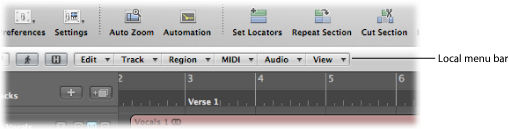
Local Menu Bars
A window’s local menu bar contains buttons that access functions specific to the window. For example, the Score Editor provides an enharmonic shift function, which is relevant to notation, but not to Piano Roll editing.
Tool Menus
The tools available in the Tool menus of each window are specific to tasks performed in the window. For example, the Arrange area provides tools for different arrangement tasks, such as cutting or moving regions, and automation editing. The Score Editor provides tools used for score layout, and tasks such as voice separation.
The Left-click Tool menu assigns the Left-click tool. The Command-click Tool menu assigns the Command-click tool. A further Tool menu (Right-click Tool menu) appears if the right mouse button is assigned to a tool. For full details, see Working with Tools.
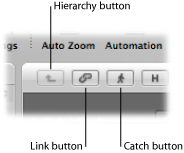
Catch, Link, and Hierarchy Buttons
Most windows contains Catch, Link, and Hierarchy buttons. These are used to tie or associate Logic Pro windows, and can aid in navigating through different levels of your project structure. For example, if you click a region in the Arrange area, the contents of a linked window (the Piano Roll Editor, for example) update immediately to show the events within the region.
Scroll Bars
Vertical and horizontal scroll bars are shown at the right and bottom edges of the window. These allow you to view sections that fall outside the visible display area.
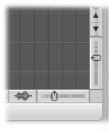
Zoom Sliders
Vertical and horizontal sliders are shown at the bottom-right corner of the window. These allow you to horizontally or vertically resize the contents of the window, giving you a closer or more distant view of data.
Bar Ruler
All linear editing windows feature a Bar ruler at the top. The position of regions and events within a project are aligned with Bar ruler positions. The Bar ruler displays markers and locators, and reflects time signature changes. It also indicates three important operational modes—solo, recording, or synchronized.
Global Tracks
All linear editing windows feature global tracks, which are displayed just below the Bar ruler, when opened. Click the disclosure triangle to the left of the Bar ruler (labeled Global tracks) to view the global tracks.
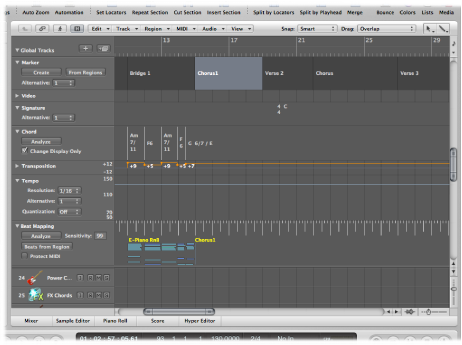
- Marker track: Contains markers, which are used to label bar positions and parts of the project. Their length, text, and color can be edited freely. For further information, see Working with Markers.
- Tempo track: Contains all tempo changes in the project. For further information, see Using the Tempo Track.
- Beat Mapping track: Allows you to assign a bar position to any musical event (both MIDI notes and distinct accents in audio regions). This makes it possible to adjust the musical timeline to the original timing of a MIDI or audio region that has been recorded rubato (free time, including speeding up and slowing down), or just without a metronome click. The audible outcome remains unchanged, but the resulting display will fit the musical timeline. For further information, see Beat Mapping Regions.
- Signature track: Contains the basic key of the project, along with all time and key signatures, as they are displayed in the Score Editor. For further information, see Working with Time and Key Signatures.
- Chord track: Contains chord symbols that can be derived from MIDI regions or created with the mouse. These chord symbols may also be inserted into the score. The root note of the chords determines the transposition (pitch shifting) of all Apple Loops, and can also affect the playback of MIDI regions. For further information, see Editing Transposition with the Chord and Transposition Tracks.
- Transposition track: Shows global transposition events. It is linked to the progression of the chord root notes in the Chord track. Changing a chord root is reflected in the Transposition track, and vice versa. For further information, see Editing Transposition with the Chord and Transposition Tracks.
- Video track: Displays frames of a QuickTime movie as thumbnails that are perfectly synchronized with the music, making it ideal for film scoring. Cuts in the movie can be detected automatically and marked. For further information, see Using the Video Track.